I’ve been making my own drumsticks for years. I’ve developed various techniques and I’m at a point where I’m mostly happy with how I do things.
So let me walk you through some of of the process.
Oh… and those zipties, that’s another article (but long time readers will already know…).
Contents
Video
Video coming next! As per usual, the video will have content not available in the text article, and vice versa.
I try to utilize the medium that is best suited for the information being conveyed.
Why

The math here is simple!
- A single drumstick is about 0.05 board feet.
- ((Stick blank size + kerf * 2)^2 * length) / 144
- A single board foot of maple is around $6.00usd
- A single drumstick made of maple thereby costs $0.30
Compare that to the $7-12 cost in store, plus the immense flexibility you have in wood selection, sizing, finish and more…
It’s a no brainer!
Well, except the equipment. Here’s the bare minimum that I’d suggest
- A cheap lathe - I purchased one of these for drum stick turning for about $130.
- Or a DIY Drill Lathe
- OPTIONAL A better chuck - $200-$500
- OPTIONAL Veritas Dowel Maker - About $250. I feel that this is worth the price as it greatly increases the speed and accuracy of the process.
- A lathe tool - This can vary.
- Make your own - I wrote an article on how to make your own great tool for cheap - $50 or so.
- Lathe Chisels - $100-$400
- Sharpening Equipment - This can be as simple as a cheap bench grinder and a DIY Jig.
- Or a nicer bench grinder, some CBN Wheels, and a Wolvering Jig. This is the setup I use.
From scratch you’re in for about $50 for the cheapest setup, which is where I started and achieved execllent results with practice and patience. I would recommend at least a cheap lathe, skew chisel and some sharpening stones, which comes to around $200.
My current setup is around $1,900.
To figure out how many pair drum sticks you’d have to make use the following formula:
- 11x - 0.6x = y + t(rx)
- Solve for x (number of sticks to be made) where y is the cost of equipment, t is time spent per stick and r is your hourly rate.
- This assumes a retail value of $11 for a pair of sticks and $0.60 for DIY sticks at $0.30 each.
- Your tr total value must be less than the cost of a pair of sticks or you will always “lose money”.
- For example let’s assume we spent $200 on equipment, assuming it takes half an hour to make a pair of sticks. and we’re a super cheap $15/hr.
- 11x - 0.6x = 200 -+0.5(15x)
- 10.4x = 200 + 7.5x
- 2.9x = 200
- x ~= 68.966
- You’d need to make 69 pairs of sticks to cover costs and your time.
So we’d be saving about 69 * $10.4 = $717.60 by making 69 sticks. Our costs would be 200 + 69 * 7.5 = 717.50.
That seems like a poor value proposition at first, however I can make about 12 pairs of sticks in an hour at this point thereby putting “my cost” in this down to 22 pairs.
The value proposition monetarily is only a small part of the story though! You can experiment with different woods, such as the venerable Ash (frequently used in impact-based activities). You can’t easily find Ash sticks anywhere, or any other wood except Hickory, Hard Maple and Japanese White Oak.
Different tip shapes are easily accessible. Stick diameters. Stick Lengths. Stick Finishes. Etc…
We could even modify the formula to factor in durability. My average self-made stick lasts around 70% longer than a store-bought hickory stick. I think it’s a bit silly to utilize that in value calculations as it will take a lot of time and experimentation to determine a relative durability and that time/testing inflates your cost, so now we have to factor that in some how and then what about the value of having exactly what you want in a stick? Can you even quantify that?
What I’m using
Wood

I’m using Sugar Maple. Various forms of Hickory are the most common, with Shiragashi Oak being used occasionally.
It’s important that the material have excellent impact resistance, low Elastic Modulus with a High Modulus of Rupture and be relatively non-porous.
If you use a species that’s too stiff, the lack of shock absorption will ruin your hands quick. If it breaks too easy then… well, duh. If it’s too porous then it will degrade quickly.
Weight is generally not a concern, but it is a component that pivots based on other factors. You won’t get a heavy wood with a low Elastic Modulus, and a light wood with a high Modulus of rupture won’t happen.
So don’t hop over to the home store thinking that you can grab some local Pine or Oak or Walnut dowels, chuck it in your drill, and make some usable drumsticks.
Per contra, you can saunter over to your local lumberyard and purchase excellent hickory, white oak, hard maple and ash without a hitch. Finding pre-made dowels may be more difficult, but for an extra charge they will usually rip a board to the size you need.
Don’t be afraid to experiment though! I’ve made some soft, but thick, pine sticks that were ultra-fat sounding. I also have a set of purple heart sticks I made for pad practice that I’ve been using for 3 years now. Noticeable improvement in control after a few months of utilizing the denser sticks.
Dowel Maker
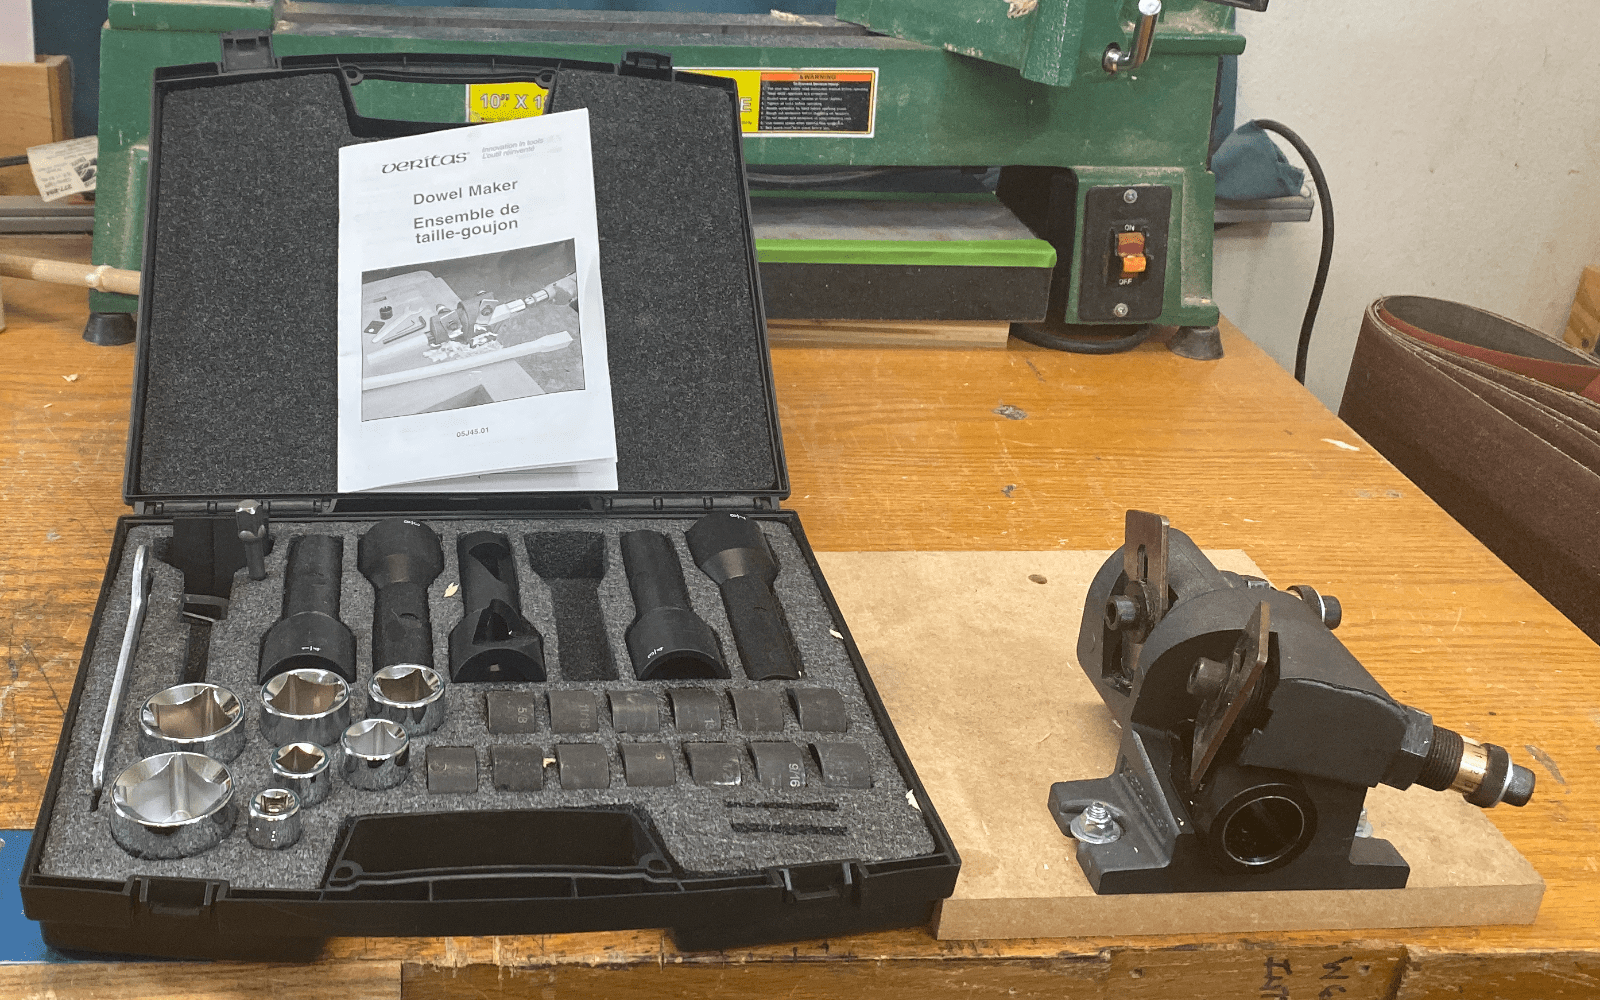
I use the Veritas Dowel Maker, which is an expensive kit for most drummers I suppose. It will cost you about $300 for the supplies that you need to make common sized dowels for drum stick making.
When you consider that you’re probably paying up to (or exceeding) $15usd for drum sticks, and that the raw materials (wood) to craft your own cost <$0.50 per pair then the value proposition is upscaled into a new territory of tasty.
You also gain the freedom of experimenting with different woods, shapes (shoulders, necks, grips), tips, asymmetry and anything you can think of.
Lathe
You probably want a lathe. A cheap one will be totally fine and you can get them on sale/couponed/second-hand for $150 or less.
You can easily make your own tools on the cheap. If you’re new to this then I STRONGLY suggest starting out carbide-insert based turning tools.
Traditional turning tools allow you to achieve better results more quickly and with a higher level of precision for some operations, but they also require sharpening equipment (more $$) and acquisition of a particular skillset (more time). I will be using traditional turning tools, specifically a spindle gouge, skew chisel and a scraper.
I’ve made probably a hundred pairs of sticks (probably more) with the tools that I made. Don’t think you can’t get by cheap.
An alternative here is to just throw your stick in a drill and sand it to shape, or make your own mini-lathe. I do not recommend it. Long spindles require more support, and you’ll be lucky if you can fit the stick in your chuck anyway. It’s a mildly dangerous operation with a 18” spindle spinning in your hand with a piece of dermal destroying sandpaper vying for the grippy-attention of the stick. Not that I’ve uh… done anything that stupid. Not me… nope. Never.
Sandpaper
All you need is some stearated #100 and #220 (# = grit) sandpaper.
The homestore brand stuff is fine. Don’t cheap out, you will regret it. The cheaper papers are either not stearated (stops clogging), or are garnet. Garnet sandpapers wear down quickly, which can be a great feature if you’re familiar with using it. If you’re reading this, then I suspect you’re not.
Topcoat
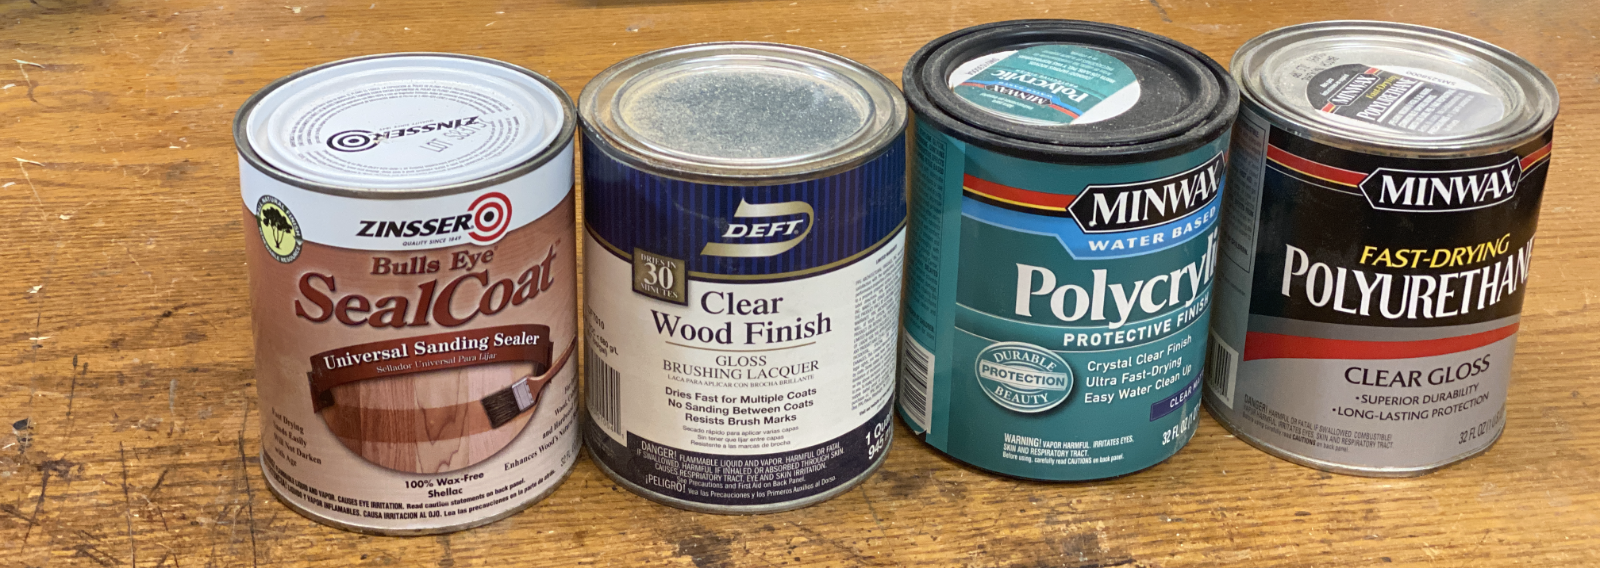
Wood is fine. Coated wood is better.
A well-selected coating will increase the impact resistance, abrasion resistance and change the modulus of rupture. It works very similarly to those fancy coatings on glass: small bits do break, but the jacket of protection holds it in and stops complete rupture.
The variety of options is tremendous. A discussion of coatings, their tradeoffs and application just for drum sticks could feel a book. I’m not qualified to write that book, and I’m not even going to try to write an article on it.
I will tell you that I’ve tried a variety of coatings and I’ve settled on one: Shellac.
Shellac is the secretion (NOT the excrement or “poop”) of the lac bug, which is usually dissolved in ethanol to varying degrees of proportion.
Here’s why I’ve settled on Shellac:
- Repairability - I repair my sticks. Yet another topic for yet another article, but shellac important to this process. Shellac readily dissolves in alcohols, and it’s applied while dissolved in alcohol. You can apply subsequent coats to existing ‘worn’ shellac without issue and you can clean off previous coats easily if desired. Eventually your stick will wear and expose uncoated wood. Shellac is the easiest to recoat with.
- Control - I purchase shellac in flake form and then mix it myself to the concentration that I want. I can vary the strength, weight, drying time, mix variants etc…
- Flexibility - Shellac is one of the more flexible ‘hard’ coatings. If you play with some thick buttons of it, it will easily crack as if it’s hard and brittle. If you take a thin sheet (such as what you’d put on your stick), it’s surprisingly pliable for something so brittle. Most other common coatings with short drying times are more brittle.
- Drying time - Shellac dries in 15 minutes or less. If you put on a thin coat, it’s a matter of how long it takes for the alcohol to evaporate.
- Application time - You can apply your next coat of shellac… whenever. You can keep applying and applying and applying for an hour without stopping, and you will build up a coat. It’ll go faster if you wait 5-15 minutes between coats though ;) Compared to the 2-4 hours between coats (and the dreaded, wait until cured if you exceed 4 hours), shellac is amazing.
- Universal Mistake Fixer - If you’ve ever finished wood then there’s a good chance that you’ve ended up with hazing, swirlies, fisheyes, brushmarks… tldr; frustration. Shellac not only rarely has these problems but it fixes them. Almost any commercially available finish can be soundly applied upon shellac. Shellac will cover up any hidden oils, silicone, over-porosity and other bug-a-boos. You’re (likely) more lavish topcoat can be applied upon the shellac with no qualms.
- Cleanup - Spill some shellac on the floor? Your hand? Your prized 1952 telecaster? (oops). Just wipe it off with some alcohol and go about your life. Nice.
It’s clear: Shellac > All.
Setup
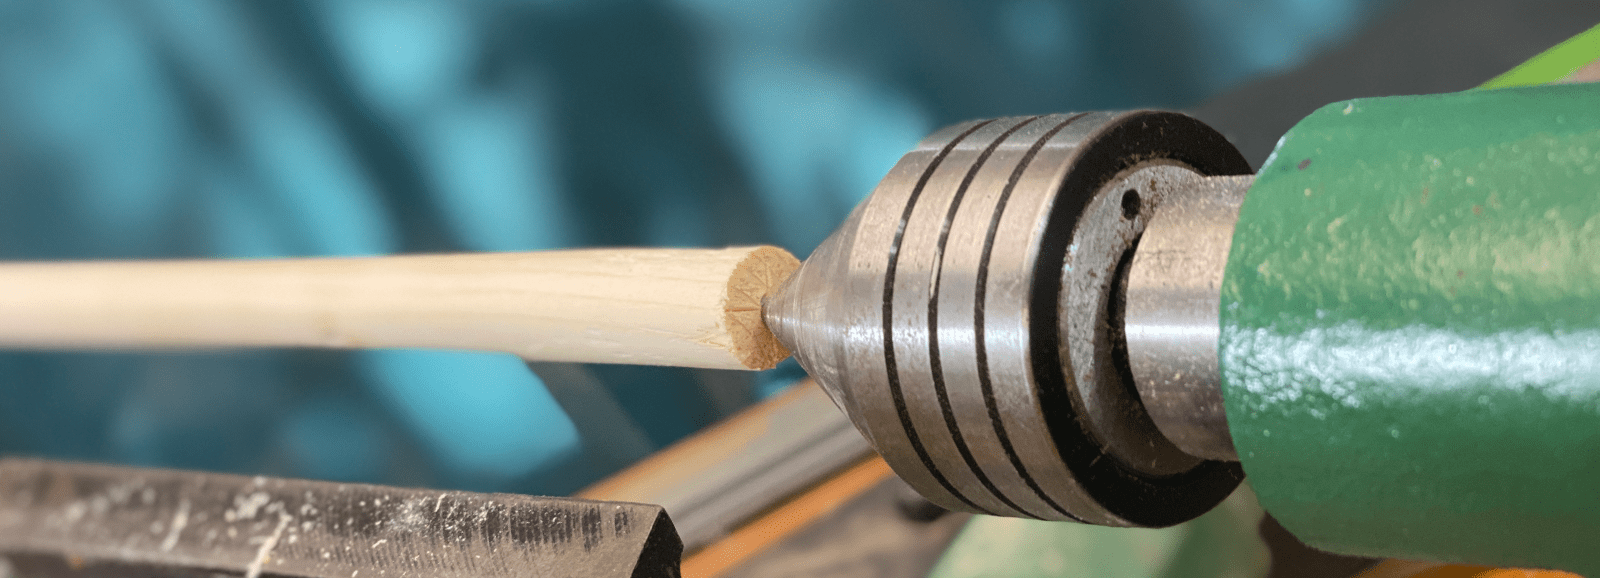
Dowel Maker
The Dowel maker instructs you to make blanks of a specific size to fit in the initial bushing. Do that.
That’s all of the setup.
Dowel Maker Tips

The Dowel Maker (DM from here on out) instructions are clear. They’re also wrong. I’m certain they’re wrong and I’m flumoxxed as to how they think it’s correct.
The Problem
There are 2 stages to the device:
- Front - This blade roughly shapes the wood to a dowel with a rough surface. It takes a fairly large cut, and since it’s trimming the corners of the round stock it is constantly being ‘hammered’ rather than taking a long smooth cut.
- Rear - Takes a long smooth cut to bring the rod to its final diameter.
The settings in the manual above describe how far away the blade is pushed from the body of the device. Larger number means the blade is further away, thereby making that stage’s cut result in a larger rod.
In order for this to all work, the blade must be at an angle. (The front blade is angled ‘away’ to alleviate the forces of the squared corners on the blade. Before I purchased this product I tried to make my own and I made the mistake of having the blade in a complementary angle only to find out the hard way that the blade just gets hammered out of place from the repeated action of the corner smashing the blade.)
With an angled blade cutting the face of a spinning object there’s an opportunity for the entire apparatus to be turned into a screw+bolt, and that’s exactly what happens if you follow the manual in some circumstances…
The “Front” offset adjusts the distance of the blade from the incoming work. A larger number means the blade is further from the center of rotation, thereby increasing the diameter after passing and changing where the cutting action happens on the angled blade.
Secondary is the effect of diameter on the cutting location. A larger diameter moves the cutting action forward on the front blade (towards the entry hole), and moves the cutting action rearward on the rear blade (towards the exit hole). The reverse is true for each as well.
The front blade alleviates the potential for a larger offset or smaller diameter catching the corner of the rear of the blade by rounding over the corner.
The rear blade has no such relief. An incorrect offset isn’t likely to be the cause, as the rear offset is “fixed” to create the final diameter. The diameter of the incoming work is variable, and it’s decided by the offset of the front blade.
If the cutting action reaches the sharp corner then… well, you’re now creating a screw, not a dowel! The work will try to aggressively grab the blade and pull through, and the surface will be marred. Ideally the work should exit with the final cutting location as close as possible to the corner, but no closer.
Realize as well that wood burnishes. The fibers of the wood compress during the cutting process, and potentially expand at some point, varying the diameter beyond what the cutting action would indicate.
Given that the rear blade is not variable in this equation (it determines the final size, and we can assume that’s static), there’s two solutions to stopping the rear blade’s back corner from engaging the wood improperly:
- Round over the rear corner - I don’t wish to do this as in my experiments I’ve noted that the rearmost 1mm or so of the blade is still engaged when cutting some dowel sizes. I would need to remove more than 1mm (probably 3-5mm) in order for the rear of the rear blade to be relieved sufficiently to avoid the screw-cutting-like engagement.
- Change the front blade’s output - By adjusting the size of the rod coming from the front blade, the cutting position of the rear blade can be adjusted. A larger rod moves the cutting action forward and away from the rear corner of the rear blade.
I know this may be confusing without access to the dowel maker, but if you watch the video above then perhaps it will make more sense.
The Solution
The solution is simple: for any odd numbered front offset in the manual, use the next largest even numbered offset.
In general I’ve found that using a larger offset than recommended works best: better surface finish, better feel when ‘drilling’ and easier to suction chips.
All of the odd numbered offsets appear to work fine in general. Softer woods work better with larger offsets, and harder woods require smaller offsets to more evenly distribute the work between blades.
The previous assumption that the rear blade is static is a poor assumption. With a larger input to the rear blade, we can decrease the offset slightly so that the final cutting location is “higher” up the blade. The change is very slight (~1 position on the dial or less) This does require some experimentation, and I suggest taking notes when you reach notable results. You don’t want to end up forgetting your perfect settings 2 days later. :(
REMEMBER: The type of wood matters. Some wood fibers will compress more easily, cut more easily or vice versa. These variances will change how the blades need to be set for optimal results. Even the exact same species can react slightly different from board to board.
I’ve found that you can reliably get excellent results in all woods by simply using the Odd->Greater-Even method of setting the front offset.
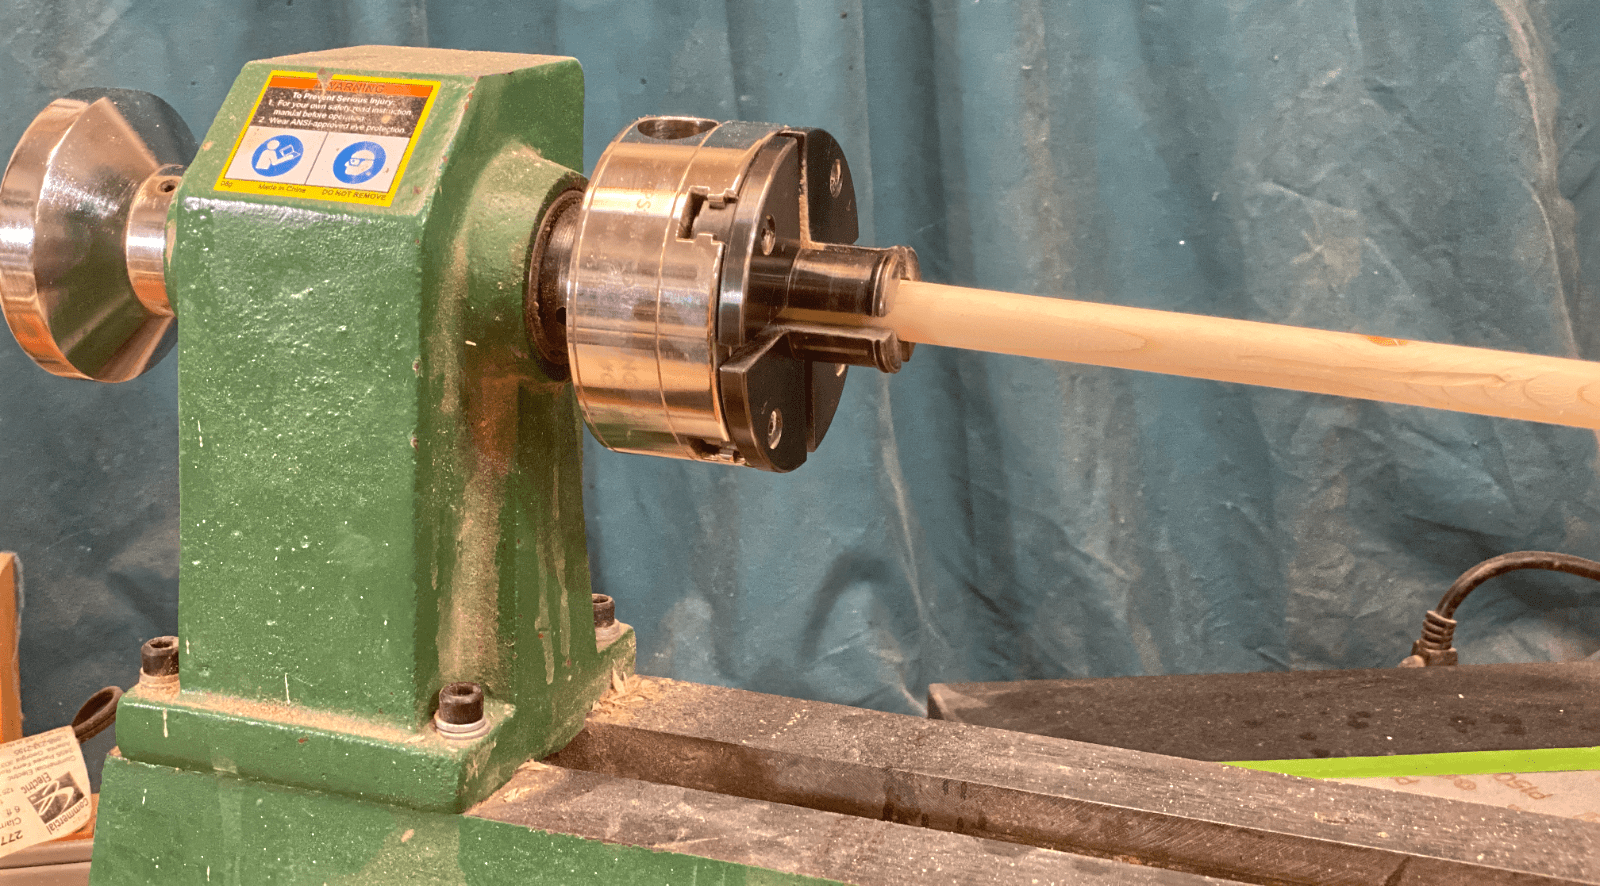
Lathe Setup
That cheap lathe I linked earlier, that’s exactly the lathe I use for drum sticks. It sits on my benchtop and is always available for small projects.
If you decide to go this route, then you will want a simple 3 jaw check and a Live Center.
From there the only real setup is to mount the stick. I use a center finder and a BLue #2 Kiridashi to mark the center of the stick with a cross on both ends. The center of the cross creates a detent for the live center to engage (and likewise if you use a drive center).
Steady Rest?
Due to the lathe’s bed size, it’s not possible to turn a 16.5” drum stick at the chuck end. That presents a problem. The live center does not provide as much support as the chuck. The chuck has a solid grip on the stick, and the live center is just poking at end-grain.
Care must be taken when turning a thin spindle, like a drum stick, on the tail end of the lathe. It’s not a big deal, but you may experience some chattering that will won’t feel great, and it can impact the surface finish of the stick.
If you have a longer lathe, or lathe extension then work on the chuck side and just cutoff the leftover bit (that was inside the chuck) when you’re done.
If you’re able to find a “Live Cone Center” that will work for 1/4”-1/2” (6mm-12mm), then please use that. I have not found a live cone center sufficient for stabilizing small spindles.
A device called a Spindle Steady Rest could be an option, but I’ve yet to find a working style. Here’s the issues:
- Size - A spindle rest requires something to turn with the spindle. We want to turn spindles down to around 1/4” (6mm). That means that our wheels at larges can be:
- What we’re finding is called Descartes’ Theorem or Soddy’s Circles. We want to find the 3 largest exterior circles that are tangent to each other and tangent to an interior circle. Our three circles will have identical radii.
- Formula: r4 = r1r2r3/(r2r3 + r1(r2 + r3) + 2sqrt(r1r2r3(r1 + r2 + r3)))).

- Formula Equilateral, as all 3 radii are identical: r4 = x^3/(x^2 + 3x + (2sqrt(x^3 (3x)))). (simplified below)
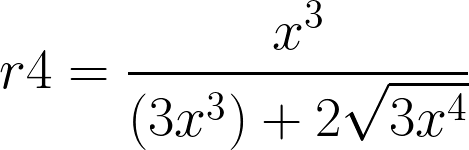
- Data for c-like consumption: 0.25 = x^3/(x^2 + x * (2x) + (2 * sqrt(x^3 * 3x))) = 1.61603
- Formula: r4 = r1r2r3/(r2r3 + r1(r2 + r3) + 2sqrt(r1r2r3(r1 + r2 + r3)))).
- The largest possible wheels will have a radius of 1.61603” to be used with a 1/4” stick.
- Those are some surprisingly small wheels, about 3” (7.6cm), and in my experience it’s necessary to create long rollers to avoid overly burnishing the surface or simply indenting it.
- What we’re finding is called Descartes’ Theorem or Soddy’s Circles. We want to find the 3 largest exterior circles that are tangent to each other and tangent to an interior circle. Our three circles will have identical radii.
- Rubber wheels leave marks if the work slips. Metal Bearings burnish the work.
- Cost - The good ones get pretty expensive.
A potential solution you may think of is to offset some large wheels along the long axis of the spindle. Unfortunately that makes it practically impossible to get sufficient support without lightly warping the spindle.
Now that I’ve written all this, I’ve realized that I could try a large 2 rubber roller setup where the wheels counteract only the lateral pressure put forth by the tool. A third wheel isn’t needed for a small spindle.
Dear reader, thanks for ducking this one out with me.
Execution
Stick Shape
Stick tips have two major axes. The tangent of both axes influence how much wood touches the drum or cymbal. More wood touching = less high frequency content, less rebound.
The shape of the tip can affect the directionality of the rebound, the tangent of contact for angle of the stick upon contact and the durability of the tip.
An exploration of stick tip types could fill a book. It’s sufficient to explore them yourself as long as you consider the tangent of the tip at contact angle while looking along the stick, and while looking down the stick.
I prefer what’s called an “Acorn tip”, but with sharp back edges. It allows me to vary the amount of wood contact by changing the stick angle. The shape of the tip naturally causes less wood contact with a higher angle (such as hitting cymbals), thereby producing a brighter sound with a sharper transient. Lower and negative angles produce more wood contact, lessening attack slightly and mildly damping high frequencies: excellent for drums. At very shallow angles I get a wide, but sharp striking surface.
With turned sticks, one axis will always be circular, so the consideration is the radius of the circle. The other axis can vary infinitely and even a shape with a small area can have a large contact area, and a large shape can have a small attack area.
Refer to the animation above to visually explore the concepts. There are multiple surfaces for the tip to interact with the striking surfaces, and the tip’s contact point will naturally vary with the player’s technique, the mechanics of the instrument and its placement.
There’s A LOT of potential variance there. Sit down with a drum stuck and gently strike random things, pausing at the point of contact, and see which part of the tip is in contact with your ‘instrument’. Imagine how you can vary the shape of the tip to change the striking surface depending on how the ‘instrument’ is struck.
Sanding

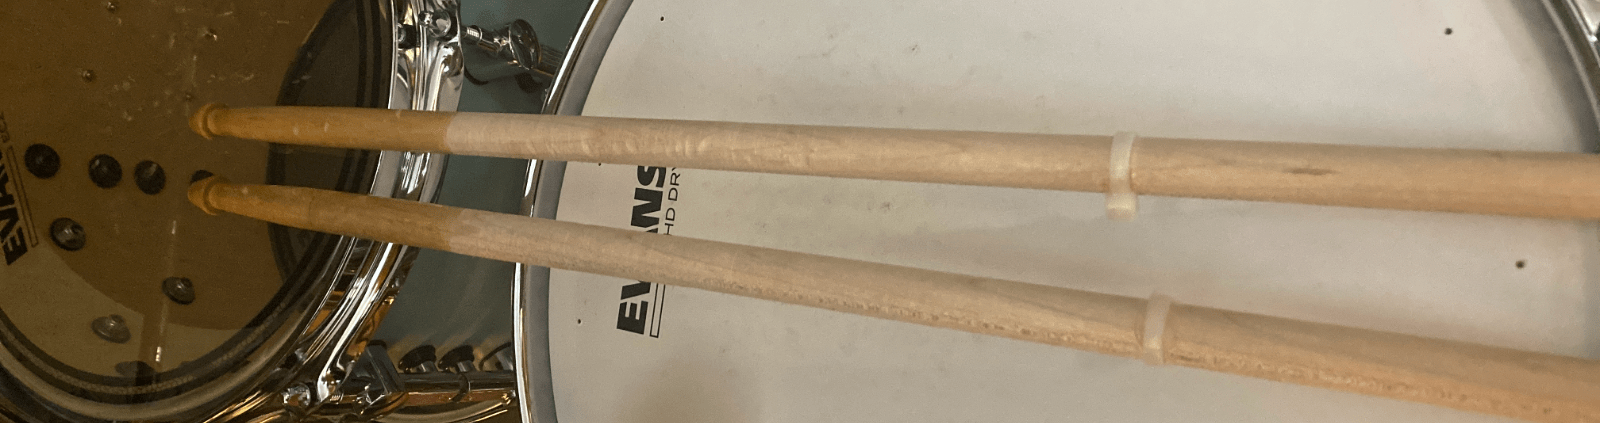
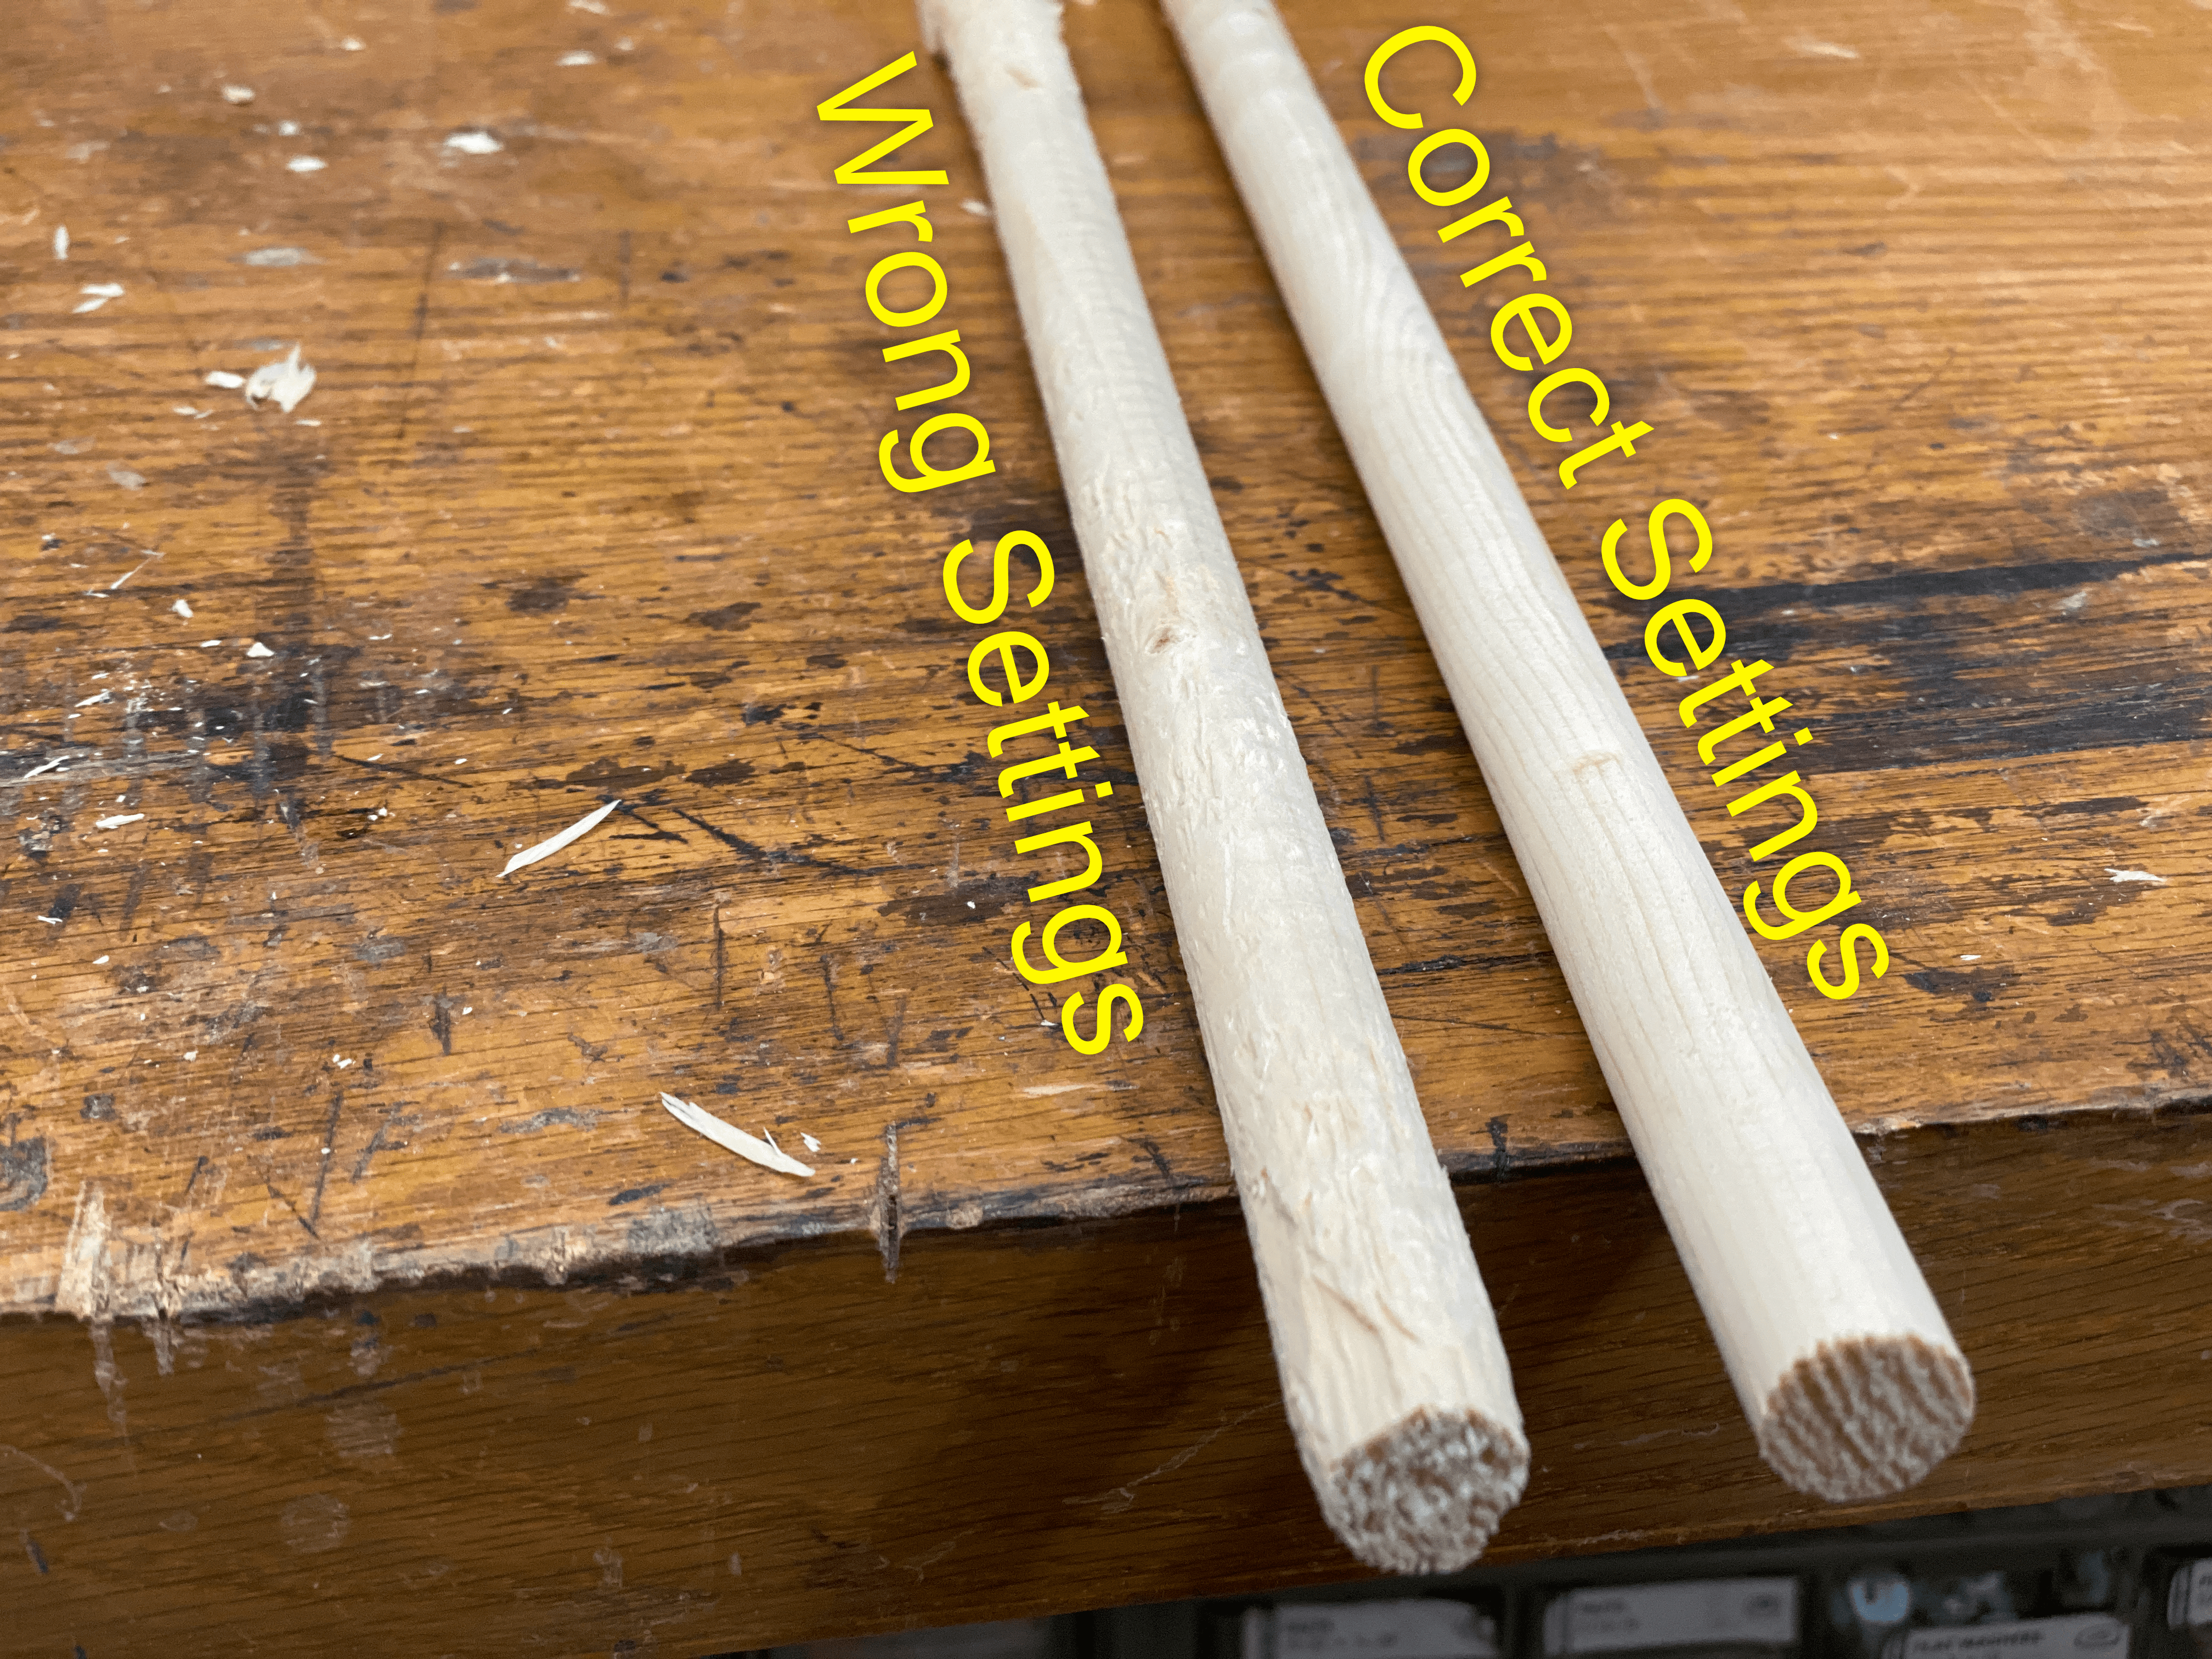
NOTE: The image above is the exact same stick, in the same lighting, taken with the same camera, with the same settings, in the same position. The difference in colour is almost purely a result of the surface of the wood. The stick above is the “Correct” stick shown in ‘The Solution’ section. I processed the stick after that picture. You can clearly see that in the “before” image, the stick’s colour is consistent. I always find this variation in photographed colour and brightness fascinating.
Surface finish is likely the most important aspect of the construction of sticks. Sticks that are too smooth will fly out of your hands, and sticks that are too rough will leave callouses.
It’s not as simple as picking the correct grit of sandpaper and givin’ ‘er a rub. When you sand it and how you sand it matter even more.
Let’s look at the image above. If we have the stick on the lathe, with the stick turning as expected, if touch sandpaper to the stick it will be abrading perpendicular to the grain. We’ve taken the natural undulations in the wood and cut across them. Our smooth ridges have now turned into not-so-smooth peaks. The surface of the stick is essentially a landscape of regular pyramids.
The grit of the sandpaper can be reduced in size to make this egyptian terrain less prickly, but we’re forced to double our efforts. Finding the balance between an abrasive surface and a grippy surface is difficult.
There’s yet another factor when sanding perpendicular to the grain. We’re essentially pre-scoring the wood in the axis where it will receive the most force. Imagine looking at where your sticks hit the edges of your cymbals. Now consider putting some knife marks right there. Does that help the longevity of the sticks? That’s exactly what you’re doing with sandpaper in the above case. Even though the ‘knife marks’ of the sandpaper are much smaller, they’re also more numerous.
What’s the alternative? Sanding perpendicular to the grain. The natural convolutions of the wood’s structure are instead subdivided. The depth is reduced by the removal of wood, and the variance in shape is normalized.
Naturally, a critical thinker may leap at the dining table and shout, “Alas! Now the surface anomalies are parallel to the trajectory of my stick’s escape from my mortal claws!” Yes, they are. You’re creating a churro on a micro-scale.
The ‘slipperiness’ of this configuration is also its saving grace. The parallelized structure can be finished to a rougher (larger) grit without causing significant abrasive action on your skin. In my testing, 220 grit (lower is rougher) parallel is equivalent in feel to about 600 grit perpendicular. Yet the 600 grit is both easier to let fly, and harsher on the hands when you keep it in tow.
There’s a tertiary consideration, and if you know anything about my habits in the studio maybe you can guess: repairability. Cross-grain abrasion is not easily refreshed without creating an awful looking mess and an unpleasant feeling mess of cross-grain and cross abrading. It’s difficult to put a worn stick back on the lathe so you’ll be forced to try to twist the stick inside some folded sandpaper. Inevitably your scratches will cross the scratches you’ve made previously and now you have 3 axes of torture.
With parallel abrasion, you can accurately and easily refresh the grip of the stick after the pores and grain have been filled with oil and jetisoned skin. Fold up some sandpaper and pull the stick through it a few times. Done. Easy. Good as new.
The third option is straight off the lathe tool, which offers you the worst of all worlds. You get ‘pyramids’ where the tool slides across the work, and you get a non-refreshable surface.
Shaping
This is the part where I will defer to the upcoming video. Shaping is a matter of technique, tool selection and goals. Unfortunately this is also the part that most people will read this article hoping to find information on.
There’s a few things to keep in mind:
- Watch the top of the work to monitor the shape.
- Work slowly and in small increments until you acquire proficiency.
- Step away and look at your work from various angles frequently.
- Wear correct safety equipment!
- HAVE FUN!
There’s a huge amount of material out there on basic spindle turning, so I won’t be covering that in depth. Just search and jump in the rabbit hole.
Conclusion
Making sticks is easy, it can be cost effective, and it opens your musical world to a huge variety of possibilities!
Then again, I can always make you a set if you want. :)
Meta
This post took 52 hours to research, write and edit.