I like to have a real click track in my project. That means that I want have a track with the click that I can put on effects or use as a sidechain source. I don’t want a phantom click source that just plays when the project plays. I want a track.
Reaper allows you to do this, but if you want a button on your toolbar to control that track then you gotta write a script or two to make that work. So that’s what I’ve done.
Click through to see how I setup a real click track, with effects, and a toolbar button that controls it.
Contents
Make a click track
The first step is to create a click track.
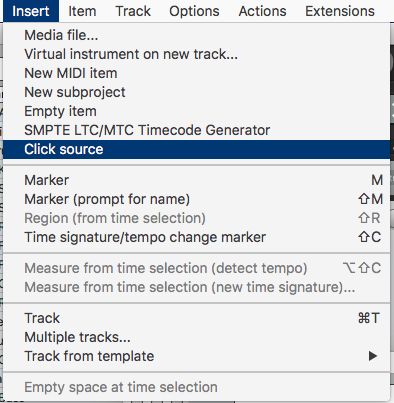
- Create a new track
- Select track
- Insert->Click Source (or action “Insert click source” (40013))
- Turn off the click in the project
This places a click media item on the track that follows all changes in the project.
Adjust the click track
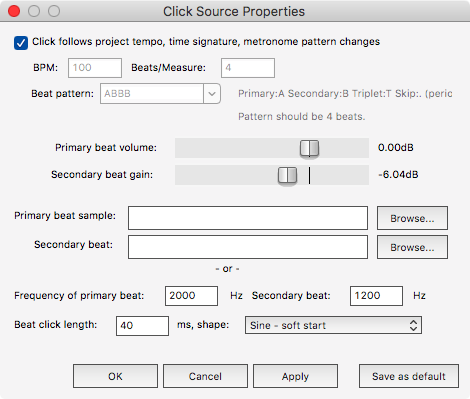
The project click settings do not affect your click track. To adjust the click sound you need to use the ‘source properties’ dialog. This can be accessed by right clicking the click source, or ctrl-F2 by default.
Bonus tricks #1 - Compress
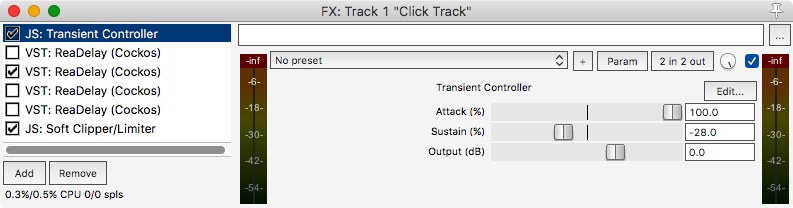
I like to have a compressor on my click sound. It is not always turned on, but frequently it’s useful to compress the click and slowly open up the attack parameter so that the click has a sharper transient.
The sharper transient helps the click get through when a musician is playing a washy or splashy part. If you find that someone seems to keep losing the beat in a particular part that has a lot of washiness, try it.
Alternative - Use JS: Transient Controller like have pictured
Bonus Trick #2 - Delay
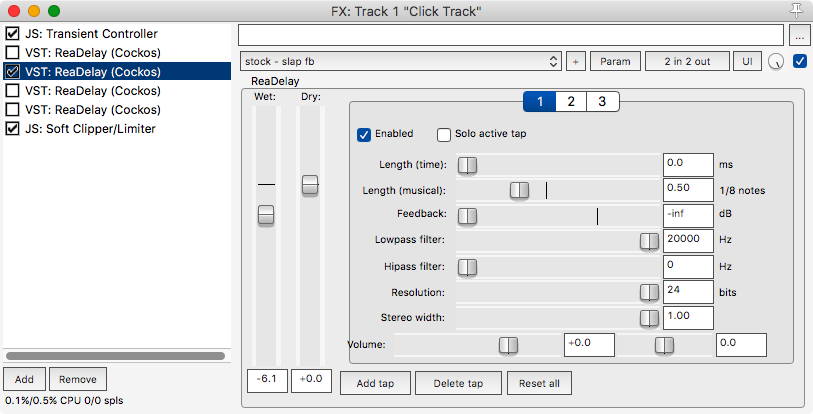
Putting a delay on the click is a very fast way to add sub-divisions. If you need to sub-divide down, rather than editing the click source properties you can simply add a ReaDelay. Set the delay taps to your desired sub-division and you’re good to go.
I have multiple ReaDelays setup and bypassed on my click source. Each one corresponds to different sub-divisions.
The beauty of this method is that you can automate the ReaDelays parameters and bypass. You can quickly setup the click to have 8ths in one part, 16ths in another and quarters in yet another section.
Note - This can sound strange if you have accents. I actually have two click tracks, one with accents and one without. I only have the ReaDelays on the unaccented one to sub-divide. If you do this then you do not need to modify the scripts below, simply put the 2 clicks in a folder track that is the first track in the project.
To turn off the first accented beat, set the frequency to 0. You can’t use the ‘Primary Beat Volume’ Parameter.
Setup the scripts
Having to constantly find and mute your click track is annoying. It’s much easier to have a toolbar button that corresponds to your click track being muted or not.
To set this up you need to add 2 scripts to Reaper, and have SWS installed.
Toggle script
The first script is what you assign to your toolbar button. This script sets the track to be the opposite of the toolbar button state.
When the button is ON, your track is un-muted. When the button is OFF, your track is muted.
Important - This script assumes that your click track is the first track in the project. This can be modified to find the track by name, but that’s just way slower. If you need that then let me know and I will offer an alternative.
1
2
3
4
5
6
7
8
9
10
11
reaper.Undo_BeginBlock()
  is_new_value, filename, sec, cmd, mode, resolution, val = reaper.get_action_context()
  state = reaper.GetToggleCommandStateEx( sec, cmd )

  -- must set track first or the deferred script gets in the way! (why? that's kinda stupid)
  track = reaper.GetTrack(0, 0)
  reaper.SetMediaTrackInfo_Value(track, 'B_MUTE', state) -- opposite of the command state

  reaper.SetToggleCommandState( sec, cmd, (1 - state)) -- Toggle
  reaper.RefreshToolbar2( sec, cmd )
reaper.Undo_EndBlock("Toggle Metronome Mute", -1)
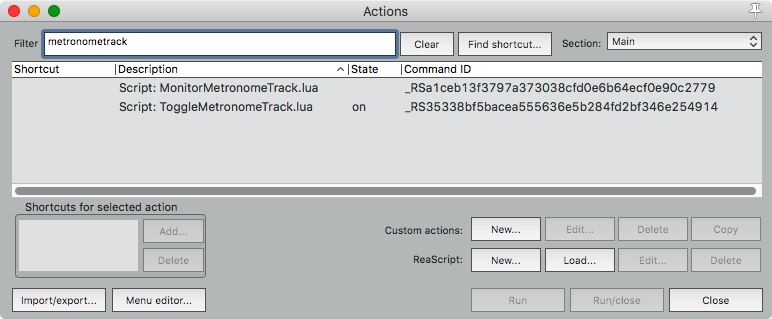
I have this script named as “Script: ToggleMetronomeTrack.lua”
Monitor script
Now you may be wondering, “Great! It works if I click the button, but what if I mute the track itself somehow?!” Right, the toolbar has no way of knowing when the track is muted by something other than the toolbar!
The following script fixes that.
Important - Make sure the “NamedCommandLookup” function refers to the command ID of your toggle script. It may be different than the command id I have in my script.
1
2
3
4
5
6
7
8
9
10
11
12
13
function main()

  track = reaper.GetTrack(0, 0)
  mute_state = reaper.GetMediaTrackInfo_Value(track, 'B_MUTE', new_state)
  cmd = reaper.NamedCommandLookup("_RS35338bf5bacea555636e5b284fd2bf346e254914")
  reaper.SetToggleCommandState( 0, cmd, ((mute_state == 1) and 0 or 1))

  reaper.defer( main )

end

-- RUN
main()
Startup!
The monitor script must be turned on every time that Reaper starts. It runs one time then is constantly running in the background to check on things (but only when Reaper says it’s ok and won’t mess up your project!)
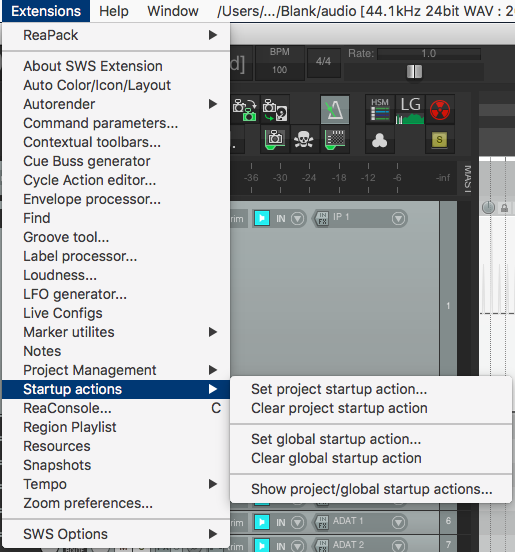
SWS has a feature called “Startup Actions” that lets you run commands when Reaper starts, and/or when a specific project is opened.
If you already have a startup action, then create a new Custom Action with your current startup action and the metronome toggle script. Now use that custom action as your Startup Action.
Conclusion
That’s it! Now you have a real click track. The track has a toolbar that controls it and updates to reflect the on/off state.
Not very difficult, but very useful.
Support Me!
This post took 4 hours to research, photograph, write and edit. If you appreciate the information presented then please consider joining patreon or donating!