Today I’ll be discussing how to place Drum Overheads, and specifically what I think many people are ‘doing wrong’. This is largely in the context of the Glyn Johns technique and the Recorderman Technique, but it also applies to various other drum overheads miking techniques.
Before you get your jimmies rustled, let me say that there’s not really a “wrong” way. Thousands of awesome sounding records have been made using a variety of wonky techniques. What’s really important is that you capture the sound of the drumkit in a way that best represents the instrument in the context of the mix.
What I’m offering you is a geometric explanation of how to establish a good starting point, and explaining some potential snafus with various techniques.
I’m also going to discuss how many people explaining this techniques do a somewhat poor job. I’ve gone through many videos and text descriptions and there seems to be common misconceptions that I wish to clear up.
I’m going to try to do my best to explain this mathematically, but also ‘intuitively’ (whatever that means). There’s going to be 3 different explanations of the same topic. I hope one of them makes sense to you.
Onwards!
Contents
- Introduction
- Finding the circle
- XY and Mid-Side
- Spaced Pair
- Glyn Johns
- Recorderman
- The best method?
- The other best method?
- Uneven Spaced Pair Execution
- Conclusion
- Support Me!
Introduction
I’m talking about overheads in this post. These are mics that go somewhere away from the drumset. They generally are around 32”/0.8m away from the drumset so that they can capture ‘the big picture’ of the kit.
For most mixing, your overheads will be the core of the drum sound. Close mics and auxiliary will fill in holes in the sound and add impact/punch to specific drum sounds.
Most miking techniques focus on centering the snare and kick drum between them. When the sound of these elements reaches both microphones at the same time, and with the same intensity, those elements will sound ‘centered’ if the mics are panned hard to the sides.
The general rule we’re going to be working with here is how to create a 2 microphone overhead setup that satisfies these two conditions:
- The sound from the kick reaches each mic with equal amplitude and at equal times.
- The sound from the snare reaches each mic with equal amplitude and at equal times.
Luckily, those two things will occur if we maintain 1 critical aspect: distance.
However! There’s another dimension to this. We also want the overheads to capture all of the other elements in the drum kit. There’s plenty of microphone placements that satisfy these two conditions, but do a terrible job of capturing the rest of the kit. We’ll explore that as we progress.
We’ll also explore some common ‘mistakes’ and pitfalls in popular miking techniques.
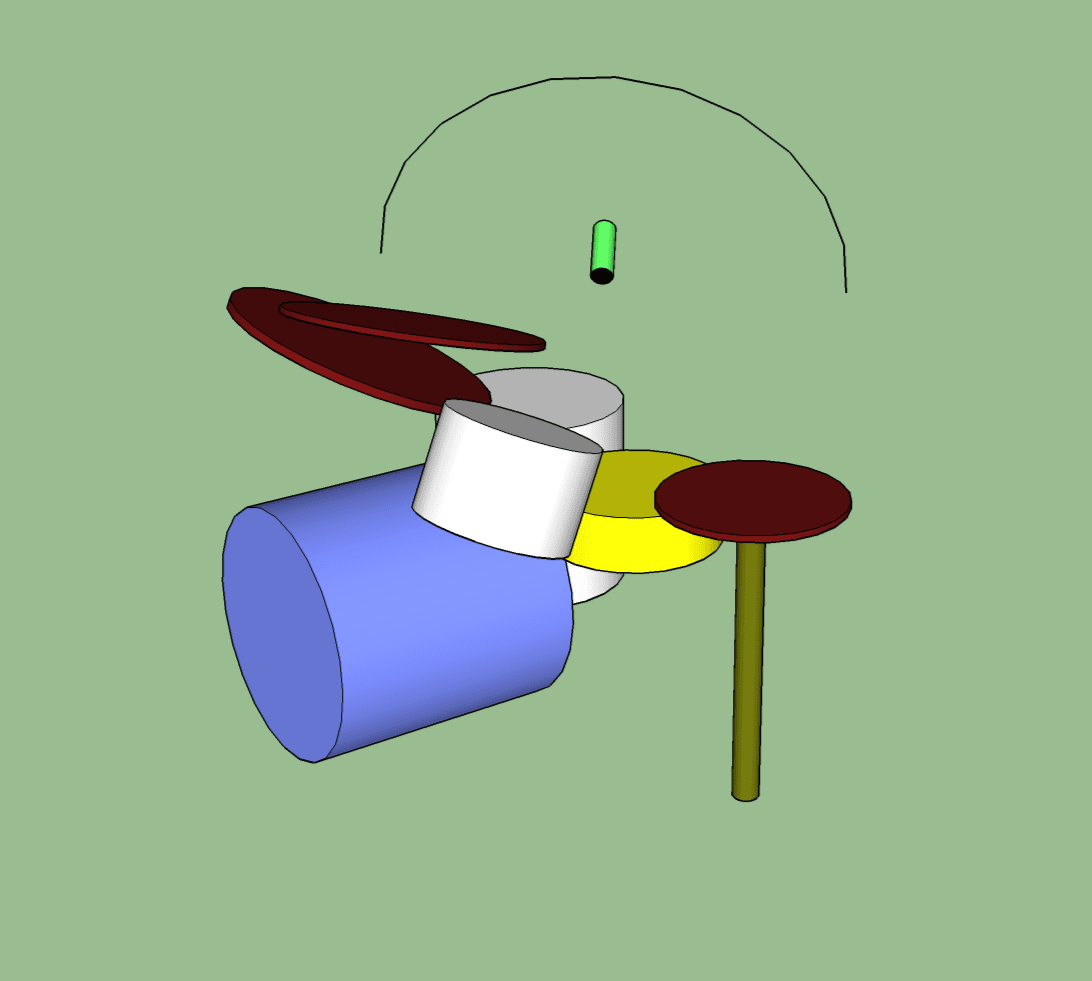
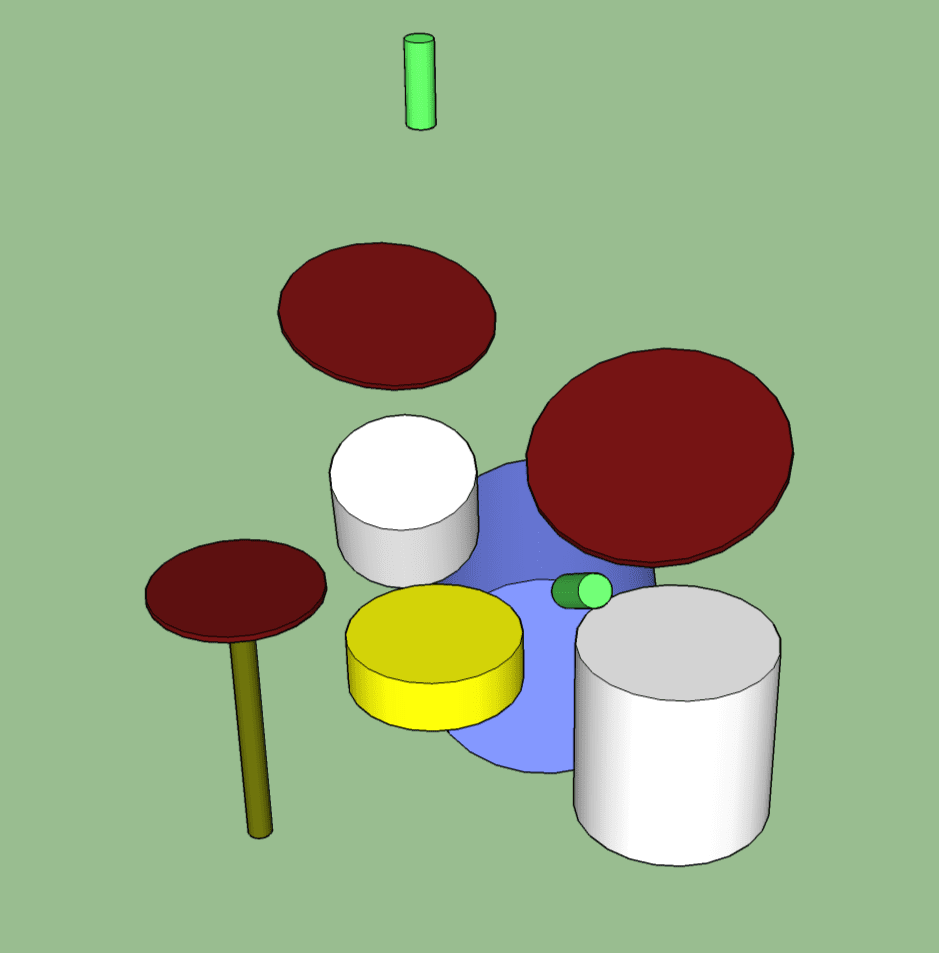
In the following 3d renderings:
- The microphones are Green.
- The snare is Yellow.
- The kick is blue.
- Toms are white.
- Cymbals are brown.
- Measurement lines are red.
Most of these examples assume an omni directional microphone!! Part 2 goes further in depth on the topic.
XY and Mid-side obviously rely on cardioid types and figure-eight respectively.
Finding the circle
In 3d space there’s exactly one 2d circular plane where 2 microphones can be maintain equal distances from 2 sources.
That may sound confusing, but I’m going to show you two ways to find this circle. Hopefully one of these methods will help cement the idea for you.
Intersecting Spheres
I feel like this is the most intuitive method. My brother disagrees with me, but I’ll show his method too.
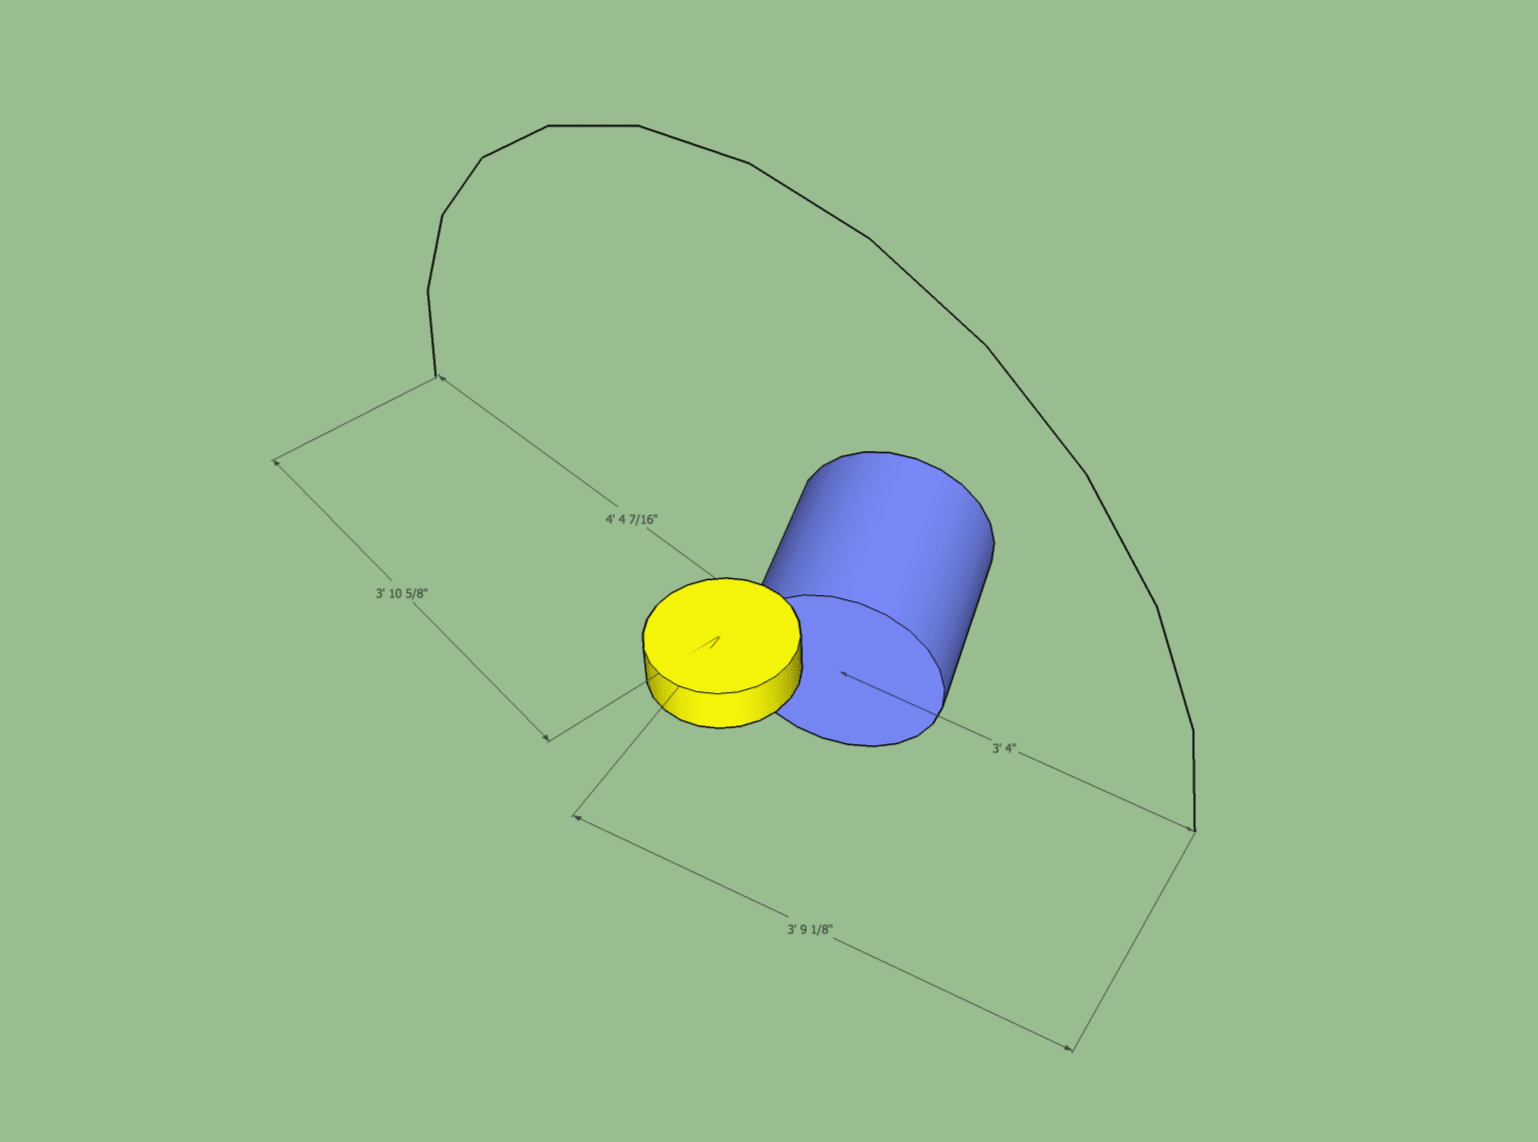
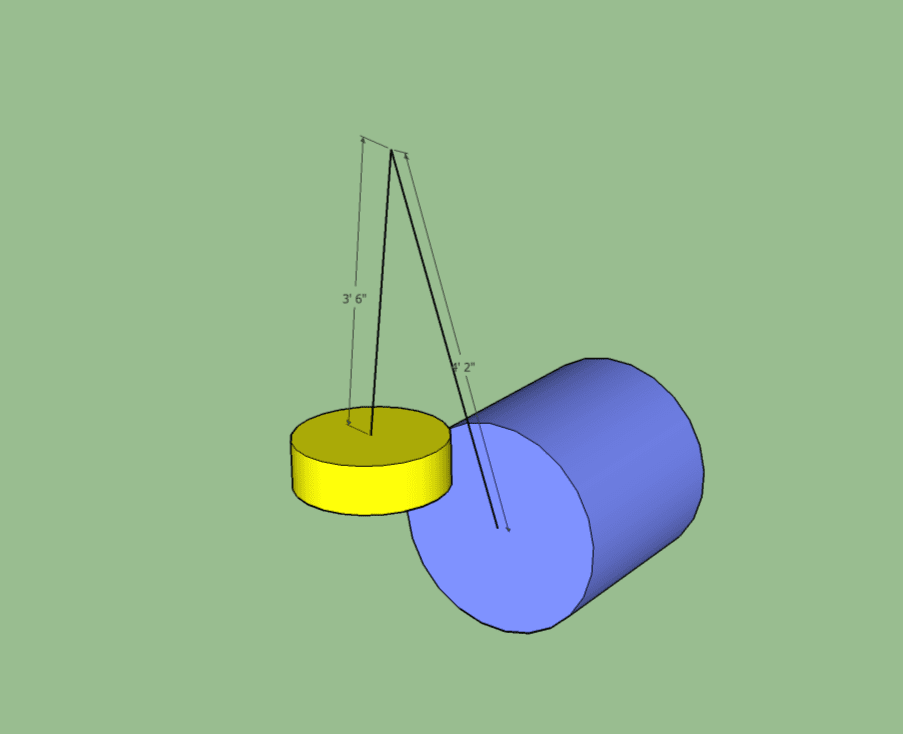
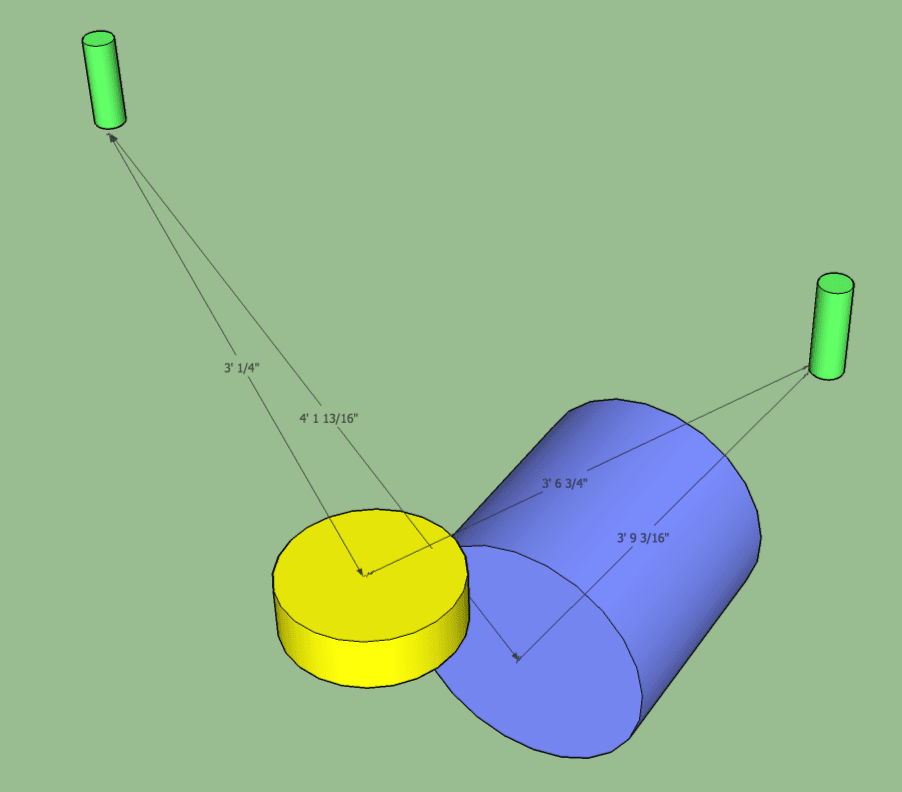
Imagine 2 spheres that have their origin centered on the drums you want to record.
The radius of the spheres corresponds to the distance you want each mic from that drum. So the snare microphone you may want 42” from each mic, and the kick 50” from each mic.
So you would draw a 42” radius (not diameter!) sphere with the origin on the snare. A 50” radius sphere is drawn on the kick. (No metric here, the actual measurements are irrelevant. Sorry rest-of-the-world!)
So that’s what we see above, except I used half-spheres to make it a bit clearer. The white half-sphere is a 42” sphere with the origin on the snare. The grey-blue half-sphere is a 50” radius half-sphere with the origin on the center of the batter of the kick.
The area where they intersect defines an arc where 2 mics can be placed and either mic will always be 42” from the snare and 50” from the kick.
(I know that the word is hemisphere, but I think that half-sphere is more clear to those with limited English vocabulary.)
So let’s check out a video…
The video above has 4 segments.
- It shows the intersecting half-spheres
- It shows the arc of intersection along with measurements. 3’6” to the snare and 4’2” to the kick. That’s 42” and 50”.
- It shows another measurement along the arc. The distance to the arc is the same…
- It shows yet another measurement. No matter where we go on the arc… the distance to the snare is always 42” and the distance to the kick is always 50”
So you could put either of 2 microphones anywhere along this arc, and the snare will always be the same distance from each mic. The kick will always be the same distance from each mic.
The result is excellent phase coherency and equal amplitude in both microphones.
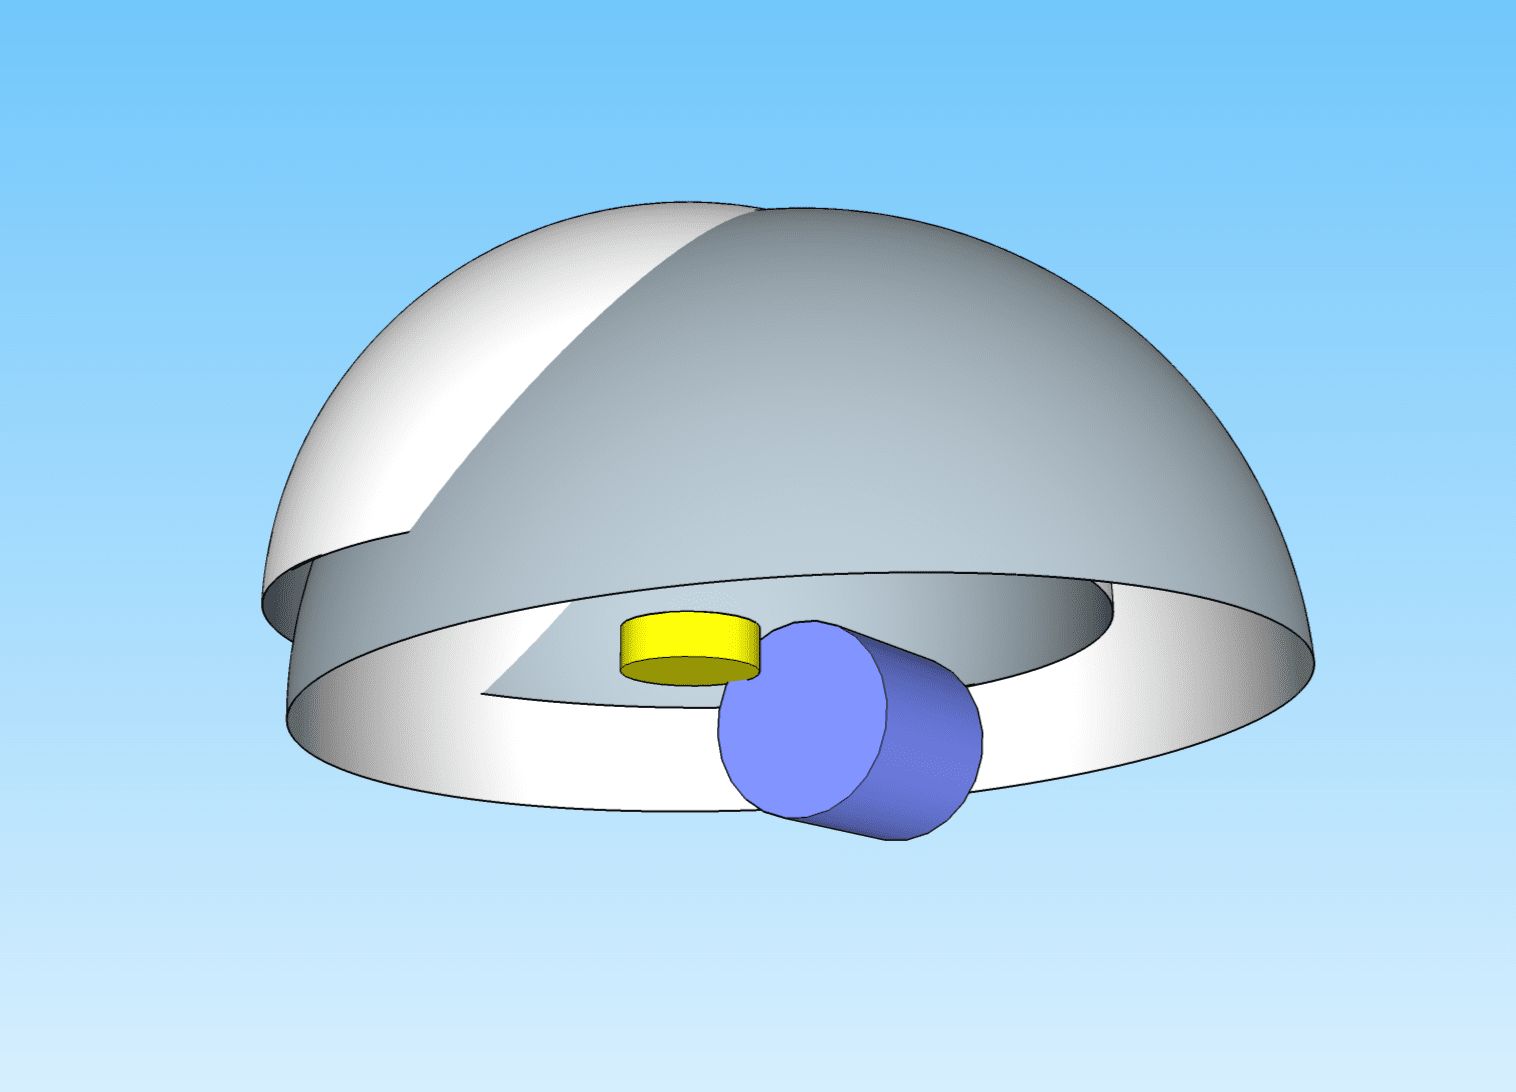
Perpendicular Circle
There’s yet another way to show this arc. This is the method that my younger sibling seems to prefer. (Warning, unnecessary trigonometry coming up)
Once again we’ll be working with 42” from the snare and 50” from the kick.
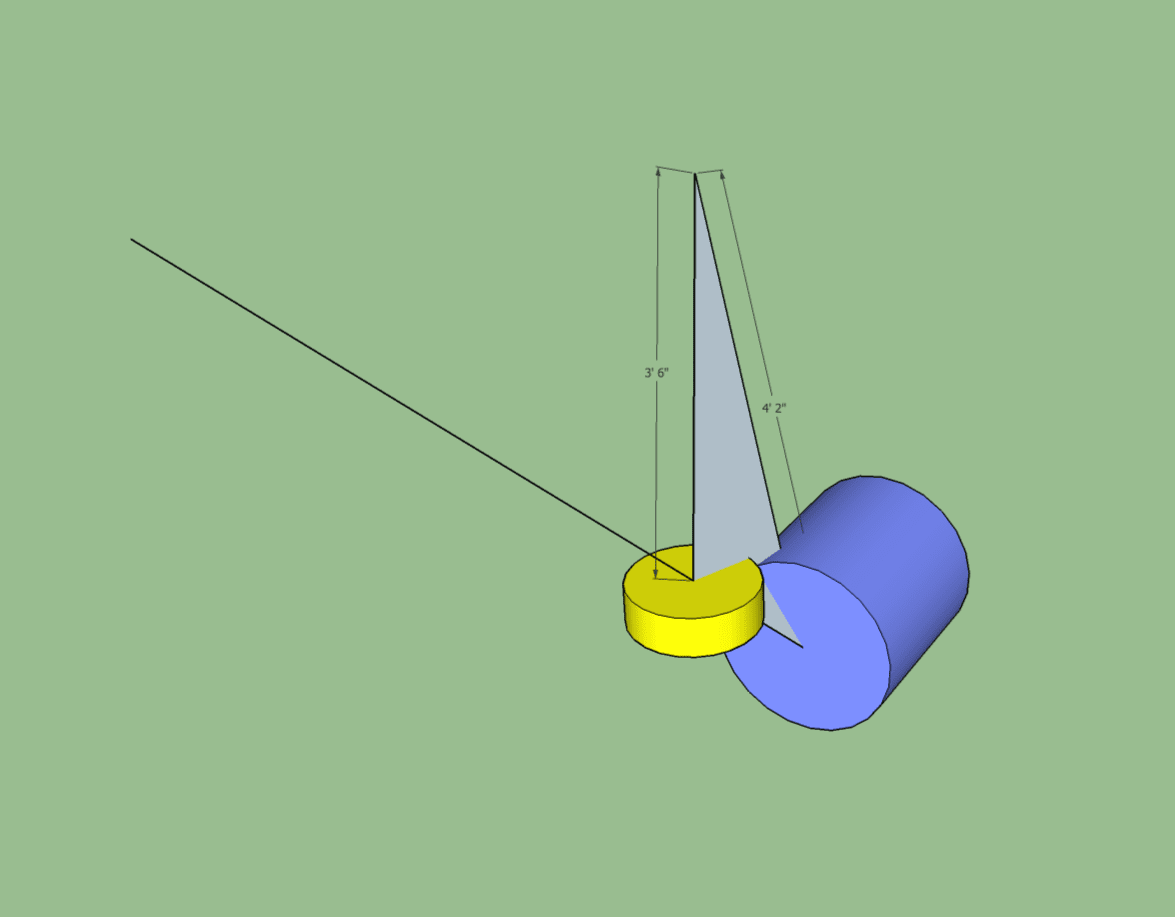
First we draw a line from the center of the kick through the center of the snare. Then we measure the distance between center of kick to center of snare along that line.
Now we construct a triangle. Our sides of it are a. 42”, b. 50” and the distance between the kick/snare centers, which is c. 14.375” in this case. To construct the triangle I need to know at least 2 of the angles. I’m going to use the angles of bc (α) and ac (angle β).
The formula for α is cos^-1((b^2 + c^2 - a^2) / 2bc) = 49.02345658°

And β is cos^-1((c^2 + a^2 - b^2) / 2ca) = 116.00138398°

Great, now we can construct a triangle with the base being the line between the snare center and kick center. That’s what is in the image above.
The next step is to find our arc, and this part is easy. Now we draw a circle perpendicular with our line whose edge meets the tip of our triangle. It looks like this:
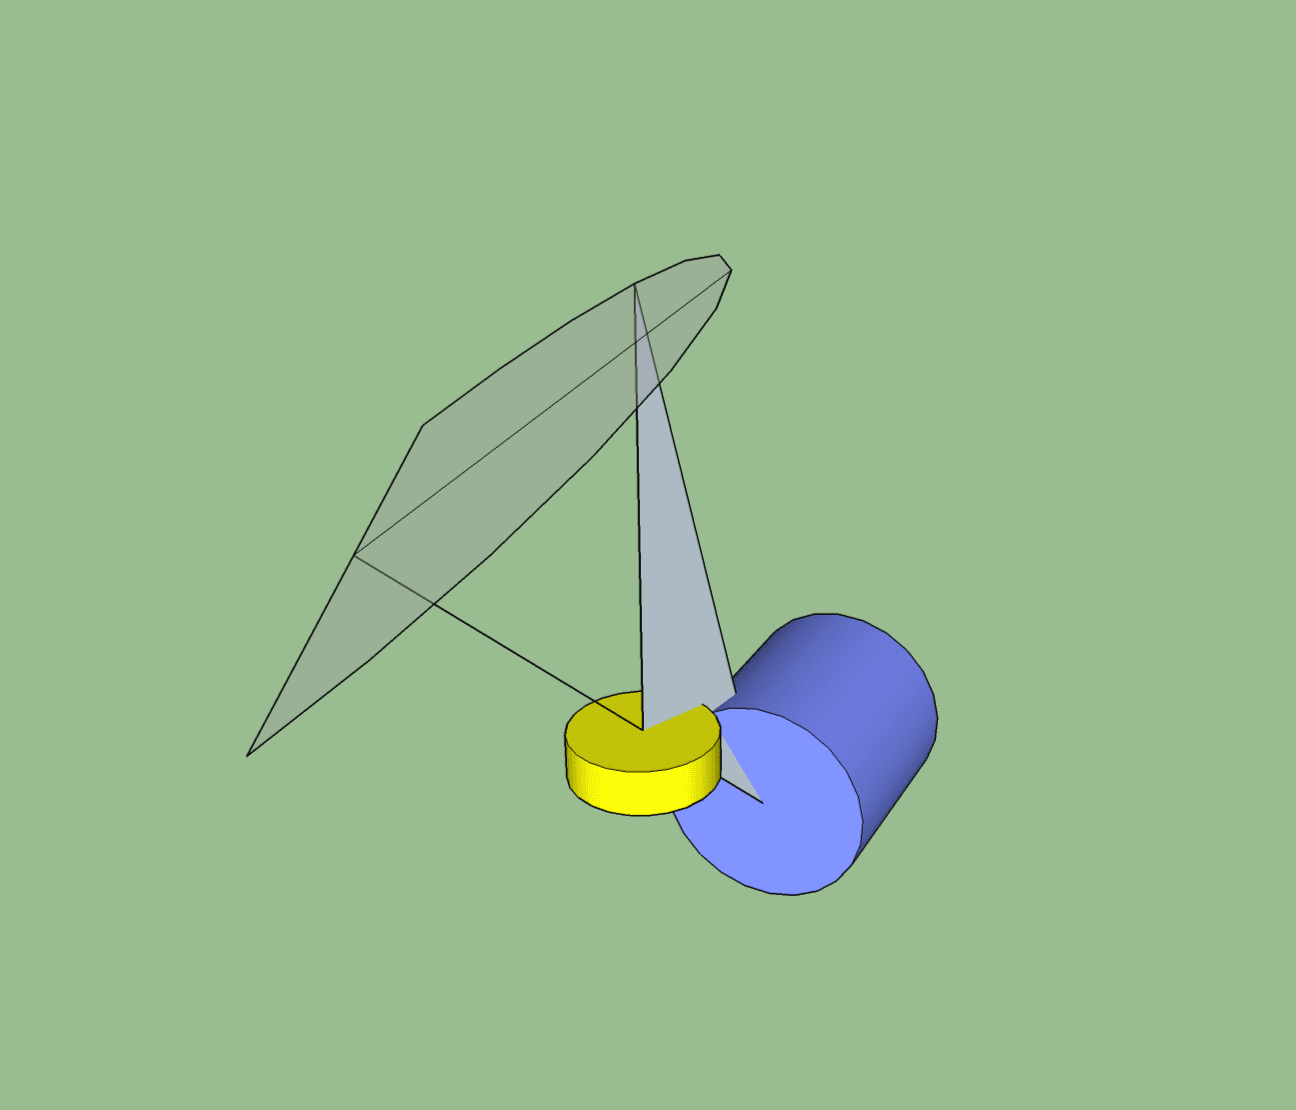
Oh hey! Look! It’s the same arc that we got with the intersecting spheres method.
That was a lot harder than the sphere method, but the result is the same.
Rotated Triangles
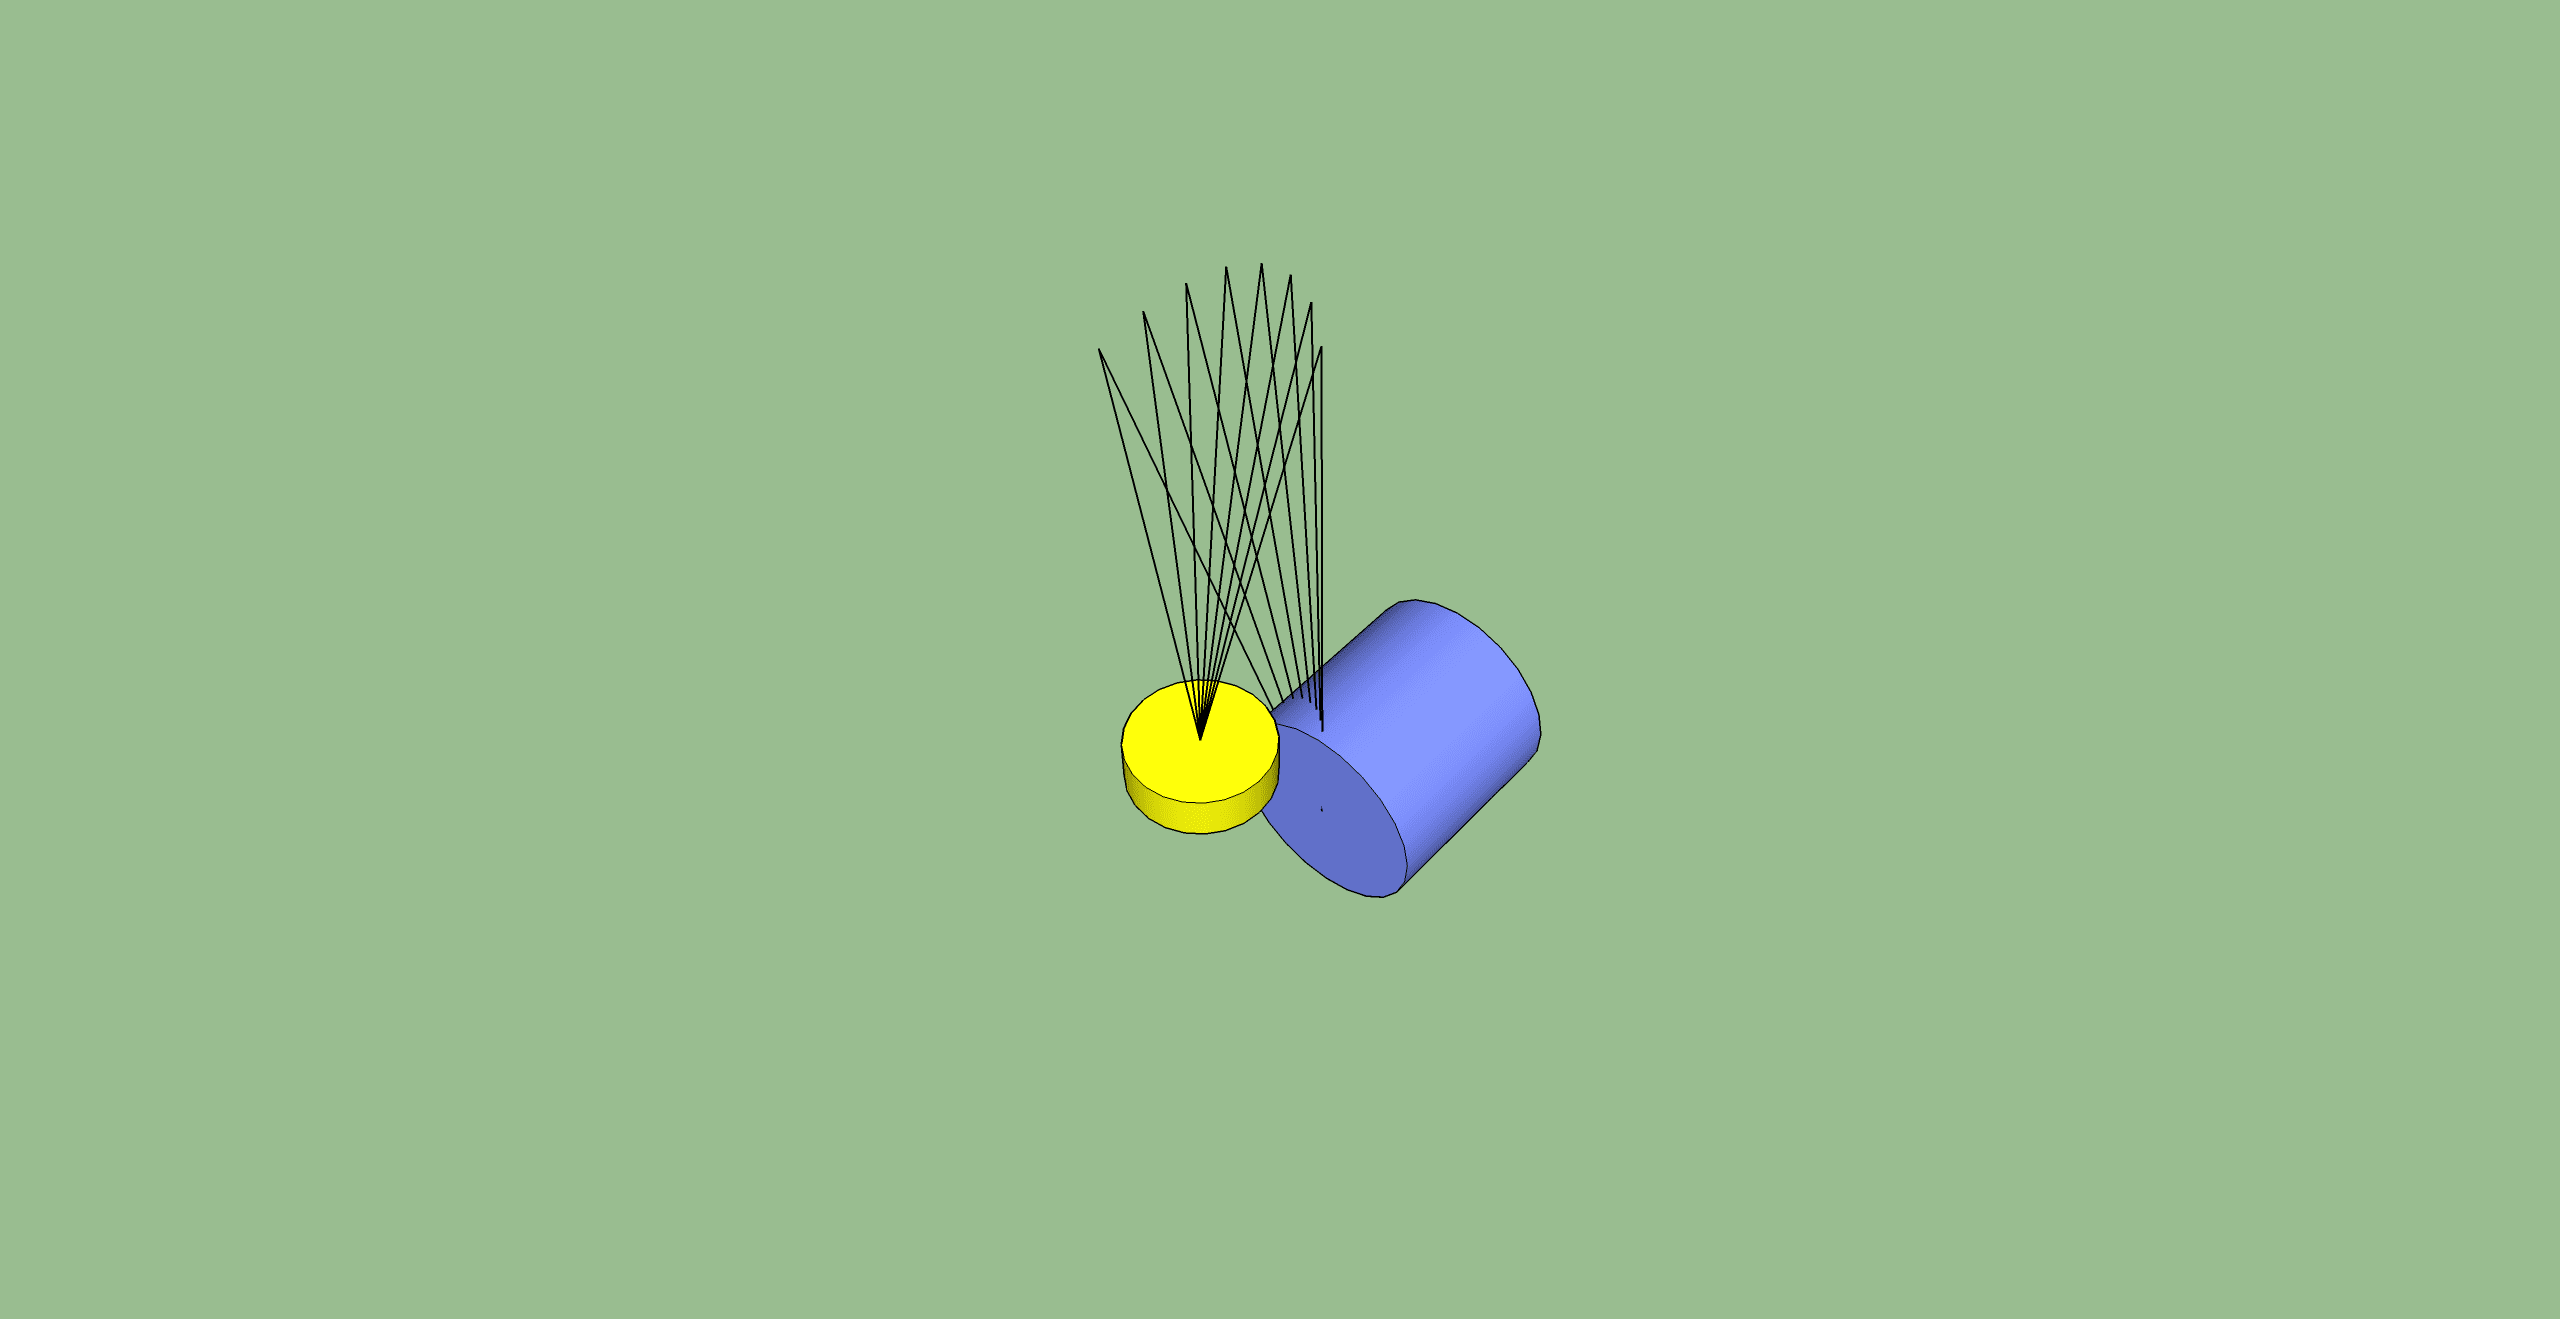
Ok, it’s time to get practical. If you’ve done any looking around on drum overhead miking then I’m sure you’ve seen people measure this using a string or a cable.
So let’s do that. I’m using the method in perpendicular circles to create my 2 ‘strings’, but in real life you can just tape a 92” (42” + 50”) to the center of the kick and the center of the snare. Grab the string at 42” from the snare and now you can swing it around.
Above we have our ‘string’ in place.
Now let’s grab that string and swing it around the drum kit so it remains tightly attached to the kick/snare. Here’s what various positions of that look like…
That’s various positions of the linked strings, and I’m moving around the model so that you can see that…
The tips of the string layout the exact same circle we’ve made twice already!
Strings through drums
Oh no! We have a problem. If you try to do this in real life, your string can’t go straight through the drum!
There is no free lunch though. The issue here is that as your mic passes over the batter head of the kick drum you begin to pick up more and more of the sound from the front of the drum. That sound is timed differently, and of a different amplitude than the batter head. This messes up your phase relationships. For best results, you want to basically imagine a wall created by the batter head and not pass that with either mic.
This is a total non-issue. The physical reality here is stopping you from making a decision that will harm your attempt at creating a kick/snare phase/amplitude cohesive sound.
XY and Mid-Side
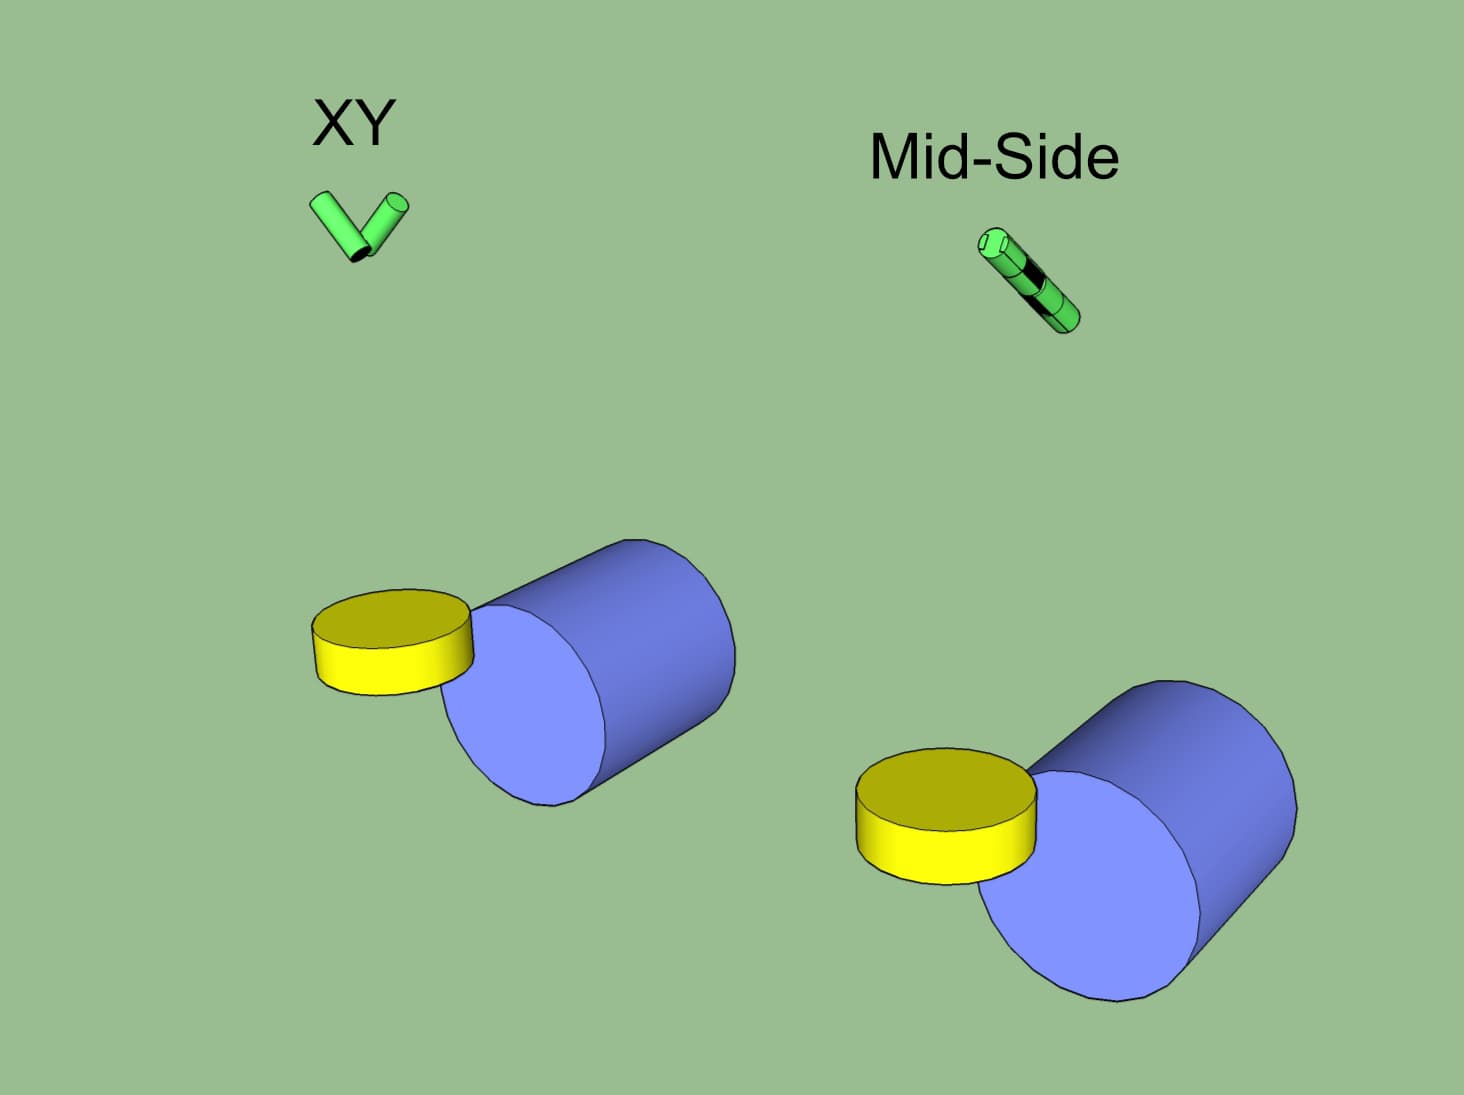
These are the easiest setups to achieve our goals. With both you have 2 mics that are right next to each other, except they capture different portions of the kit.
As the microphones are placed near each other, they satisfy the distance/amplitude requirements for the kick/snare. They also capture a fairly even image of the drumkit. Hopefully this is obvious from the 3d rendering above. The amplitude of each drum varies between the microphones due to the directionality of the mics used, but the arrival-time of sound is consistent.
So why not always use this? Simply because it can be somewhat boring. The image presented is very tight and lacks stereo width. Every element is the same distance from both microphones so there is very little precedence effect happening. The precedence effect (or haas effect) aids in creating a wide stereo image that helps the drum kit envelope the listener.
That said, these techniques can be excellent for miking drums from an extreme distance. The sound of the drums filling the room can help create a vast-sounding stereo sound that, when mixed in to the other mics, creates a more bombastic drum impression.
Spaced Pair
Space pair is simply placing 2 microphones on each side of the drum kit, above it somewhere.
Potential Issues
The issues here may be apparent to you already, but you can refer to the render above with measurements.
Both mics are different distances from everything in the kit. I’ve hidden the cymbals and toms to make this more clear.
The 2 mics differ in distance from the snare by about 5.25”/13cm. The mic closest to the snare will present the snare louder and more biased towards that side due to the precedence effect.
The 2 mics differ in distance from the kick by 4.625”/11.75cm. The right microphone will have a louder kick and it will sound more panned to that direction.
These relationships between each mic and a drum kit element persist. There will not be any elements, in a normal kit setup, that are equidistant to each microphone.
So this is clearly an interesting technique if you want a very wide drum sound with no cohesive center. That’s a pretty rare desire in modern recording though.
So let’s “fix” it.
Even Spaced Correction
Here we go again. A video showing equidistant microphone spacing between the kick and snare. The kick and snare are the same distance from each mic.
There’s 4 frames in the video:
- Our intersecting half-spheres.
- The arc that’s defined by the intersection.
- The whole drumset with microphones along the arc
- A second setup with a larger arc, and microphones along it.
This setup may look a bit familiar, but it’s not. There’s some differences between this an recorderman.
Take note the arc, as this does make it rather difficult to put mics in place on a normal drumkit, and it ends up heavily biased towards the drummer’s right side.
Uneven Spaced Correction
Does this look familiar? That’s the rotated triangles from earlier. In fact, all 3 of the methods I described earlier use these exact same measurements, so you can use the explanation that makes most sense to you.
In this setup the kick is the same distance to either mic, and the snare is the same distance to either mic, but the snare->mic and kick->mic distances are not equal.
This yields a flexible setup where you can find the position you want for your first mic, and place the second mic so that the kick/snare maintain phase/amplitude coherence.
Spaced Incorrect
The issue here is that many people make a mistake. They come up with this idea where they say, “Imagine a line going down the center of the kick and snare, then put the microphones on an arc perpendicular to that.”
It sounds good, but is it?
Look above. Does that seem familiar? That looks like the normal arc you may see drum overheads placed on.
Look at those measurments! Neither mic is equidistant from anything.
The resulting sound will have level variances, timing variances, phase variances. Eugh! It’s a cool sound for sure, but it’s a really messy sound. It doesn’t work for everything.
So how do we fix that arc? Well we twist that line so that it goes through the center of the kick/snare. Then we draw a circle through it and… wait! didn’t we do this before?. Yes, yes we did. By centering the axis where the origin of the arc lies, we’ve just done the same thing I showed three times above.
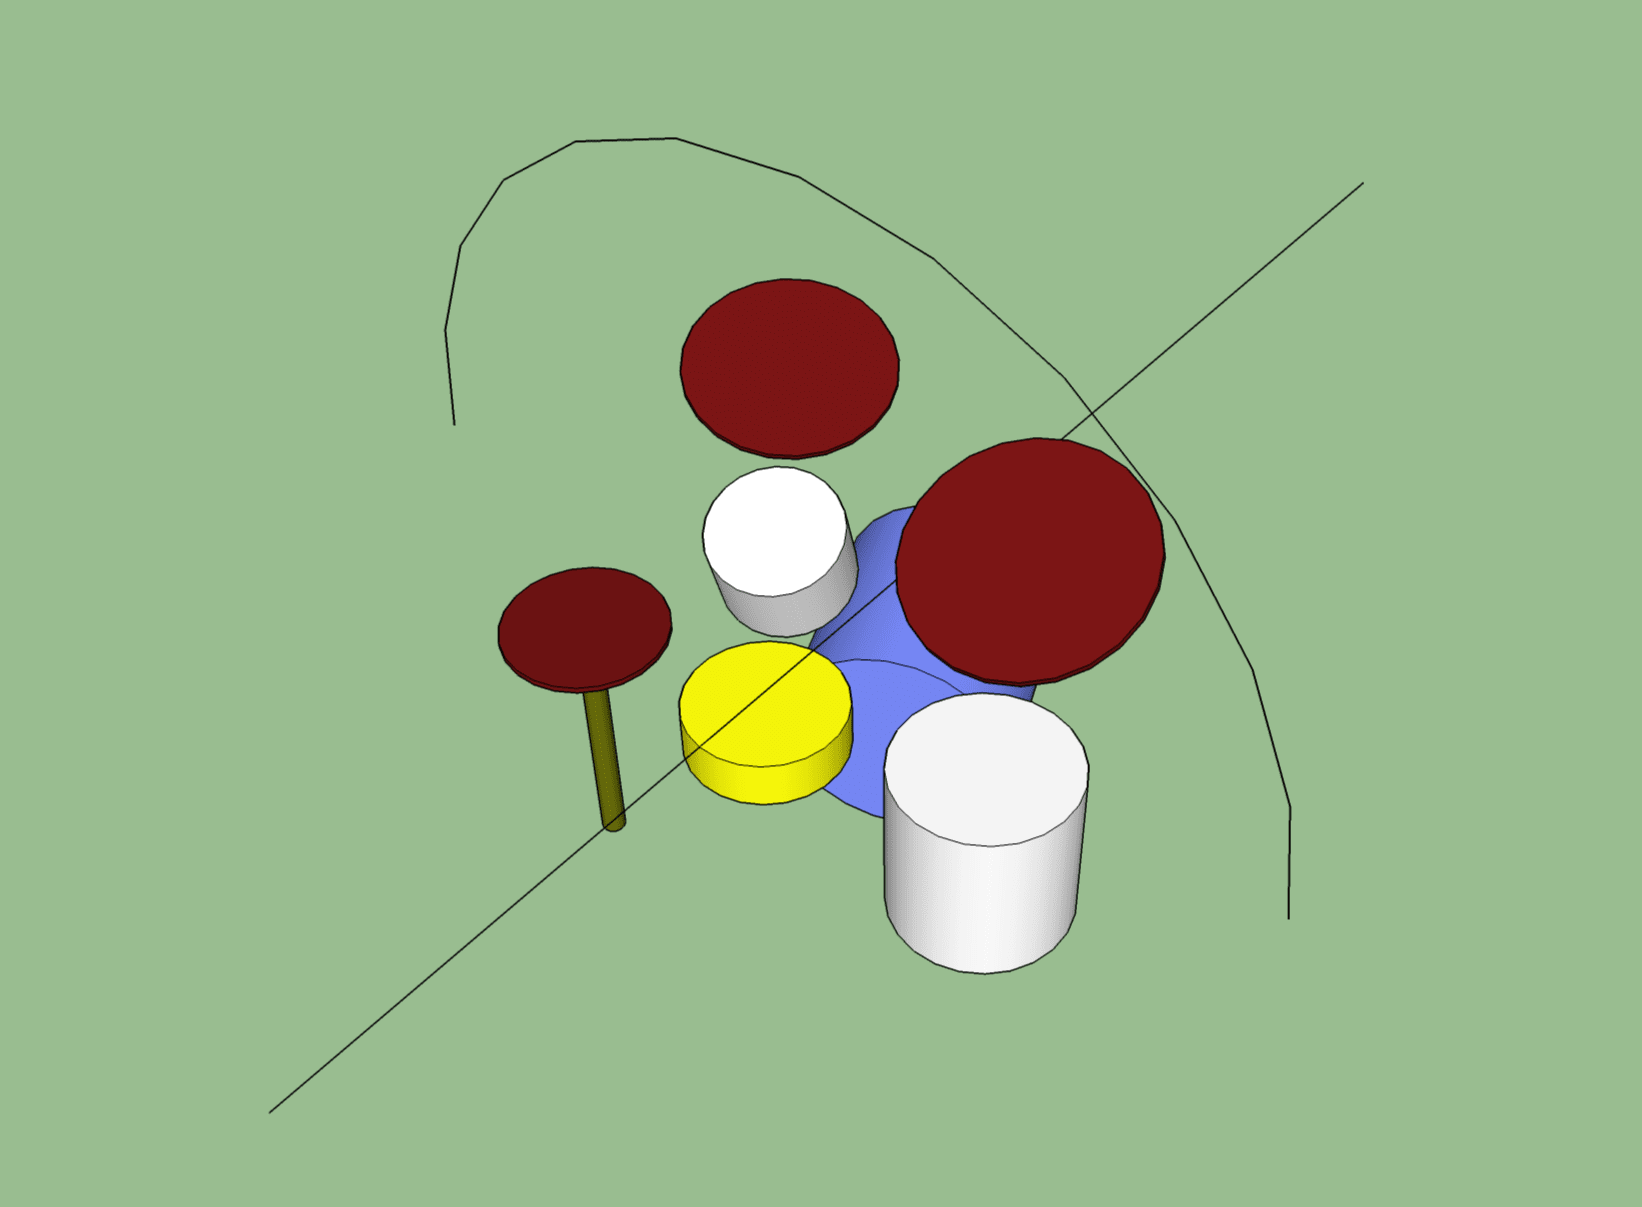
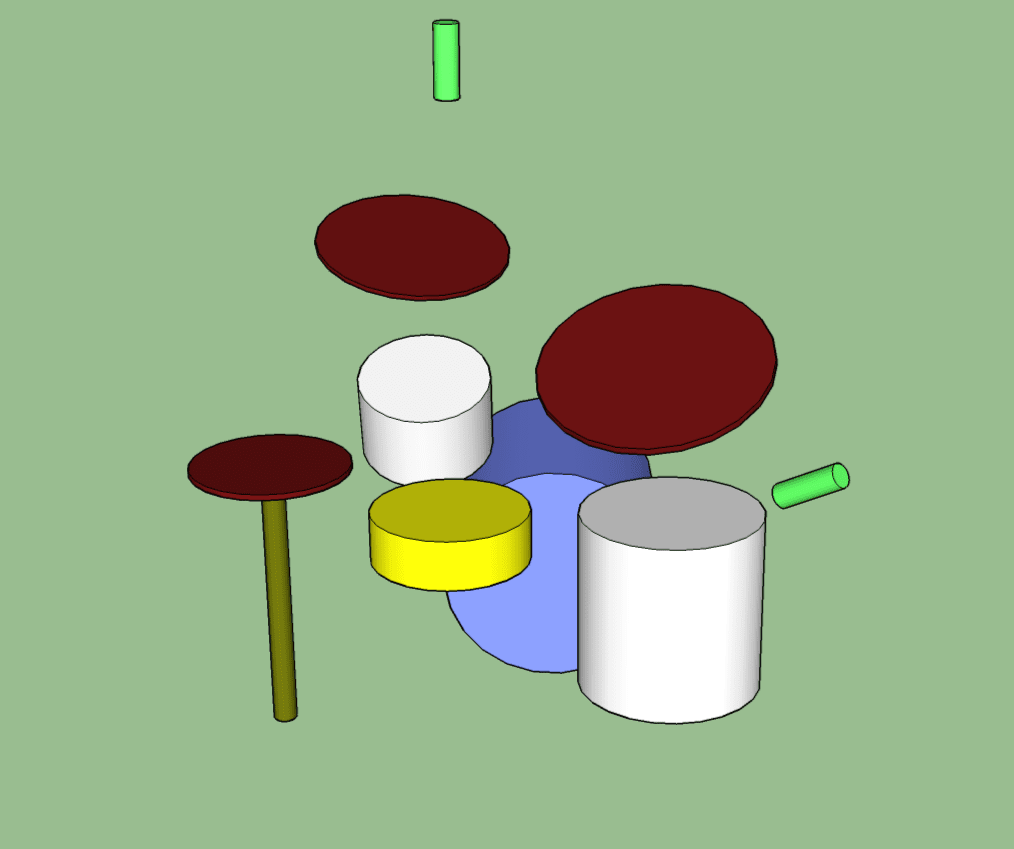
Spaced partially-correct
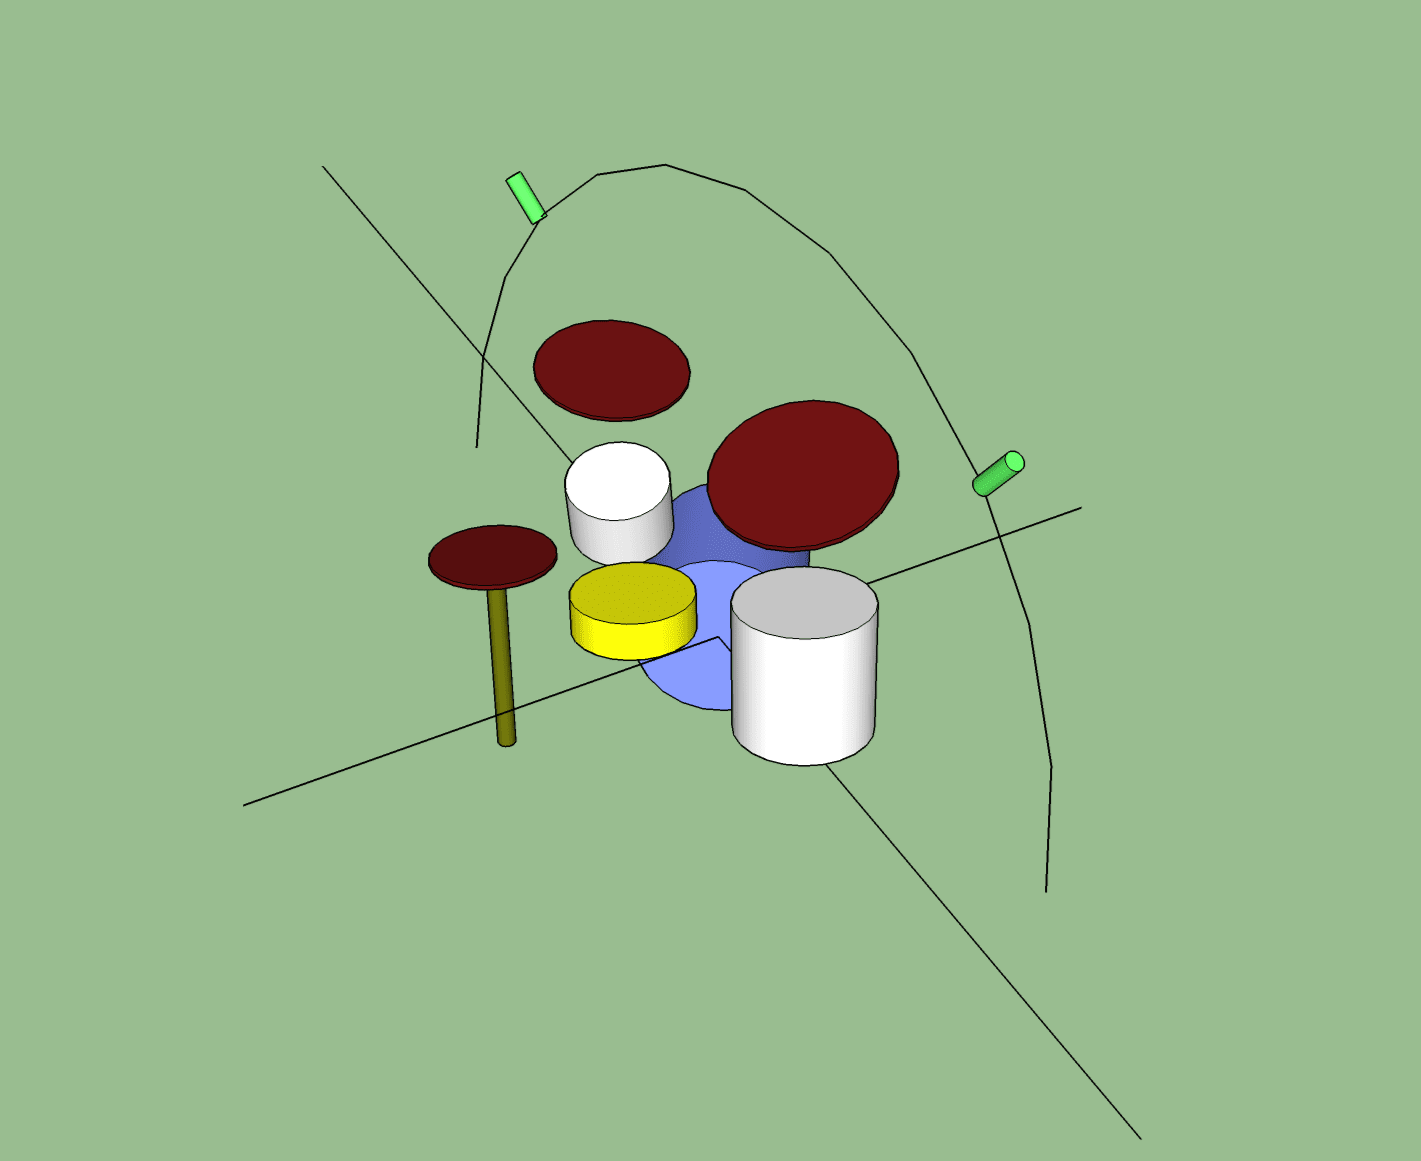
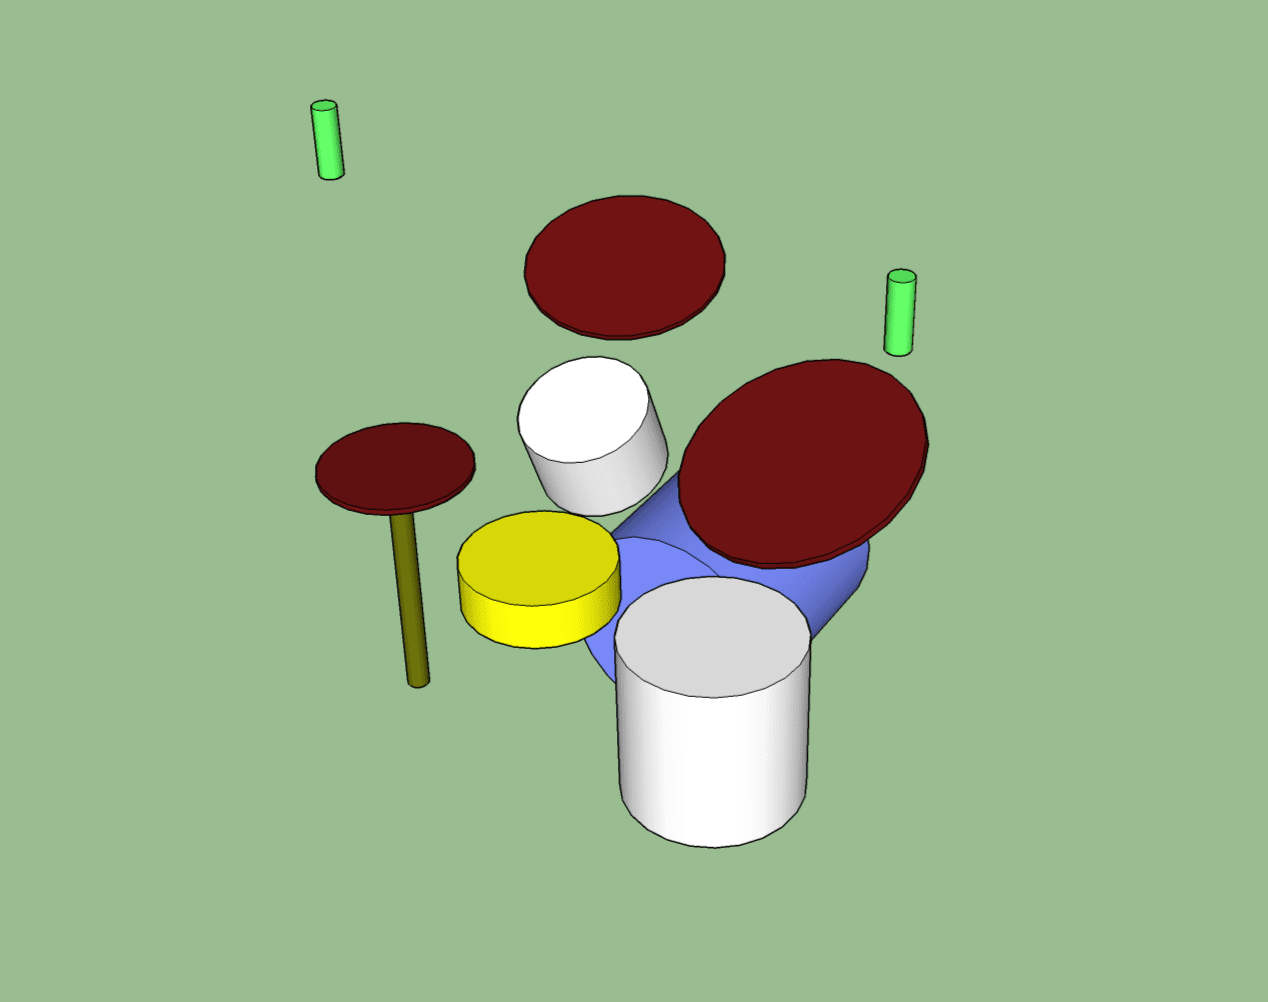
The snare doesn’t always need to be centered, but the kick almost always does. We also have the rest of the drumkit to contend with, so there’s a way we can approach this.
We draw a cross that goes through the kick and intersects the toms. Then we draw an arc perpendicular to that. The result is a kick that’s perfectly centered, a nice spread of toms and cymbals, and a snare that’s panned slightly to the drummer’s left.
That’s what is in the image above. I draw a cross that goes through the kick’s center and is oriented to go through the highest rack tom, and the lowest floor tom. Then a circle is drawn parallel to the ‘through-tom’ line.
As you can see we’ll get an excellent stereo image with the toms being on each side, the hats being on the left, the kick centered, the ride mostly-centered etc…
It’s an excellent sound.
Glyn Johns
The Glyn Johns method is going to get me in trouble. Many amazing and iconic records were recorded with this method, and I’m just some dude that’s not mixing Led Zeppelin or the Eagles or Eric Clapton.
The idea with Glyn John’s technique is that you place the snare mic about 2-3 stick-heights above the snare drum. Then you place the second mic an equal distance away from the snare, but down behind the floor tom.
This ends up being the snare-centric version of the ‘partially-correct’ spaced pair method. Both microphones are placed equally distance from the snare, but have varying distances from the kick.
I personally dislike this method because I feel that the kick is the center of the stereo image, not the snare. There’s also an issue with how cymbals are presented, which I think that this video explains pretty well.
So… can we ‘fix’ it?
Fixing? Glyn Johns
OK. I get it. This is sacred ground. Please don’t tie me to the pyre. But can we “fix” the Glyn Johns technique?
The core of this mic technique is the single over-head snare mic. So if we use one of our methods above to create an equidistant arc from the kick/snare we end up with the movie above.
Do you notice anything wrong?
Yep… The second mic is going to be placed either behind the drummer or on the left side of the drum kit. Your stereo image will consist of snare+hat and… just about that. There will be no spread of toms or cymbals in any meaningful way.
If we center the arc on the floor time mic then we have similar issues.
Again we have the same problem. We’ll only capture the right side of the drumset. The second mic can go along that arc anywhere and there’s nothing there of value.
Does this make the Glyn Johns’ technique bad? No, but you should be aware of what you are getting when you use it. You’re not getting a coherent kick drum image, and you’re also sacrificing clarity of cymbals.
Is there a better way? Sorta…
Recorderman
The recorder man technique tries to take the snare coherency in to account, as well as fixing the cymbal issue.
Unfortunately the Recorderman technique has the same issue as the Glyn Johns’ Technique. When you start with a mic directly over the snare, you end up with your equal distance arcs being in rather strange places..
Feel free to try it. Tape a string to your kick, and one to your snare. Pull the string tight above the snare drum and pinch that point.
Now swing an arc so that both legs stay tight. You’ll end up on the drummer’s left side, by the snare. That’s no good. If you try starting where the Recorderman puts the mic over the drummer’s shoulder, then the overhead mic ends up out over the ride cymbal, NOT over the snare.
Of course, many great records have been made with this technique. So I’m once again just informing you of some limitations of it. It still can work great.
The best method?
I posit that the most coherent sounding overhead setup is the Uneven Spaced Pair.
The difference between my Uneven Spaced Pair is that my method allows you to choose any starting position for the first microphone and maintain kick/snare coherence with the second microphone.
This is the technique that I used in the intro, where the distance from snare->mics is not the same as kick->mics, but they still maintain an equal distance relative to each other. The phase/amplitude coherence remains, yet you can choose your arc.
This gives the most coherent stereo image with the kick and snare perfectly centered. From this point mics can be moved slightly to add phase and time misalignment to artificially widen the stereo image.
Close mics can be used on toms and cymbals, then panned to increase the direct stereo image as well.
To adjust the stereo image, use cardoid pattern microphones and adjusting their direction to change what the mic picks up. Keep the capsule on your arc though!
Of course, this isn’t the best method subjectively. It’s only meant to be a good starting point when you specifically want a center coherent sound, which is usually the basis for most modern drum sounds.
The other best method?
However… There’s a secondary method that can be used: Anything but, with a center mic.
This is similar to the Weathervane Technique. The Weathervane technique creates an ellipsoidal path by using a single string taped to the kick/snare. This is not a circular arc because a single point is not maintained. The Weathervane technique allows you to slide the string on your finger, which makes the kick and snare foci for an ellipse rather than the center of the circle.
The result of the elliptical path of the 3 mics is that they are not equidistant from the kick and snare. I wish I could draw this one, but I don’t know how to do it in Sketchup.
This method relies on three mics though. One mic is panned dead center to establish the center channel, and the other 2 mics are panned.
The 2 panned mics are along an elliptical arc, rather than a circular arc. So they do not maintain perfect phase/amplitude relationships to the kick snare. This results in a wider image that is panned around the central microphone.
The Weathervane technique has this voodoo with equilateral triangles and whatnot. The equilateral triangle ensures that the ‘center’ mic is actually centered along the same ellipsoid plane as the other 2 mics. The result is a consistent phase/amplitude difference, but not a magical one.
You can actually place the ‘center mic’ anywhere that you feel captures the entire kit as a whole in a balanced way. In the image above I’m using the Partially Corrected Spaced Pair along with a single center mic. The mic is placed directly above the snare 42”, and is the darker green mic.
Notice though how close the ‘center mic’ is to the arc.
Uneven Spaced Pair Execution
Setting up the Uneven Spaced Pair is pretty easy. You just need a piece of string, you tape it to the drum, find a good place for the first mic then pinch that point and swing the string around with both lines tight. Anywhere on that arc you can place the second mic.
With this method I suggest setting up a distance starting somewhere behind the floor tom, and then swinging up for the overhead mic. When you try it you’ll see why. It takes some practice to try starting with the overhead.
I don’t like putting tape on drums that aren’t mind, so I have a different method.
Snare Knot
First I tie a loop about 48”/1.2m from the end of the string. I’m using paracord for this.
Now with the other end I string it around 2 opposing lugs like shown.
You want the knot that defines your loop to be in the center of the snare drum.
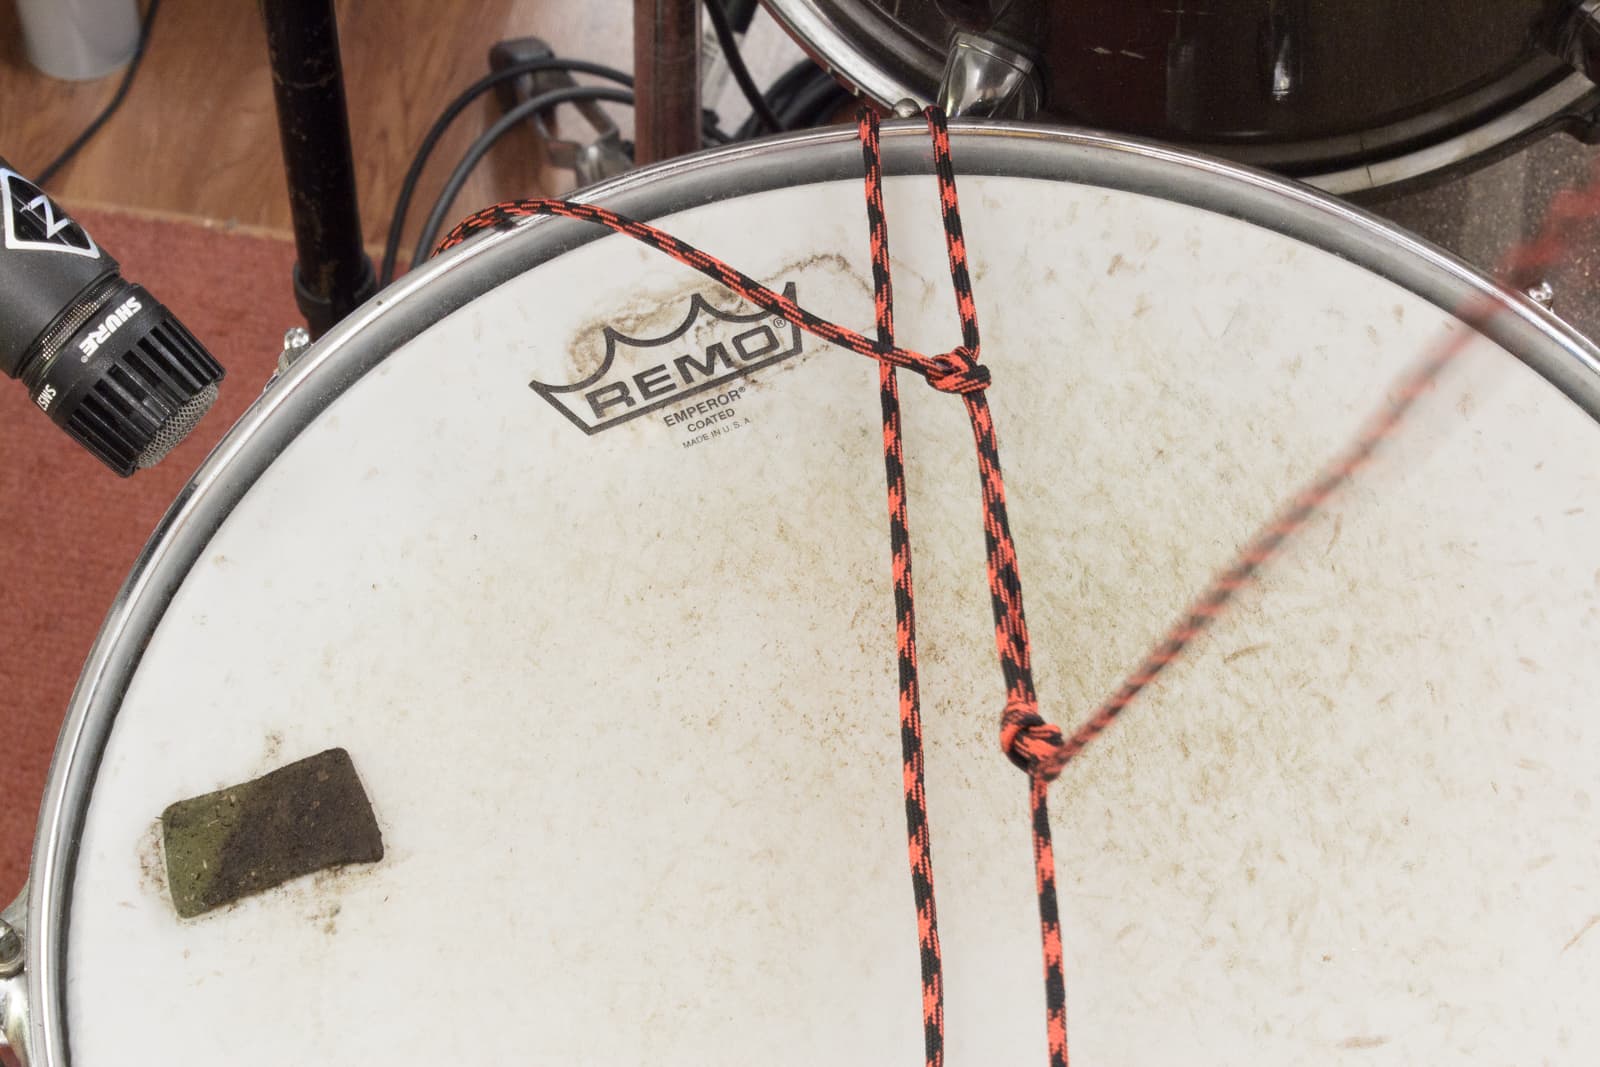
Next I attach the loop to the loose end using a Cow Hitch (which I call a Lark’s Head personally).
Make this tight. When you pull on the other end of the cord, you’ll now have a line coming straight from the center of the drum.
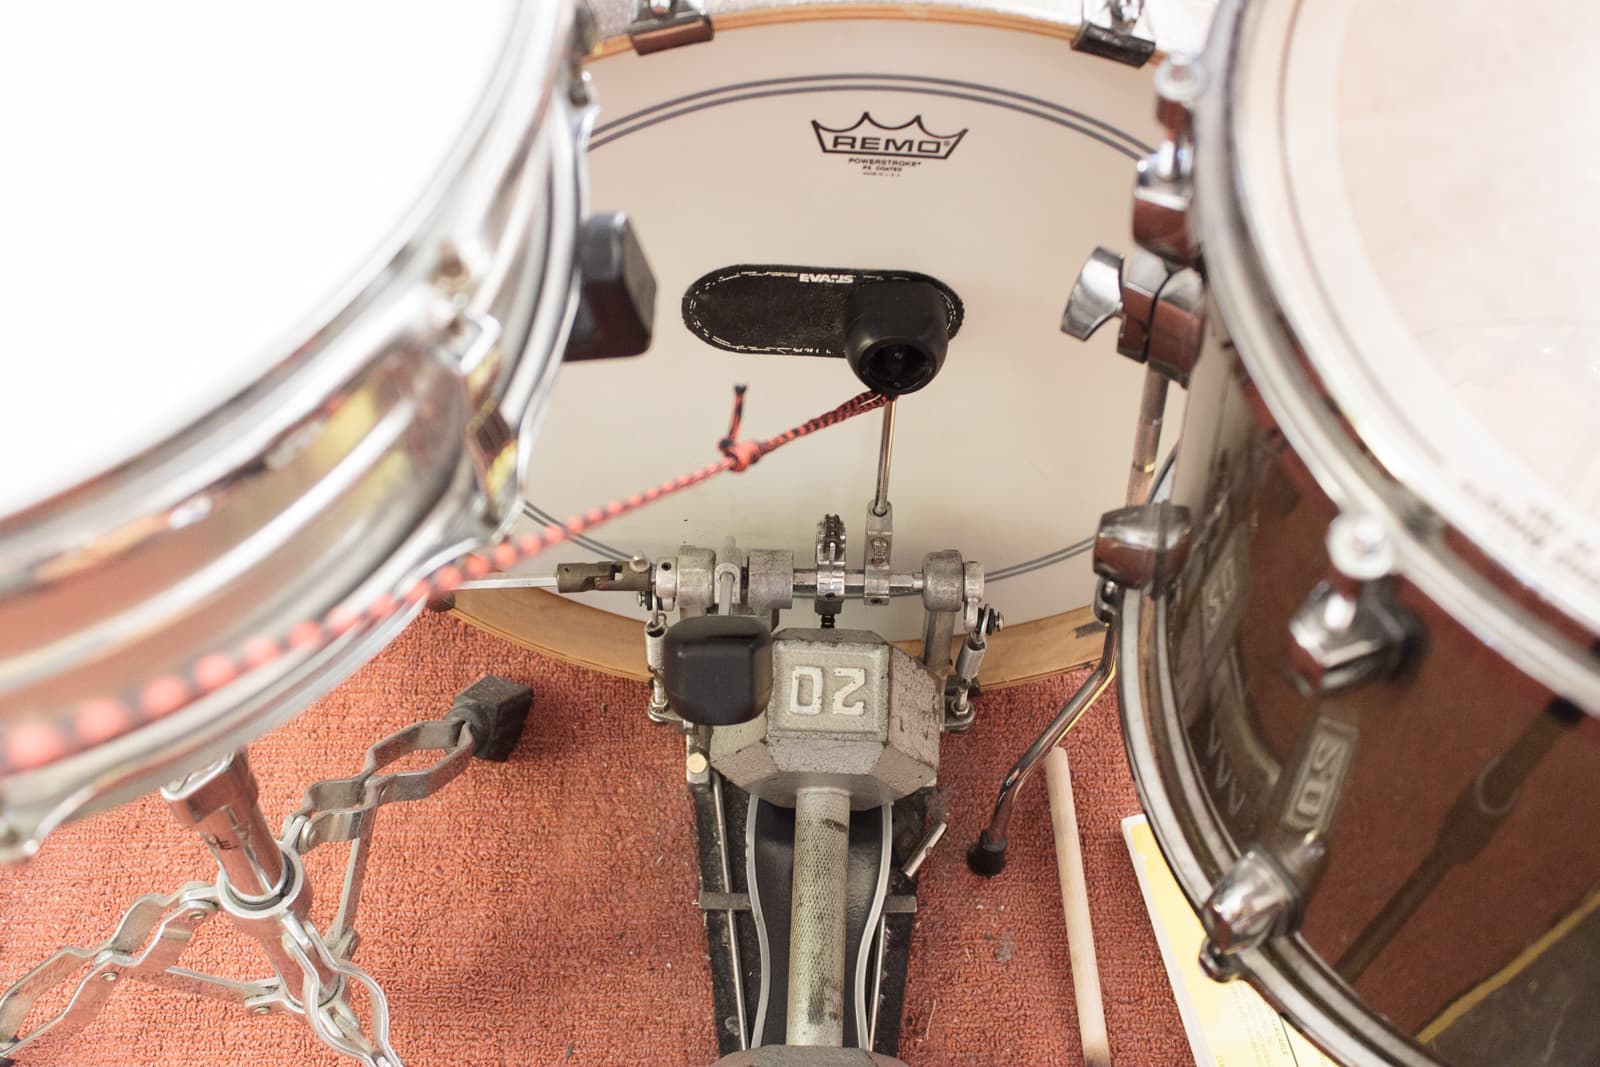
On the kick side I create a loop and once again use a Lark’s Head (These are the same knots, really… cow’s hitch, lark’s head, strap hitch, girth hitch etc…).
One the kick side it helps if your loop is adjustable. I use a Tautline hitch to create an adjustable loop. This allows you to dynamically change the length of the string to adjust your ratios as you need.
I put a 20lb weight on my kick pedal and attach the other end to that.
That’s it! Now you can find the point where you want your first mic and swing it around to find the second point! Keep that point pinched. That’s how you keep the legs equally spaced.
It takes some experimenting, but I can set this up in about 20 seconds and be placing mics. Pull it off and go. Folks think it’s magic.
Conclusion
So what have we learned? Nothing really.
There’s faults with old methods, but those old methods have sold more records than everyone reading this combined has probably. There’s new methods, but they require some learning. None of these are going to magically make your recordings better.
I hope what you take away from this is a better understanding of the tradeoffs between different methods. Once you understand how your overheads are working, you can mix with them better and supplement them with close/far mics more easily.
There’s not really any “wrong” methods. I’m simply here to educate you on how to achieve what you want. If you’re making decisions without knowing the pros and cons, that’s the only way to ‘do it wrong’.
(We also learned that I suck at 3d modeling)
Support Me!
This post took 13 hours to research, photograph, write and edit. If you appreciate the information presented then please consider joining patreon or donating!