I was asked to discuss single mic setups, so that’s what I’m doing today. I’m also going to cover some issues with using omnidirectional microphones (any microphones actually…)
Please first read:
I am going to assume that you are familiar with the methods I’m using in this article. Those topics are covered in the first 2 parts.
Contents
Omnidirectional
Imperfect Polar Plot
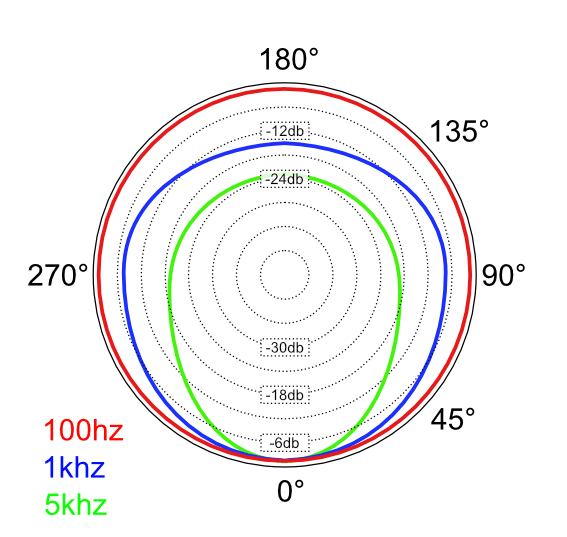
In Part 2 we covered polar plots.
I’m sure most of my readers read ‘Omnidirectional’ and you think that it picks up all sounds equally in any direction, but alas… NO. Only the very highest quality omnidirectional mics do, and even then they still have a non-linear polar response up to ~5db varying from 0° to 180°.
The image above is a somewhat worst case example. Very few omni microphones are that poor, but I’ve certainly encountered some that are.
You can see that 100hz is completely linear. 1khz has a slightly decrease on the sides, and in the back. 5khz is much more directional with a large decrease in pickup from the sides and significant loss in the back.
This is an unavoidable side effect of the fact that a microphone has a body with things attached to it. The body of the microphone, the head, the capsule mount and more all influence the incoming sound. There’s no way to have a fully omnidirectional microphone unless you had a magical spherical capsule floating in space with nothing attached to it.
This does have some affect when you are considering microphone placement angles. Even with omnis… direction can matter!
Boundary Interference
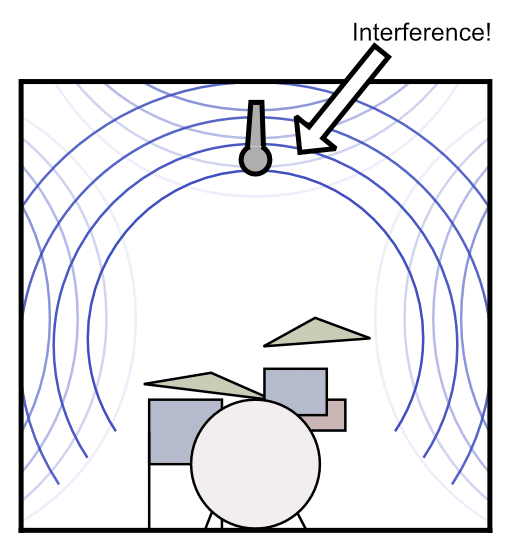
Let’s take a room. Then put something in it that eminates sound. Let’s make that thing a drumset. Now let’s visualize what happens…
(Do you like my modernist drumkit drawing? I do)
The sound radiates from the drum kit and when it hits the walls, it bounces back. The air absorbs some power, the walls absorb some things, but we still end up with these places of interference. The sound waves going away from the drumset, and the sound waves bouncing off the walls interact.
Our omni mic ends up right in the middle of this.
The net result is that the microphone picks up these sounds with the clashing soundwaves. An astute viewer will notice that there’s some areas with very clear crossovers, and yes… these exist. This phenomenon is a direct relative to room modes.
The larger the room, the more time the sound has to decrease in level (about 6db per doubling of distance). Larger rooms also have room modes that are lower in frequency. Both of these factor in to why many bedroom/hobby recordists end up with recorded sounds that have a noticable boxy (~200-400hz) sound to them. You’re a victim of these nodes and antinodes in your space.
But alas… There’s a fix! Place the mic where those nodes are not interacting as much. It’s trial and error to find these spots, but they exist.
Boundary Interference: Part 2
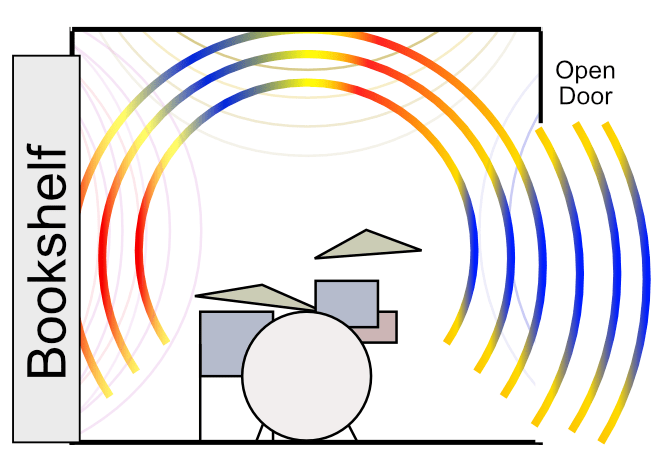
We all know that sound isn’t “just sound”. There’s various freqencies eminating from different parts of different sources that bounce off different things in different ways.
So I’ve simplified that concept. In the graphic above the colours represent different frequencies. The drumset is sending out a wide range of sound to the room.
In our slightly more realistic room we have a a bookshelf and an open door.
- The bookshelf has a bunch of uneven surfaces and small cozies that cause complex interactions between sound waves. The reflection thusly is a complex set of reflections, in our case in slightly lower volume due to the extra bouncing around and cancellations. The dominant reflection in this made-up scenario is a upper mid range reflection.
- The ceiling is unchanged. It’s a fictional thick, glossy concrete ceiling. It reflects everything evenly, but our drums primarly are projecting high frequencies upwards (the heads and cymbals project transient material in that direction). So our dominant reflections off the ceiling are high frequencies.
- We also have an open door. It simply eats sound. Since we know that a doubling in distance is a halving in volume, our reflections coming out of that room are attenuated quite a bit. I’m assuming this door exits in to a heavily furnished room, so many high frequencies are absorbed by couches and chairs. Our return is a low-volume low-frequency ‘boominess’.
Real room interactions are much more complex than this. I’ve simplified it to help you understand the concept that there’s a wide variety of sound that interacts with surfaces in complex ways.
This also means that were we place our microphone will capture these interactions.
Boundary Interference: Part 3
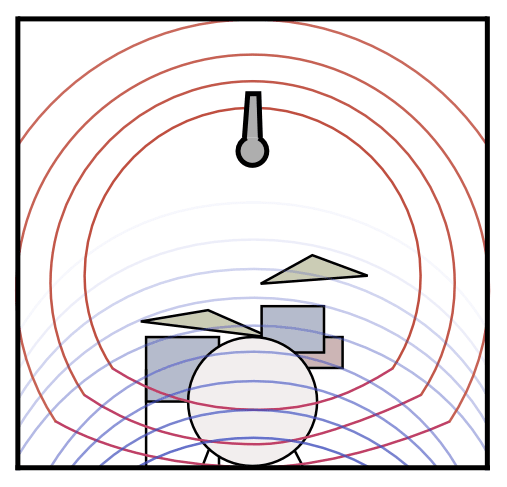
We have a problem here… Drums don’t just shoot sound up and out. Sound also goes down. This means that we always have a boundary interference effect coming up from our floor.
You can change the size of the room, the position from the walls… but you can’t easily change the fact that the drums have to be set on something. Luckily this one is somewhat intuitive to avoid: Move the mic away from the floor.
In our image above I’ve shown the soundwaves the drumset is producing in red. The reflections are coming up from the floor in blue.
The further away the microphone is from the kit, the less of these complex interactions you pick up. If you are particularly close to the drum set, which puts you close to the floor, you will pick up a lot of these complex boundary interactions with the floor. In most spaces and with most setups this gives you a recognizably boxy sound.
You may also recognize that this is the primary issue that cardioid mics have to deal with… they get to avoid most of the issues with wall/ceiling interference, a bit at least.
So if you cant put it too close, and you can’t put it too far away? Then what do you do?!
Single Mic Placement
Distance
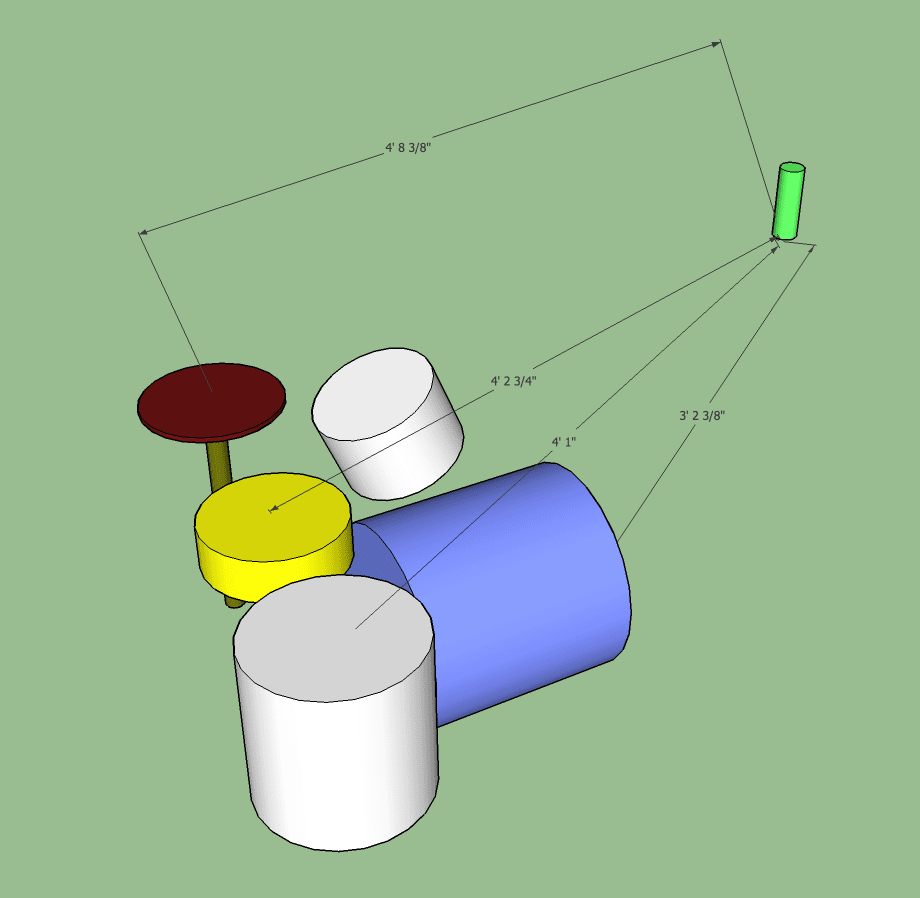
I think that it goes without say: where you place your microphone changes what you capture. If you place it close to the floor tom, it’s going to pick up the floor tom. If you place it at the snare, it’s going to pick up the snare.
The previous articles that I wrote focused heavily on the concept of distance. The idea is what when using 2 stereo mics, you wish to have certain sources on your drumkit that are time-aligned. When you use one microphone, there is no such concern. This gives you more freedom, and more freedom is scary and intimidating!
So let’s first look at the concept of distance. We’ll assume an omnidirectional microphone for now.
The main concept that you need to know: for every doubling of distance, we get a 6db drop in sound pressure level. In laymens terms: Double the distance, half the volume.
For the more technically or math inclined: we determine the ratio of change by dividing the distance of source 1 from the distance of source 2. d1/d2 = r. Then we plug that ratio in to 20log10(x). That gives us the change in volume in decibels. So if we have a mic 1m from a source, and another mic 3m from a source we find the ratio with 1/3 = 0.3333… The decrease in volume between the 2 mics is 20log10(0.333) = ~9,5db. (To anyone that knows this already, I apologize for use the word volume here… SPL is more appropriate)
Let’s look at our picture above. The Kick is about 38” from the microphone. The snare is about 50” from our microphone. We know that the snare will be picked up relatively less than the kick. The exact value is about -2.43db. (20 * log10 (38.375 / 50.75)).
The hi-hat is about 56” away from the mic. It will be picked up about -3.4db less than the kick (relatively) (20 * log10 (38.375 / 56.75)). The hi-hat will be picked up about -0.9db less than the snare (20 * log10(50.75 / 56.375)). Etc…
I think that is is somewhat intuitive: place the mic closer to things you want to increase the pickup, and further away from the things you want to attenuate.
Placement: Part 1
Now we’re getting in to the fun stuff. Distance is easy. I’m pretty sure that most 7 year olds can figure that part out within some margin of error.
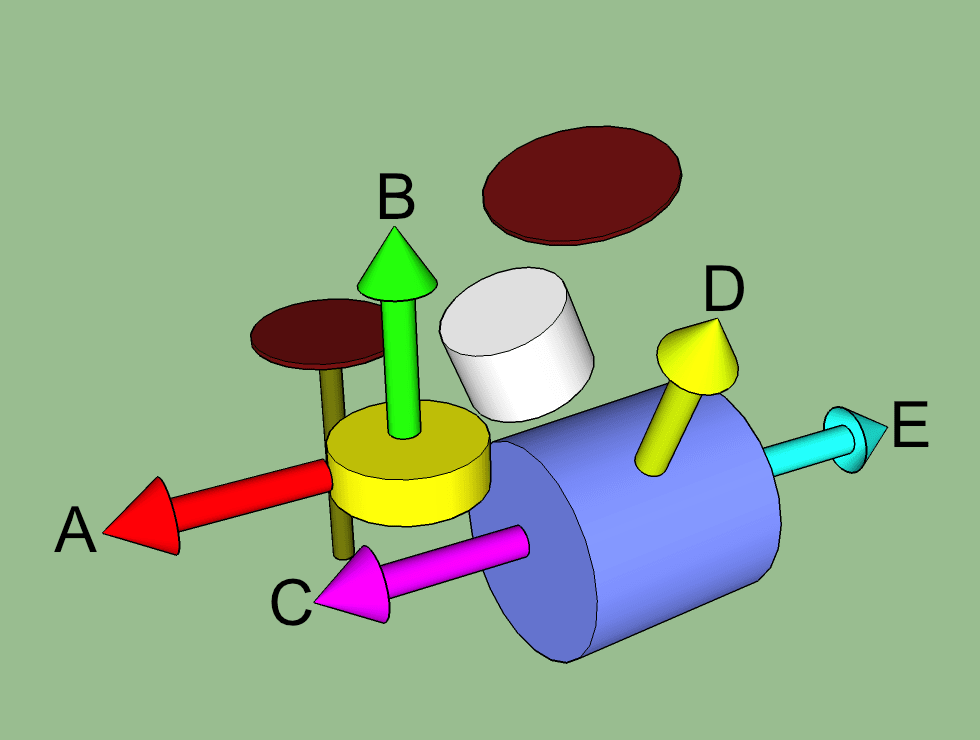
Drums don’t radiate the same sound in every direction. Let’s look at the image above.
- A Red - This is the sound coming from the shell of the snare. It’s a lot of the midrange thickness of the snare, and on some snares it imparts a great deal of ‘crack’. Some drums also let off some ring here, particularly metal shelled drums.
- B Green - The strong transient shoots upwards from the snare head. This is where you get head ring (that twangy sound) and the deep thwack of the sound.
- C Electric Violet - Kick click. Lots of snappy click. You also get to hear the drummer’s squeeky pedal and double-tapping the batter head (GRRRRRR).
- D Yellow - Midrange body. Anything that’s not click, or boom comes out this way. The shell sound lasts for only a few milliseconds after the initial attack transient, but it’s still a big part of the sound.
- E Cyan - Boom and poof. This depends on the presence and/or tuning of the batter head.
Cymbals are pretty easy. The top gives off a lot of ‘ping’. The edges give off ‘wash’.
Now it should be obvious that our microphone placement also affects the character of the sound that we pickup from each mic. Let’s explore that…
Placement: Part 2
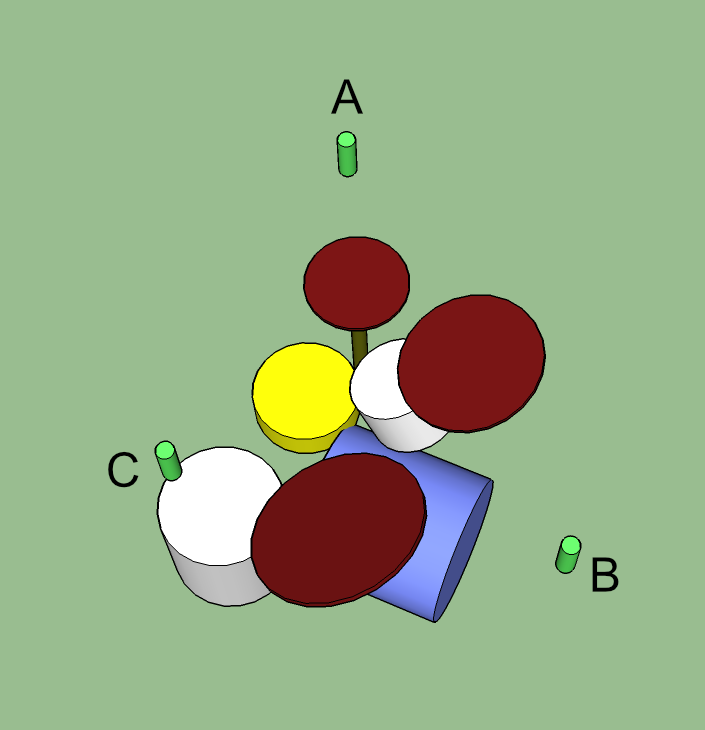
I have 3 mics here. What is happening with each mic in terms of ‘drum character’ pickup?
- A - This microphone is over the hi-hat. It’s going to pickup a lot of strong transients from the snare and rack tom. The kick will have a string snap from the batter head and a latent boominess. The mic will pick up a lot of ‘ping’ and stick attack from the cymbals since it’s overhead. Overall this will provide a very transient focused sound.
- B - The kick will have mostly boominess, with a lot less snap from the front batter head. The toms will sound ‘rounder’ with less initial transient present and more shell/resonant head sound. The cymbals will sound much washier. This is your typical “big” drum sound as most people seem to call it.
- C - This is an unorthodox placement, but effective. More hat wash, slightly less focused snare, more kick snap. The floor tom will have a dominant transient, while the rack tom will have less transient response and relatively more shell sound.
All of these setups may have some issues with volume among elements. They may have great character but not sound balanced. You can adjust this with compression or EQ as necessary. Don’t be afraid to get the character you want then adjust the levels with some creative post-processing.
Angle

Once again I’ve been assuming omni pickup. Cardioid mics have another aspect that you can take advantage of… Angle.
Please read where I explained this in another article. You need to understand how cardioid mics become directional, and how that affects the frequency response around the mic.
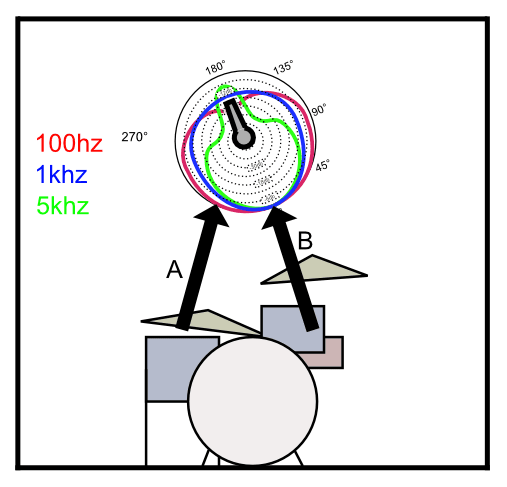
Let’s look at our image above. We have a polar plot showing the response at various frequencies. Sounds coming in from the side of the microphone have clearly reduced higher frequency response. This is demonstrated with 2 arrows:
- A - Sounds coming from the floor tom side of the kit will have high frequencies reduced. The polar plot of this microphone shows that anything coming from the side is about -12db at 5khz with our imaginary mic. That’s a lot! Our floor tom will sound very thumpy, and our ride cymbal will be very washy and dry.
- B - The snare drum and hi-hat are pulsing sound directly at the mic. The picked up sound will be similar (within the context of the microphones frequency response) for these elements. There’s no polar response influence in our imaginary microphone.
This is a powerful tone shaping tool. Is your kit too bright? Use a cardioid mic and point it away from the kick slightly. Are the hats too bright? Then move the mic closer to the hats and point the mic away from it.
The possibilities are endless. The concept that you need to take away is that you have 3 dimensions of available tone shaping simply by tilting your mic.
Conclusion
So where do you optimally put and point a single drum microphone? Where it sounds good.
I’m just trying to give you some ideas on how to do that. Just throw up a mic and listen to it. Make some notes about what you want to improve and then use this knowledge to make an educated guess about how to improve that.
Repeat the process a handful of times and when it’s good enough, get on with your life.
That is… until we talk about room vs direct sound?
Support Me!
This post took 6 hours to draw, write and edit. If you appreciate the information presented then please consider joining patreon or donating!