I often need to use drum triggers. Drum triggers are basically a type of transducer that is applied directly to a drum head. This gives you an isolated signal, without leakage from other instruments, that you can use to convert to MIDI and trigger a drum sound with a sampler.
In this post I’m going to walk you through how I do this very cheaply, and how I use the resulting trigger signal in Reaper.
YOU DON’T NEED DRUMS TO DO THIS!! You can trigger anything. A desk. A lamp. A mousepad. Your wife’s belly. A floor pad. Anything you can hit/tap/punch/stomp or impact, you can “Trigger”.
On with it!
Contents
- The Reason
- The Trigger
- The Hookup
- The Application
- The Conversion
- The Sampler
- The Creativity
- REAPERBlog video
- The Conclusion
- Support Me!
The Reason
There’s many situations where it’s necessary to either replace or reinforce (mix in the replacement with the original) the recorded sound:
- The drummer is playing very fast - The faster that a drum is played, the softer the sound. It’s simply not possible to lift the stick high enough for a strong sound and still play quickly. Replacing or reinforcing the sound gives a more powerful result while retaining the speed.
- The drums sound wrong - Sometimes the drumkit doesn’t sound appropriate for the track.
- Leakage is too extreme - There’s cases where there’s a lot of leakage from other drums in to your specific drum mic. Gating can sound unnatural sometimes, so the best action is to replace the sound entirely.
- Mix concerns - Sometimes you just need a different sound to fit in a mix.
I think that one of the big misconceptions is that triggering somehow “fixes poor playing” or lets drummers play unnaturally faster. It doesn’t. It’s just a technique that is available to improve the sound of the kit as it’s recorded.
So the question now becomes: Why use a trigger?
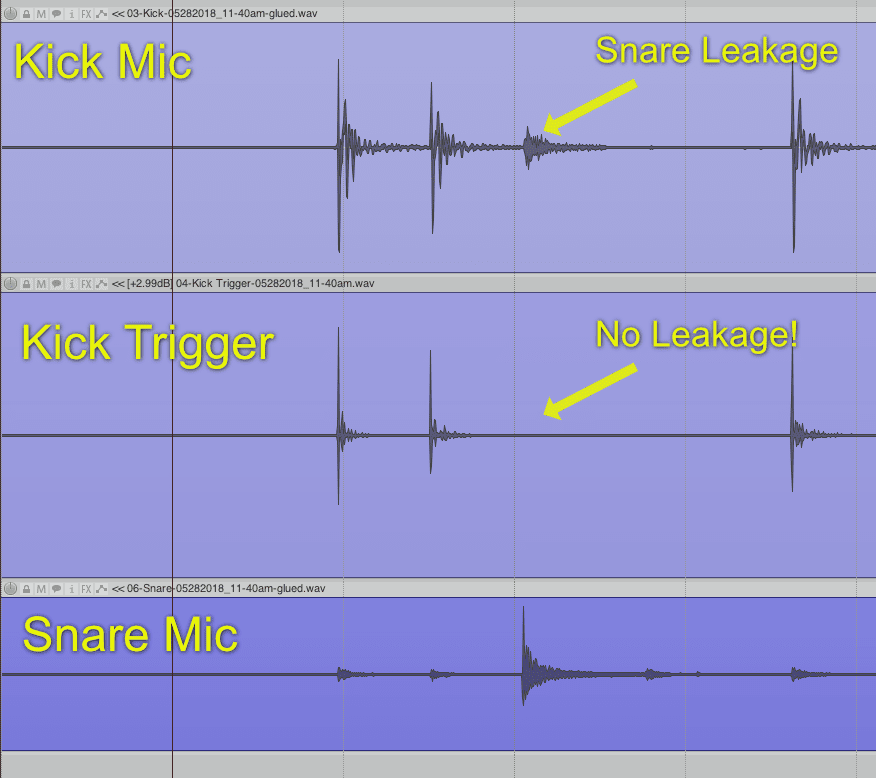
You can easily use a trigger->MIDI converter on the recorded drum sound, but then you must be careful so that leakage is not triggering your sound. If you try to trigger a snare on the recorded snare mic you might get mistriggers from the rack tom or kick drum due to leakage. That’s no good!
There are some intelligent trigger softwares like apTrigga3, Addictive Trigger, Slate Trigger and Drumagog that let you deal with leakage effectively, but why bother if you don’t need to?
Enter the drum trigger. This small electronic element goes right on the drum. There’s no leakage. You just get a spike of noise when that drum is hit, and not much else. No more leakage. No more mistriggering.
The Trigger
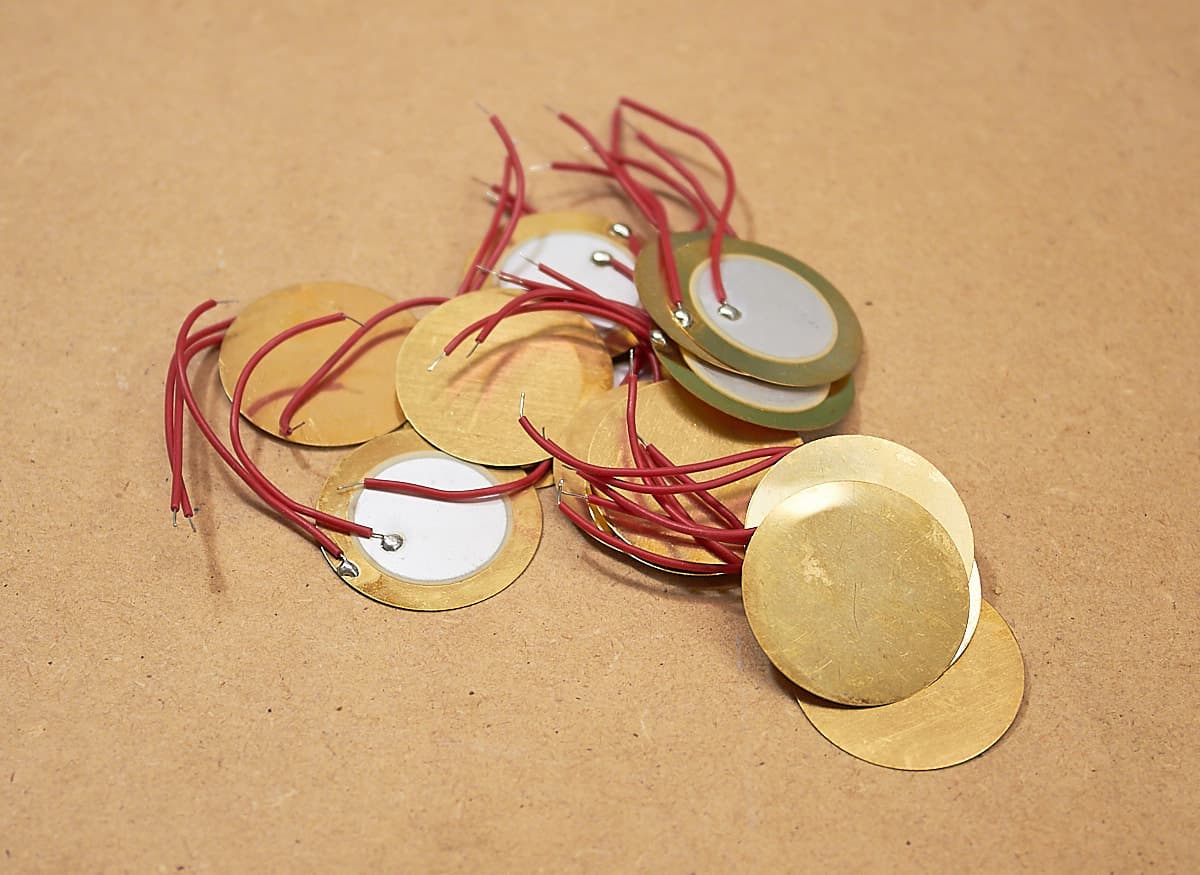
Buy yourself a piezo element or a few dozen. Sparkfun is a great company, but don’t buy these from them. Order on eBay and you can get 20 for $2usd.
I suggest something in the 1”/25mm range. It’s not critical since all we want is a spike of sound that’s isolated from other drum sounds.
The Hookup
Hooking your trigger up to a cable is ultra-mega-super simple. You don’t even need to solder.
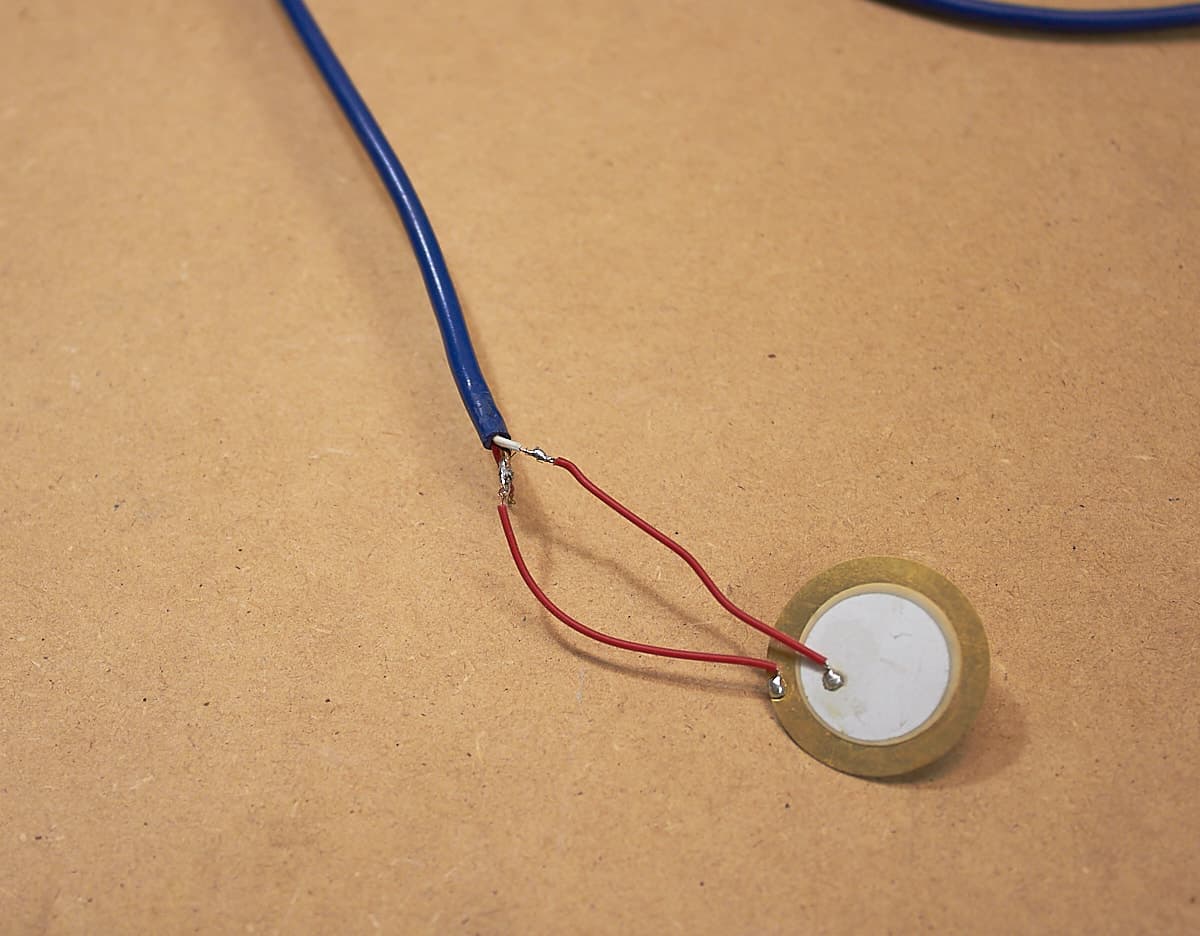
Take a 1/4”/6.35mm cable TS (tip-sleeve or “Mono” cable), slice it open so you can get to the ground and hot. Attach the piezo leads to these. One lead to one lead, and the other lead to the other lead.
You can solder it. You can twist and tape. You can super glue them. Just make sure there’s clean metal to metal contact.
Make sure the leads are electrically separated. You don’t want them touching, so insulate them with some shrink wrap tubing or tape. The image above is for illustration, as I just soldered some wire together real quick for an image.
That’s it. You’re done. It takes 45 seconds. Really. If you can twist some wire and use tape (almost any tape will work), then you can do this.
Plug your new trigger in to a DI box and then plug the DI box output to a mic preamp. You can go straight to a line-in if you want, but the DI->Mic preamp method works best.
There’s no need for fancy trigger conversion boxes. NONE. Don’t waste your time or money. If you have Reaper (or any DAW!) and can record an audio signal, then this is all you need.
The Application
Getting the trigger on your drum is an interesting predicament. If there’s a chance that you want to blend the sampled signal with your original drum, then you need to be careful not to interfere with the drum head. You have a few options:
- Place the piezo element under or between existing damping.
- Place the element on the shell of the drum.
- Place the element on the kick drum beater (for the kick drum). This one is guaranteed to destroy your trigger pretty quick, but it’s fun!
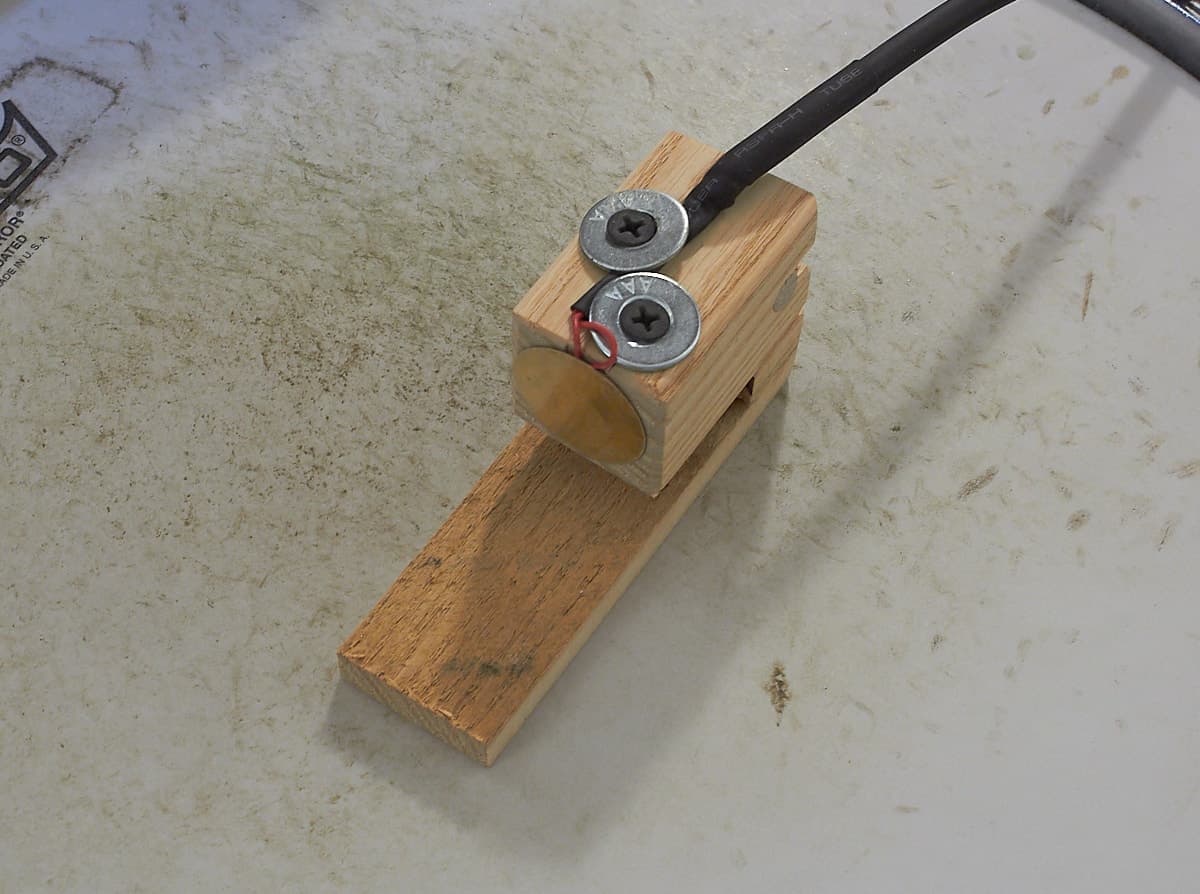
For the kick drum, which is what I’m using as an example here, I have glued a piezo element to a piece of wood. A string attaches to 2 lugs and through the wood piece. The piezo is pressed lightly on the outside edge of the kick drum head. There’s minimal change to the sound this way. I can put it on and take it off in less than a minute. It’s ugly, but it works nicely. (I have some nicer ones, but I want you to realize how easy this can be without any major tools).
You can just tape your trigger on if you want. Just get it on there.
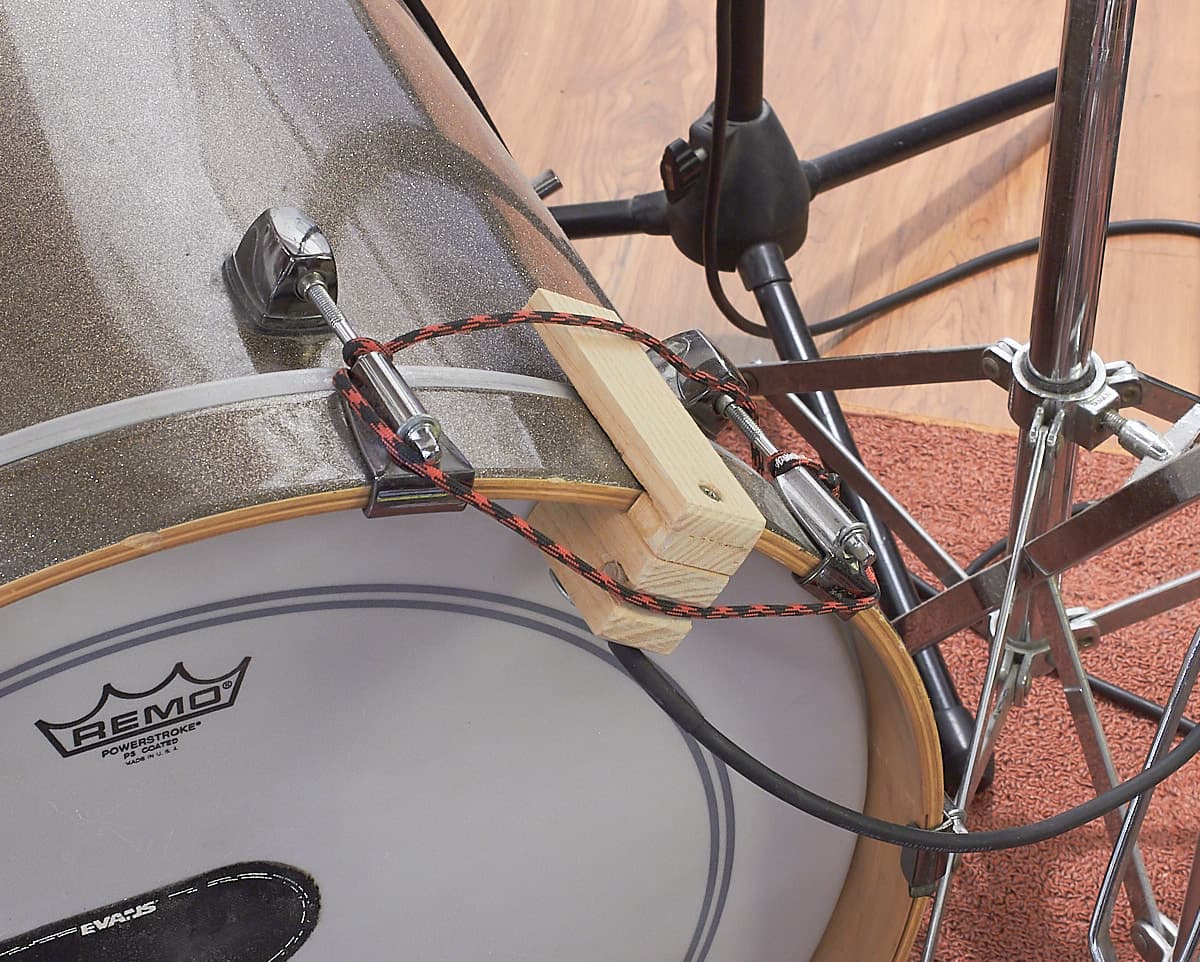
Look at my solution. It isn’t pretty, but it works fantastic. Just get it on there!
The Conversion
I am going to be using a script called Eugen Drum Trigger (beta). You can install it with reapack by searching for “Drum”. The script is called Drums to MIDI(beta version) in reapack.
The REAPER Blog has a video on some other methods and Kenny has a video on the topic as well, but Eugen’s Drum Trigger is the cat’s meow.
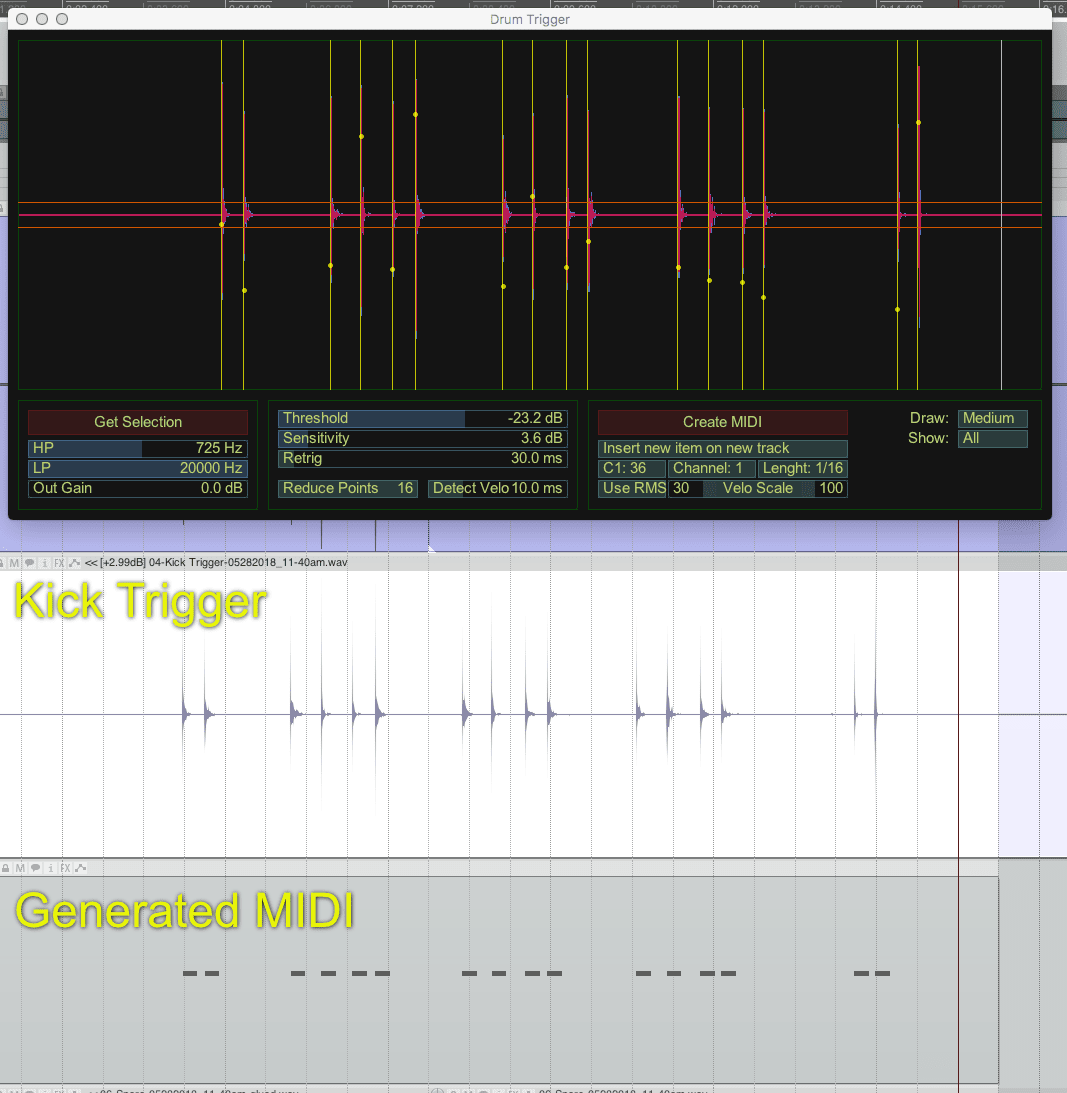
Operating this is pretty straightforward:
- Make a selection of the item and range you want to analyze
- Press the “Get Selection” button
- Adjust the Threshold, Sensitivity and Re-trigger until you’re happy
- Be aware of the HP/LP settings. It defaults with a high pass that is very aggressive. You may wish to turn this down.
- Set up the “Insert item on new track” (or whatever other option you want) along with the associated MIDI settings
- Press “Create MIDI”
A new item is created with MIDI notes that have start times corresponding to the onset of your trigger events.
The Sampler

Once you generate the MIDI, all you need to do now is take a drum synth or sampler and put it on that MIDI track. I suggest using something that has multiple samples per layer and multiple sampled velocity layers.
If you own a drum plugin like Superior Drummer, BFD or any other drum library then use that. Any sampler works. Any drum sound making plugin works. You can even trigger non-drum sounds.
You can also sample your own kick drum and process it, then load those samples in to ReaSamplOMatic5000, which is what I’ve done above.
I hit the kick drum 5 times, then processed the sound so each hit sounded decent. Then I imported the sounds in to the ReaSamplOMatic5000 “List” page from the FX/Media Bay source tab. Selected “Sort Peak” in the list window, and adjusted the velocity range of the samples.
The Creativity
You don’t need to use this on just drums! You can attach piezo elements to ANYTHING. You can make a drumset out of your desk if you want. Throw one in an old pair of shoes, one inside your mousepad and one under your keyboard rest. Now you magically have a 3 piece drumset right at your desk.
If you want to hear the drum sounds in realtime, I strongly suggest watching the REAPER Blog’s video. You can use some of those methods to trigger samples in realtime.
REAPERBlog video
Check out this video discussing a very similar topic on REAPERBlog’s youtube channel:
The Conclusion
There’s some resulting sounds. All done 100% natively in REAPER with no extra paid products.
This is a completely un-mixed drum recording (and there’s some wonderful kick-pedal squeeking in there. UGH). The only thing that changes is having no kick drum triggered sound, a mix of recorded and trigger, and just the trigger by itself. The generated MIDI track is using ReaSamplOMatic5000 with 5 kick drum samples I recorded myself from the same kick/mic.
The files are normalized to a fixed LUFS value. The difference in a mix is pretty huge.
Neat, isn’t it?
Support Me!
This post took 7 hours to photograph, write and edit. If you appreciate the information presented then please consider joining patreon or donating!