Today we’re going to learn to write ReaScript, specifically Lua.
If you’ve never programmed in your life, I’m going to try to take you from that point to your very first script with a GUI.
This isn’t a super trivial example either! This is a useful script that lets you create sidechaining via automation items.
THIS IS A LOT OF READING!. You do not need to do it all at once. Try it in sections, take a break if you need to, and come back another time. Programming takes time to learn, and time to do. Don’t force it all on yourself at once.
I’ve a video walking you through it as well. Let’s get on with it…
Contents
- Special Thanks
- Dragon - Speech to Text
- Video
- What is Reascript
- What things mean
- The Script
- Expert Tutorial
- Beginner Prerequisites
- Beginner Tutorial Part 1 - Concepts
- Beginner Tutorial Part 2 - Programming in Reaper
- Beginner Tutorial Part 3 - Writing the script
- Beginner Tutorial Part 3 - Making a GUI
- MPL’s awesome code
- More Resources
- Conclusion
- Support Me!
Special Thanks
Before we start, I want to thank Justin of Cockos. Without his surprisingly timely support this entire post wouldn’t be possible.
Thank you to Evildragon for helping proofread, I really needed it this time. :) (there is some irony here…)
Lokasenna for his GUI Library, constant contributions to the REAPER community and pleasant chats.
X-Raym and his fantastic website full of ReaScript resources and scripts for REAPER. He also helped me proofread and improve this article.
Jon @ The REAPER Blog for giving me an incredible community resource to utilize.
CFillion for his amazing work on ReaPack and a variety of important REAPER projects.
MPL for his demonstration of an advanced script that shows what REAPER is capable of and offers a more elegant solution to this use-case. Check out the Reaper Script Showcase to see many more of his amazing scripts. (Many of them replicate features from other DAWs that are paid add-ons, but he does it better!)
Dragon - Speech to Text
This entire post, including the code, was written using Dragon for Mac v6.
I have developed a number of vocalizations that allow me to create common programming syntax, plus I have a number of snippets that I used in Visual Studio Code.
I normally write my blog posts in emacs, however Dragon does not like typing words into Emacs. I have had a good deal of luck using VS code, however there are occasionally some issues
If you have ever wondered how well the speech to text software works, like Dragon, then let this be a demonstration. I have been using Dragon for nearly all of my text for the last week now and it has been incredibly accurate. I can edit the vocabulary and create custom commands that let me do nearly anything I want.
I was even able to feed it a number of my blog posts to start out, and it built a vocabulary based on things that I commonly write. Thusly I could write things like REAPER, Cubase, VST or FLStudio without ever having to train the software.
Due to the amount of pain that I have had in my arm and my hand this has been an incredible addition to my software arsenal. if you have ever been curious about speech to text software I can wholeheartedly recommend Dragon. It does require some set up, and you will need to spend some time adding the commands you need, but out-of-the-box it does an amazing job of voice recognition without any training or any set up.
Without Dragon, I do not think I would have been able to write this post at all, or it would have taken me literally weeks due to number of long pauses I would have to take while typing.
Video
This entire lesson (mostly) is available on youtube as a ~39 minute produced video (not just rambling while someone fumbles around).
What is Reascript
ReaScript is a generalized word that refers to miniature programs that can control REAPER. There are various computer programming languages that can be used to do this: Python, Lua and EEL.
There is also an API for C.
In this tutorial we will be using Lua to create a script that creates new automation items in the envelope lane that correspond to edits in media items. This will become more clear as I show the results of the script.
Don’t fear, I will be leading you through everything as if you have no clue how to program or how to use REAPER.
What things mean
this is code- code is like this- “variable” - when I refer to a variable in the code, it will be in double quotes.
I also put REAPER shortcuts inside of these. It should be clear when something is a shortcut, or if it’s code.
The Script
“Sidechaining” is a a techinque people use for having the content of one track affect another. You’ll have a transient item like a kick drum, and a non-transient item like a bass that occupy the same sonic space. You want the bass to be turned down for a short period of time when the kick hits. This lets the kick be full sounding without clashing with the bass sound.
REAPER has a concept called automation items. These are items that encapsulate automation so that you can:
- Move the automation around and apply transformations to it (such as changing the shape) independently
- “Pool” automation items. This allows you to have encapsulated automation anywhere in your project that is mirrored. If you change one of the items, all of the other items change the exact same.
- These pooled items can be anywhere on an automation envelope. You can have pooled items on pan, volume, VST effect etc… all at the same time, and they all have the same data.
This script requires that you’ve split your audio part (using the menu item “View->Dynamic split”).
When the item is split, you will have new items that have the start of the item right at the transient.
Our script will get all of the items on the selected track then create new automation items on the selected envelope. The automation items will have matching start times to the items, and a configurable length.
This setup allows you to edit the automation items to have a custom shape to sidechain whatever you want. It also alllows you to individually shift parts, or shift all of the automation items at once.
Expert Tutorial
Here’s the things that you need:
- ReaPack
- SWS
- Lokasenna’s GUI library v2 for Lua - Install via ReaPack
- Lokasenna’s GUI library v2 for Lua (developer tools) - Install via ReaPack
- Script: Set Lokasenna_GUI v2 library path.lua - this must be run before any of the GUI Library
In order to find the documentation for REAPER, open REAPER then goto the menu “Help->ReaScript Documentation”. Better yet, go here for better formatted documentation.
You can edit code in any editor you want like vim, emacs, Intellij, Sublime Text and…
Lokasenna has some fantastic extensions for VS Code that give you a bunch of snippets, highlighting and API documentation inline.
Jump to the GUI section to see how GUIs are done. There are a few other GUI Widget libraries, but Lokasennas is the most complete that I’m aware of. You can also find a number of examples insides your Reaper Scripts/ReaTeam Scripts/Development/Lokasenna_GUI v2/Developer Tools/Examples and Templates directory. (also available on github)
There is some digging you may need to do in order to understand how to use some functions, but general it’s only a cycle of two of feeding a function some garbage data to get an error message and be pointed in the right direction.
Beginner Prerequisites
In order to be able to do this there are two things that you will need, you will need Reapack and you will need SWS.
SWS
REAPER’s bare functionality is lacking sometimes. There’s a bunch of functions that can be added to REAPER that are necessary for certain scripts, or necessary for bare functionality.
SWS Extensions provides a great deal of extra capability to REAPER and it acts as a library to give the programmer extra functions to use. These functions are automatically added to the ReaScript Docs.
Once it is installed you will see a new menu in REAPER named “Extensions”. If you do not see that window, then please utilize google and the REAPER forums to see what you may have done wrong.
Reapack
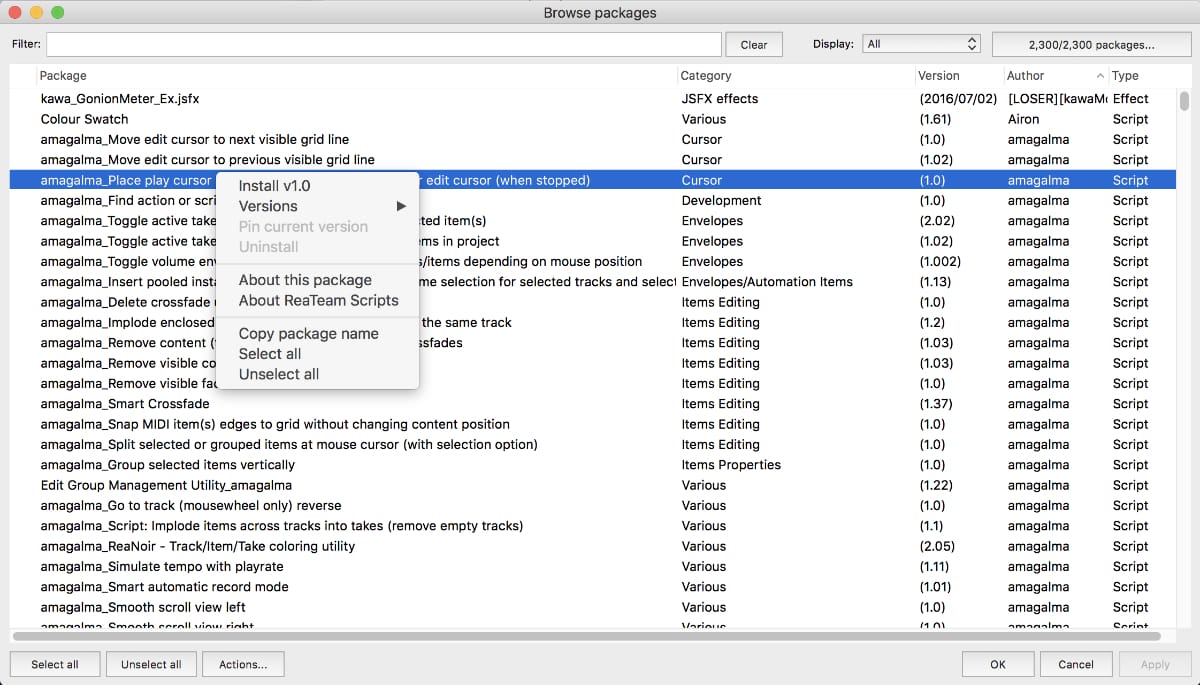
ReaPack allows you to install Libraries and other people’s scripts.
Follow the directions to install it.
Once it is installed you will see a menu inside “Extensions” named “ReaPack”. Click “Browse packages” to see the window above.
Using ReaPack
Installing with ReaPack is slightly tricky. You right click a package and select “Install”, but that does not install the package. You need to select the packages to install then hit “apply”.
Explore the interface and see what else you can do with it.
Beginner Tutorial Part 1 - Concepts
Before we start actually writing some code let’s go over some basics of programming. I’m going to assume that you have never programmed in your life, and that you can just barely operate REAPER.
This tutorial is only written in the context of Lua for REAPER. Some of these concepts don’t apply necessarily to other languages.
You will need to read this tutorial at least twice if you are a total beginner. The concepts presented won’t make much sense until you see them in action, then you will need to go back and read about the concepts again and see them in action again.
You can try all of the examples here by going to repl.it, pasting the code and hitting the “run” button.
As the tutorial progresses, you will learn to use REAPER for this task.
If you do not understand the first time then please make sure to read the entire thing all the way through at least twice
Variables - Storing things
Computer software generally deals with two things: doing things to data, and dealing with events generated by outside sources like users.
When your program encounters new data then it needs to store it somewhere, and you need a way to reference that data sometime in the future.
You will also sometimes need to create your own data that is included in the software (such as pre-defined settings for your script), and you will want to reference this data by some sort of name.
This is what variables allow you to do: store data, and then refer to it at some other point in time by a name.
Let’s look at some code:
a = 1
In that line we declare a variable named “a”, and it is assigned a value of one. Anywhere we use the letter “a” it will be just like using the number one. So let’s look at that more.
1
2
3
a = 1
b = 2
c = a + b
I assume that you can guess what the value of “c” is.
Variables in Lua can store any data that we want. It can be words, they can be numbers, and variables can even hold things like functions.
So when there is some data that you want to save and refer to later, then you assign it to a variable.
Types - What things are
Data comes in a variety of types. This data can be numbers, strings (words), functions and other types of data that were not going to worry about right now.
(“String” is just a fancy word for alphanumeric characters that don’t explicitly reference numbers or other data.)
You can assign any type of data to any variable in Lua, however sometimes you will need to use a specific type of data such as a number or a string.
nil is a special type of data in Lua. It simply means, “nothing at all”. It is also read as a “false” value, which you well learn later.
We will only be working with numbers, strings and nil in this (explicitly at least. The only things you will need to know are how to convert between strings and numbers.)
Tables - Storing many things
Lua has a concept called tables, which is how you can store many things in a single variable.
1
2
3
numbers = {"one", "two", "four", "three"}

a = numbers[1]
The variable “numbers” is storing four strings.
If we want to access one of them then we use the variables name, and square brackets with the index of the value we wish to use. So “numbers[1]” will get the first thing in our table.
I’m assuming that you can guess what “numbers[3]” will return, right? Be careful and look closely!
When we want to process an entire table, item by item, then we use loops.
Functions - Doing things
In Lua for REAPER your entire script will be put inside what is called a function named “main()”. This is not necessary, but it is a tidier way to work.
Functions are how you do things. A function will contain variable assignments, loops, conditionals and calls to other functions. Let’s look at what a function looks like:
1
2
3
4
5
function add_a_and_b()
    a = 1
    b = 2
    c = a + b
end
In this function we assigned two variables, then assigned a third variable which was the addition of the first two variables.
Lua understands what belongs to the function due to the end statement. Code is read more often than it is written, so we try to make this easier by indenting the things that belong to the function. As you can see, this makes it more obvious what things are “inside of the function”. Indentation is actually a complex topic(!!??), the only thing that is really important is that you are consistent with your style.
If we wanted to use this function, then we need to “call it”. When you call a function then the program jumps to that section of code and does everything inside that function block. Let’s see what that looks like:
1
2
3
4
5
6
7
function add_a_and_b()
    a = 1
    b = 2
    c = a + b
end

add_a_and_b()
The line with function doesn’t do anything but declare the function as something that exists. If we want to use the function then we need to write add_a_and_b().
That is not very useful though. We will want the function to interact with the outside world. It will need to take in its own data, and produce new data.
To give data to a function we use a feature called “arguments”.
1
2
3
4
5
function add(a, b)
    c = a + b
end

add(1, 2)
We no longer need to assign A and B to variables. When we call the function with add(1, 2) we are telling it that we want A to equal 1 and B to equal 2. Look at where we declare the function and where we call the function.
We are still missing a piece here though. If we send data to a function then it would stand to reason that we would also want to sometimes get data back from a function. There is a special word we use, return. Let’s see that in action…
1
2
3
4
5
6
function add(a, b)
    c = a + b
    return c
end

print(add(1, 2))
When the function is called then we add “a” and “b”, assign it to “c and then we return c. That means that we can call the function, and immediately assign the result of the function to another variable.
Remember, the line with function only says ‘Here I am!’. The line print(add(1, 2)) is where the function is called, and there are 2 things happening:
- Things are processed from the most inner-most (). So this means that
add(1, 2)is processed.add(1, 2)returns a value of 3.
- Now
print()is called. It sees a value of 3, and it prints that.
Where did print() come from though? This is a function built-in to Lua that lets us print things to the screen. It’s not something that we use in ReaScripts, but while we are learning the the basic of Lua it’s perfect. You will learn REAPER’s equivalent of the print() statement later
Comments - Annotating things
Programming is not just about writing code, but about reading it as well.
In order to write a line that is not interpreted as code then place two hyphens in front of it.
1
-- This is a comment
If you want to have a comment that spans multiple lines then each line needs to have two hyphens in front of it or you can use this syntax:
1
2
3
4
--[[
    Everything here
    Is a comment
]]--
Comments aren’t just for writing notes for yourself, or for somebody who might read your code. Comments can be used to temporarily disable parts of your code. If you have a portion of code that is no longer needed, or if you want to disable something so that you can test something, then use comments.
1
2
3
4
5
6
7
8
9
10
11
12
13
14
--[[
    function add(a, b)
        c = a + b
        return c
    end

    result = add(1, 2)

    None of this does anything! It's all a comment.
]]--

-- c = 1 + 2
-- that last line was a comment too.
-- there is no working code here at all!
Scope - Seeing things
Imagine for a moment that you are making a script in REAPER that deals with moving items around. Often you will want to store the position of an item inside of a function. You may have many functions that move items around or store the position of an item.
So you may want to use a variable named “item_position”. That’s great, but if function “a()” uses “item_position” and function “b()” uses “item_position”, but the two functions need to store different values then what happens?
If you simply declare a variable in Lua, then it is visible to the entire program. If you want a variable to only be seen by the enclosing block (such as a function, conditional, loops, etc… almost anything with an ‘end’) then you need to put the word “local” in front of it.
Let’s try this:
1
2
3
4
5
6
7
8
9
10
11
a = 1
b = 2

function global_test()
    c = a + b
    print(c)
end

global_test()

print(c)
This is a slightly tricky one. The function global_test() can see the variables “a” and “b” because they are what is called ‘global’. Any function can see them, and any function can change them.
The trick here is that even though “c” is declared inside a function, it is also able to be seen from outside the function!
Let’s try to make “c” only visible to the function global_test().
1
2
3
4
5
6
7
8
9
10
11
a = 1
b = 2

function global_test()
    local c = a + b
    print(c)
end

global_test()

print(c)
The first print(c) statement works, but the one at the end gives us a nil value. The local word makes it so that “c” is only visible inside of the function global_test().
This is a very important concept to understand! When in doubt, make your variable local.
Scope in Lua can be confusing for even experienced programmers, so don’t get discouraged if you find variables with the wrong value or you get some errors about a variable not existing. local is your friend and it will guide you through the darkness.
Conditionals - What if?
Often when programming you need to make choices, and the if statement is what allows you to do that, so let’s just go ahead and try an if statement:
1
2
3
4
5
a = math.random(5)

if a == 1 then
    print(a)
end
math.random(5) generates a number between one and five, then assign that value to “a”. This is another function built-in to Lua.
Now we use the if statement, and then compare “a” to 1. This is done using ==. == takes the two values to the left and right of it, compares them, and returns true or false.
Be careful! == is for comparing things. = is for assigning things. If you use = in your if statement then you may be surprised with an error (thankfully Lua gives an error… other languages will let you assign things in an if statement, a frequent source of confusion)
The if statement executes the stuff inside of it if the condition is true. == isn’t the only thing you can use though, there are other comparison operators…
1
2
3
4
5
a = math.random(5)

if a < 3 then
    print(a)
end
This code will print “a” if it is less than 3. There’s a number of ways to compare things:
- < less than
- > greater than
- <= less than OR equal to
- >= greater than or equal to
- == equal to
- ~= not equal to
Sometimes your code will need to test two different things before it does something, so LUA has the operators and and or (also not is available):
1
2
3
4
5
6
7
a = math.random(5)
b = math.random(5)

if a > 3 and b < 5 then
    print(a)
    print(b)
end
This code will only print “a” and print “b” if “a” is greater than 3 and “b” is less than 5. (note: repl.it always gives the same random values… so your code may never work correctly depending on the output! See if you can figure out how to make this code work by utilizing scope and print statements)
Occasionally you will need to do one thing if a value is something, or do another thing if that the value is something else. This is where else comes in.
1
2
3
4
5
6
7
a = math.random(5)

if a < 3 then
    print("less than 3")
else
    print("greater than 3")
end
Other times you may need to test the value for something else. This is where you use elseif, which can be combined with else like this…:
1
2
3
4
5
6
7
8
9
a = math.random(5)

if a < 3 then
    print("less than 3")
elseif a == 3 then
    print("exactly 3")
else
    print("greater than 3")
end
This code should be pretty self-explanatory. Note that elseif needs a new comparison, and else does not. else happens if no other comparisons are true, so it exists on its own.
Try some if, elseif and else statements yourself to get a feel for it.
Loops - Repeating things
When programming you will frequently need to do things multiple times, or process a bunch of items one after the other in the same way. Loops are how you do this.
Let’s try a simple loop in LUA:
1
2
3
4
5
numbers = {"one", "two", "three", "four"}

for index = 1, 4 do
  print(numbers[index])
end
The for statement declares a local variable, in this case named “index”. Then it executes the code inside the for block.
When it is done it goes back and increases the value of index by one, so now it’d be doing print(numbers[2]). This increases until “index” is 4, and the loop stops.
What if we only wanted to print every other value?
1
2
3
4
5
numbers = {"one", "two", "three", "four"}

for index = 1, 4, 2 do
  print(numbers[index])
end
Here we have added a third number to our statement, “2”. This tells the for loop to increment index by two every time it loops.
Lua has another way of looping, but it will not be necessary for this tutorial. I will show you anyways, if this is confusing then you can ignore it for the context of this article.
1
2
3
4
5
numbers = {"one", "two", "three", "four"}

for key, value in pairs(numbers) do
  print(key, value)
end
Tables in Lua are what is called associative arrays. Each slot is two values, the key and the value.
So far we have been using keys that correspond to the “index”, or position in the table, and the value associated with that index.
When using a for loop in Lua you can extract the key and the value using the format above. Lua will go through every single key and value pair then print the key and the value. (But it does not loop in order if we use pairs(). That is outside the context of this tutorial! It also does not matter for us.)
Give it a try!
Perhaps this example will make it more clear…
1
2
3
4
5
numbers = {["one"] = "eins", ["two"] = "zwei", ["three"] = "drei", ["four"] = "vier"}

for key, value in pairs(numbers) do
  print(key, value)
end
You can ignore those square brackets in the “numbers” declaration for now, that’s just a weird thing about Lua.
However if you run this code you will see that the keys are a string and the values are a string. Anything can be a key and anything can be a value, and that is how you iterate over them.
Libraries - Using other people’s functions
Most programmers want to write as little code as possible, and they want the code to be as correct as possible.
One way of achieving the first part, and hopefully the second part is to use somebody else’s code. people will put all their code together in a file and distribute it as what is called a “library”.
What we will be using is called a “module” in Lua.
This lets us take somebody else’s code, imported into ours, and then use the functions from the other person’s code.
We will be using this concept to take somebody’s GUI functions so that we can draw a GUI easily without having to write all the annoying code.
This is done like this for the code that we will be writing:
loadfile("filename.lua")()
But you don’t need to worry about that, because the GUI builder that we will be using automatically generates this code.
You can learn more about loading modules right here, but the concept that we use is loading files.
In Lua it is possible to load libraries from other people using the “module” concept, or we can take an entire file or a string that contains a Lua code and import that into our project.
In this tutorial we will copy and paste the code into our file.
Beginner Tutorial Part 2 - Programming in Reaper
If you are truly a beginner, I suspect you probably didn’t fully comprehend everything that I just covered, and that is totally fine.
It is now time to actually do some stuff in reaper.
How to try code
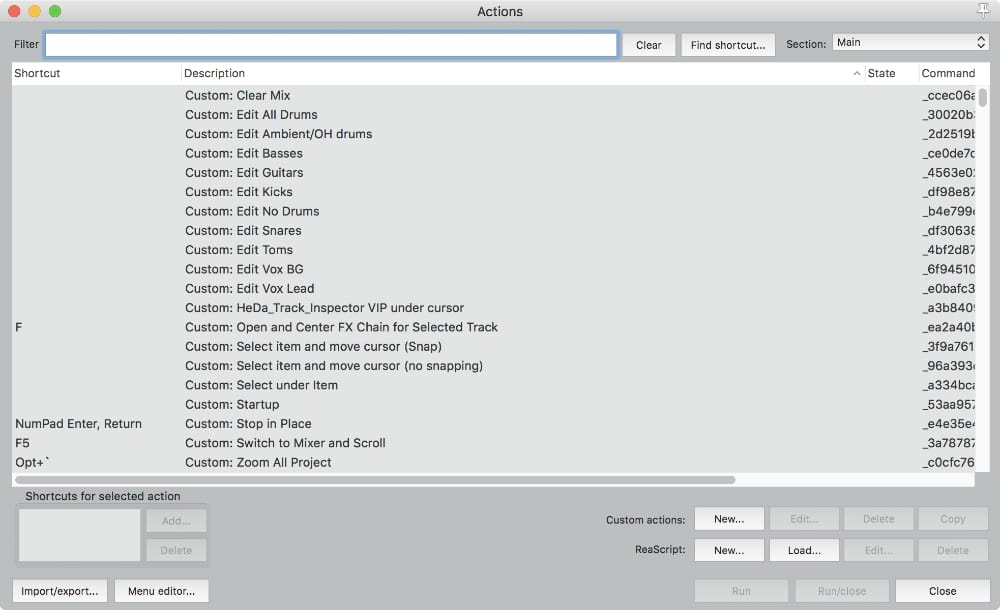
The first thing you need to do is press shift-/ or just ?. This brings up the action list.
Click the button next to ReaScript that says new, and then save the file wherever you want.
Editing code
This is where you edit code. Let’s go ahead and try something simple:
1
reaper.ShowConsoleMsg("Hello AdmiralBumblebee")
Save the file by pressing ctrl-s on Linux and Windows, or command-s on macOS.
Now you are presented with a box saying hello to me.
If you want to get back to your code after closing that window, then go back to the actions list by pressing ?, searching for the name of your script, selecting your script, then clicking edit in the lower right-hand corner.
If you prefer to edit your code in another program you can do that. REAPER will pick up changes as the file is saved.
Where to find information
Let’s look at that command we used again reaper.ShowConsoleMsg(). How did I figure out that this command exists?
In REAPER go to the help menu and select “ReaScript Documentation”.
This will open a window in your web browser with a bunch of documentation. Alternatively you can use this nicely formatted documentation.
When inside your browser press ctrl-f (win/lin) or cmd-f (mac) to bring up the search and enter “ShowConsoleMsg”.
Now you will see the documentation for `reaper.ShowConsoleMsg() with information for C, EEL, Lua and Python.
How to interpret that page
In order to use these functions we need to understand what all this mess of text means. So let’s take the ShowMessageBox(). Open the documentation and find this function by using the search feature in your browser.
The Lua line looks like this Lua: integer reaper.ShowMessageBox(string msg, string title, integer type)
So let’s break this down piece by piece:
- “Lua:” - this tells us that this is the definition of the function for Lua
integer- as we discussed before in the functions section, functions can often return data to the thing that called to the function. The word integer tells us that theShowConsoleMsg()function returns an integer, or a number.- “ret 1=OK,2=CANCEL,3=ABORT,4=RETRY,5=IGNORE,6=YES,7=NO” - if you look below at the integer type argument in the function, then you can see that there are multiple types of windows we can create with different types of buttons.
ShowMessageBox()will return a numeric value that corresponds to which button the user pressed. Based on that information we can proceed in our code likely by using a conditional
- “ret 1=OK,2=CANCEL,3=ABORT,4=RETRY,5=IGNORE,6=YES,7=NO” - if you look below at the integer type argument in the function, then you can see that there are multiple types of windows we can create with different types of buttons.
reaper.ShowMessageBox(- all functions for Lua are preceded by the word reaper, followed by the name of the function. I’ve seen this as a common mistake for beginners where they forget to put the word reaper in front of functions provided by reaper.string msg, string title, integer type)- once again as discussed in the functions section, function sometimes need to take data from outside. this function takes a string, another string and an integer. we do not need to provide all of these, as you can see above that we only provide a string initially.string msg- this is the message that is shownstring title- this will change the title of the window that is showing the messageinteger type- in the documentation we see “type 0=OK,1=OKCANCEL,2=ABORTRETRYIGNORE,3=YESNOCANCEL,4=YESNO,5=RETRYCANCEL”, so if for instance we provided the number 2, then we would get a window with aboart, retry and ignore buttons.
This may seem like a lot of information to process at first, but as you are looking for functions that do what you need it will become more obvious what the return values and arguments need to be.
If all else fails, then you just need to experiment… the documentation is not that great.
Beginner Tutorial Part 3 - Writing the script
Alright it’s time to write the script. Let’s just dig right in.
Get information
The first thing our script needs to do is get some information, it needs to know the track and the envelope that we wish to affect.
So what were going to start with is to get the select the track and the selected envelope.
Open up your REAPER documentation and search for “getselected”. You’ll see some options and look until you find these:
Lua: MediaTrack reaper.GetSelectedTrack(ReaProject proj, integer seltrackidx)
Lua: TrackEnvelope reaper.GetSelectedEnvelope(ReaProject proj)
We are always going to pass a value of 0 for ReaProject proj. That means that we wish to affect the current project and not something in the background.
reaper.GetSelectedTrack(ReaProject proj, integer seltrackidx) has a value named “seltrackidx”. Since you can select multiple tracks in reaper, ReaScript needs to know which of the selected tracks you wish to grab, and we will always grab the first selected track, which has an index value of 0.
So in our code will look like this:
1
2
sel_track = reaper.GetSelectedTrack(0, 0)
sel_env = reaper.GetSelectedEnvelope( 0 )
Now the value “sel_track” contains data of the type MediaTrack. So when we want to use another function that is expecting MediaTrack we can pass “sel_track” to it.
The same goes for “sel_env”, which now has a TrackEnvelope stored inside of it.
Safety
Before we do anything with “sel_track” or “sel_env” we need to make sure that it exists. If we try to use a value that does not exist then we will get an error. So let’s make sure were careful about this
1
2
3
4
5
6
7
8
9
10
11
12
13
14
15
sel_track = reaper.GetSelectedTrack(0, 0)
sel_env = reaper.GetSelectedEnvelope( 0 )

if sel_track then
    -- do things to the track
else
    reaper.ShowMessageBox("Please select a track!", "Error", 0)
end


if sel_env then
    -- do things to the envelope.
else
    reaper.ShowMessageBox("Please select an envelope!", "Error", 0)
end
Go ahead and test this code.
Since we can identify two different things that we are doing separately, let’s put these things into functions so that we can reuse them easily.
1
2
3
4
5
6
7
8
9
10
11
12
13
function get_track()
    sel_track = reaper.GetSelectedTrack(0, 0)
    if not sel_track then
        reaper.ShowMessageBox("Please select a track!", "Error", 0)
    end
end

function get_envelope()
    sel_env = reaper.GetSelectedEnvelope( 0 )
    if not sel_env then
        reaper.ShowMessageBox("Please select an envelope!", "Error", 0)
    end
end
We put all of the code for getting a track and getting an envelope into their own functions. If we need to get the track or get the function multiple times when we do not need to rewrite this code we just call the function.
Note that the values of “sel_track” and “sel_env” are not local. That means that other functions in the program can see these variables. This will be important later.
This is generally not good programming practice, but for the simplicity of this tutorial and how simple the script is, we will be totally fine using these global variables.
Looping over items
The script that we are writing requires that the user has split the items at transients. This means the track will contain many media items that start at a transient.
We want to place an automation item on the selected envelope that corresponds to the start of every media on the selected track.
In order to do this we need to be able to get a table of all the media items, and then loop over all of those items.
Let’s add a new function called “main()” that uses get_track() to get all of the media items on that track.
1
2
3
4
5
6
7
8
9
10
11
12
13
14
15
16
17
18
19
20
21
22
23
24
25
26
27
28
29
30
31
32
33
34
35
function main()
    get_track()
    get_envelope()

    reaper.Main_OnCommandEx(40297, 0 , 0)
    reaper.SetTrackSelected(sel_track, true)
    reaper.Main_OnCommandEx(40421, 0 , 0)

    local item_count = reaper.CountSelectedMediaItems(0)

    for i=0, item_count - 1 do

        local sel_item = reaper.GetSelectedMediaItem( 0, i )

        local i_pos = reaper.GetMediaItemInfo_Value( sel_item, "D_POSITION" )

        reaper.ShowConsoleMsg(i_pos .. "\n")
    end
end

function get_track()
    sel_track = reaper.GetSelectedTrack(0, 0)
    if not sel_track then
        reaper.ShowMessageBox("Please select a track!", "Error", 0)
    end
end

function get_envelope()
    sel_env = reaper.GetSelectedEnvelope( 0 )
    if not sel_env then
        reaper.ShowMessageBox("Please select an envelope!", "Error", 0)
    end
end

main()
So here is what happens in the main function:
- We want to select all of the items on the track, but what if the user has many tracks selected? We must make sure that no tracks are selected with
reaper.Main_OnCommandEx(40297, 0 , 0).- Then we select our desired track with
reaper.SetTrackSelected(sel_track, true).
- Then we select our desired track with
- We call
reaper.Main_OnCommandEx(40421, 0 , 0). This executes the action “Item: Select all items in track”. This will ensure that we have items selected if there are any. - Now we get the number of items that are selected with
reaper.CountSelectedMediaItems(0)then assign that to a local variable named item_count - We create a for loop that goes from 0 to the size of item_count minus one. This is because in REAPER, values start at 0 (in Lua things start at 1, so we need to be explicit about what we want!).
- Inside of the loop we create a variable named “sel_item”. This will contain a
MediaItemtype value that comes fromreaper.GetSelectedMediaItem( 0, i ). Look up “GetSelectedMediaItem” in the ReaScript docs to see if you can figure out why we called it with a zero and with the i. Remember that i represents the current index in the loop, so it goes from zero up to the number of items we have minus one. - Now we use
GetMediaItemInfo_Value()to get the current position of the item in the project and assign that to a local variable named “i_pos” - Lastly we make a console message that takes “i_pos” and combines it with “\n”. “\n” indicates that we want a new line. The “..” tells Lua that we want to combine two strings. You can think of it as an addition sign when you want to add the strings together.
Make sure that you understand how GetMediaItemInfo_Value works. Look at the documentation and experiment with it a little bit. You can see the values of variables on the right-hand side of the editor while the code is running, or you can use reaper.ShowConsoleMsg() to see the values of things.
Now we need to do something with that position, such as use that position to create new automation items on the envelope with the same position.
Create Automation Items
1
2
3
4
5
6
7
8
9
10
11
12
13
14
15
16
17
18
19
20
21
22
23
24
25
26
27
28
29
30
31
32
33
34
35
36
37
38
39
40
41
42
function main()
    get_track()
    get_envelope()

    reaper.Main_OnCommandEx(40297, 0 , 0)

    reaper.Main_OnCommandEx(40297, 0 , 0)
    reaper.SetTrackSelected(sel_track, true)
    reaper.Main_OnCommandEx(40421, 0 , 0)

    local item_count = reaper.CountSelectedMediaItems(0)

    for i=0, item_count - 1 do

        local sel_item = reaper.GetSelectedMediaItem( 0, i )

        local i_pos = reaper.GetMediaItemInfo_Value( sel_item, "D_POSITION" )

        if i == 0 then
            local first_ai = reaper.InsertAutomationItem( sel_env, -1, i_pos, 1 )
            id = reaper.GetSetAutomationItemInfo( sel_env, first_ai, "D_POOL_ID", 0, false)
          else
            reaper.InsertAutomationItem( sel_env, id, i_pos, ai_length )
        end
    end
end

function get_track()
    sel_track = reaper.GetSelectedTrack(0, 0)
    if not sel_track then
        reaper.ShowMessageBox("Please select a track!", "Error", 0)
    end
end

function get_envelope()
    sel_env = reaper.GetSelectedEnvelope( 0 )
    if not sel_env then
        reaper.ShowMessageBox("Please select an envelope!", "Error", 0)
    end
end

main()
We have only added a few lines here.
1
2
3
4
5
6
if i == 0 then
    local first_ai = reaper.InsertAutomationItem( sel_env, -1, i_pos, 1 )
        id = reaper.GetSetAutomationItemInfo( sel_env, first_ai, "D_POOL_ID", 0, false)
    else
        reaper.InsertAutomationItem( sel_env, id, i_pos, ai_length )
end
So let’s look at this. This says that if we are making the first automation item, then we need to give it a pool ID of -1. This is necessary because as of this writing reaper does not let you create arbitrary pools.
Automation items that are in the same pool will all contain the same data and all change simultaneously when we change any single one of them.
Once we create this new automation item, then we need to get the pool ID from it so that all of the new automation items we create also have that pool_ID.
If were not processing the first automation item then we know we have a valid pool_ID and we can simply insert the automation item.
(Hopefully in the next version of REAPER we will not have to do this, and we can simply insert an automation item with the pool value that we want.)
I strongly suggest looking to the documentation and looking up:
- “InsertAutomationItem”
- “GetSetAutomationItemInfo”
Once you think you have a basic idea of how these work and let’s move onto the next section.
Setting a length
In our code so far we simply set an automation length of one. I would like to use the length of the smallest item, and later we will allow the user to input a length.
So let’s find the item when the shortest length
1
2
3
4
5
6
7
8
9
10
11
12
13
14
15
16
function get_length()
    local item_count = reaper.CountSelectedMediaItems(0)
    local min_len = 0

    for i=0, item_count - 1 do
        local sel_item = reaper.GetSelectedMediaItem( 0, i )
        local i_len = reaper.GetMediaItemInfo_Value( sel_item, "D_LENGTH" )

        if i == 0 then
            min_len = i_len
        else
            min_len = math.min(i_len, min_len)
        end
    end
    return min_len
end
This function makes the scary assumption that we have selected items, which we may not have. I’m going to leave it up to you to fix that.
After that assumption we go through all of the selected items as we have before. We store the current selected item in the loop in “sel_item”, then we use “sel_item” to get the length of the item.
If this is our first time through the loop then we assign “min_len” to the length of that item. (if i == 0 then…)
For each subsequent item that we evaluate, we assign “min_len” to either “i_len” or “min_len”. Math.min() takes two values and returns the lesser of the two.
As we loop through the items eventually “min_len” will be the value of the smallest item.
Then we return that so that we can use that value in the place that we call the function.
I strongly suggest taking a minute to use reaper.ShowConsoleMsg() to show yourself what is happening in this function. Print out the current “i” value, the current “i_len”, the current “min_len” and perhaps the name of the media item that you are processing. You remember how to do that?
Use things like “..” to put strings together and “\n” to create a new line.
Do this any time you become confused! I actually had an issue while writing this code were I accidentally typed “min_length” instead of “min_len”. I ended up getting this cryptic error that I could not figure out until I started putting little messages to give me idea of what values were at what point.
This tends to be called “printf debugging” (due to how print is done in C). Some other languages have fancy debuggers, but with any language this is a powerful and quick way to figure out what is happening in your code. Don’t be afraid of it.
Put it all together
1
2
3
4
5
6
7
8
9
10
11
12
13
14
15
16
17
18
19
20
21
22
23
24
25
26
27
28
29
30
31
32
33
34
35
36
37
38
39
40
41
42
43
44
45
46
47
48
49
50
51
52
53
54
55
56
57
58
function main()
    get_track() -- call the get_track function to update sel_track with a value
    get_envelope() -- call the get_env function to update sel_track with a value

    -- if there is no selected track or envelope, then jump to ::continue:: and ignore everything in between
    if not sel_track or not sel_env then return end

    reaper.Main_OnCommandEx(40297, 0 , 0) -- deselect all tracks
    reaper.SetTrackSelected(sel_track, true) -- set one selected track, the first one
    reaper.Main_OnCommandEx(40421, 0 , 0) -- select all media items on the track

    -- count the number of selected media items
    local item_count = reaper.CountSelectedMediaItems(0)

    -- find out the length of the smallest Media Item, that is our Automation Item length
    local ai_len = get_length()

    -- loo from 0 to the number of media items, minus one.
    for i=0, item_count - 1 do

        -- get the media item in the selection that corresponds to the current index (i in our loop keeps
        local sel_item = reaper.GetSelectedMediaItem( 0, i )

        -- get the position of the media item.
        local i_pos = reaper.GetMediaItemInfo_Value( sel_item, "D_POSITION" )

        if i == 0 then
            -- First Automation item currently must be created with a pool_id of -1
            local first_ai = reaper.InsertAutomationItem( sel_env, -1, i_pos, ai_len )
            -- find out what the POOL_ID we need to use is, based on the AutomationItem we just created
            id = reaper.GetSetAutomationItemInfo( sel_env, first_ai, "D_POOL_ID", 0, false)
          else
            -- insert a new automation item on the selected envelope, with the ID we got,
            -- at the posistion of the current item in the loop with the length of the smallest Media Item
            reaper.InsertAutomationItem( sel_env, id, i_pos, ai_len )
        end
    end
end

function get_track()
    -- get the selected track. sel_track is a global variable that can be seen by every function!
    sel_track = reaper.GetSelectedTrack(0, 0)
    -- if there is no selected track, then we complain to the user
    if not sel_track then
        reaper.ShowMessageBox("Please select a track!", "Error", 0)
    end
end

function get_envelope()
    -- get the selected envelope. sel_env is a global variable that can be seen by every function!
    sel_env = reaper.GetSelectedEnvelope( 0 )
    -- if there is no selected envelope, then we complain to the use
    if not sel_env then
        reaper.ShowMessageBox("Please select an envelope!", "Error", 0)
    end
end

main()
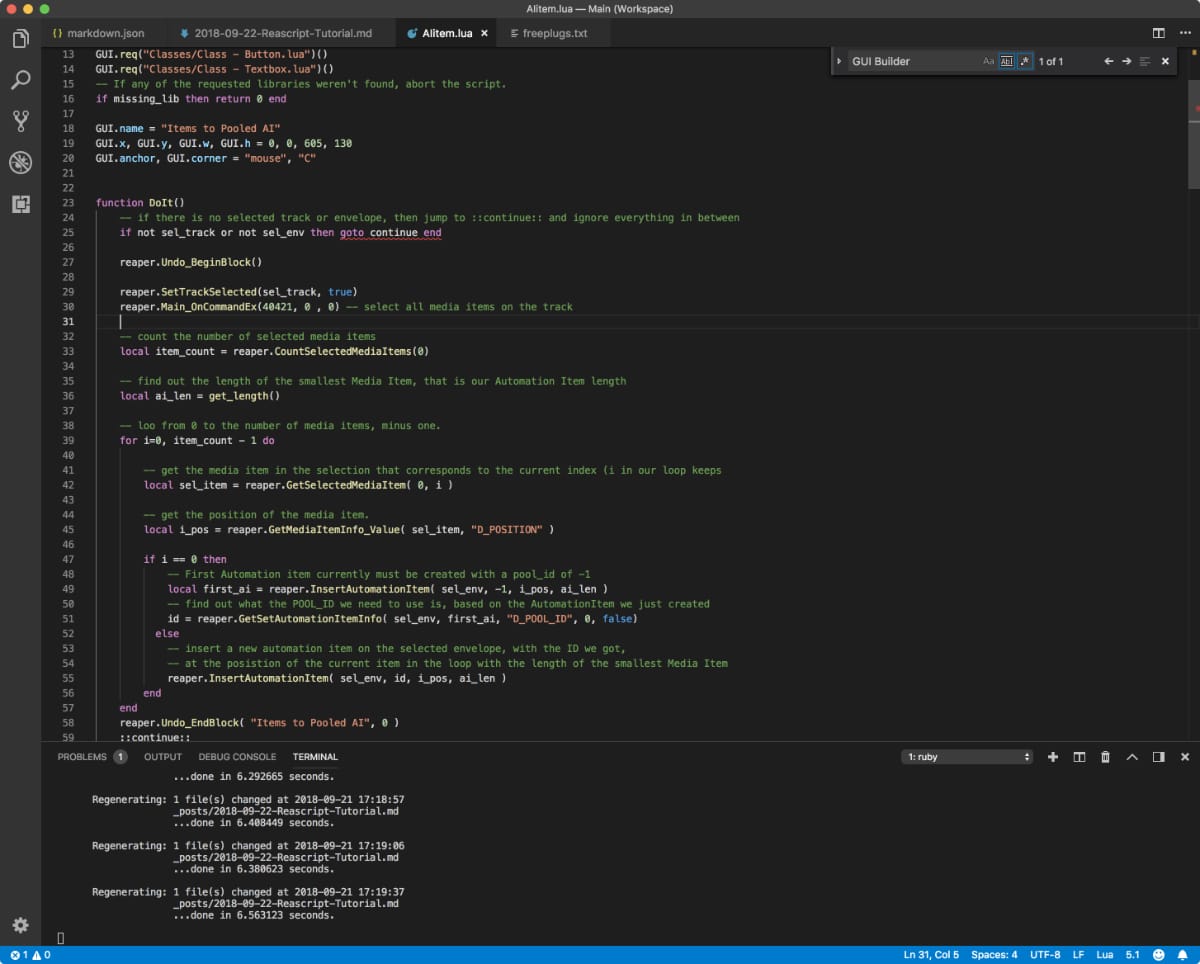
It looks like we actually have all of our working code down. this will take the selected track, the selected envelope and make a new automation item at the start of every media item, and the length of the automation item equals the length of the smallest media item.
This time I have added some comments to the code to help make it be more clear for first-time readers.
We did add one small thing here,
1
if not sel_track or not sel_env then return end
If there is no “sel_track” or “sel_env” then we wanna abort our mission immediately. We return from our function immediately, and no further code will be processed.
Ideally we’d encapsulate this all in a class (using metatables) and pass values (and a few closures) around via functions while relying on no globals, but that would add complexity for zero benefit in this simple case. I also don’t want to make this tutorial too long :)
As your scripts become complex, you’ll google for solutions and find out about better practices, new functionality and see some fun arguments about how things should be done.
Beginner Tutorial Part 3 - Making a GUI
Our code works if you run it and you have a track and an envelope selected. However, there is no way for the user to set the length of time that they want that automation items to be.
So let’s create a GUI that allows the user to select a track, select an envelope, set the length of the automation item and then do the process when they are ready.
GUI Builder
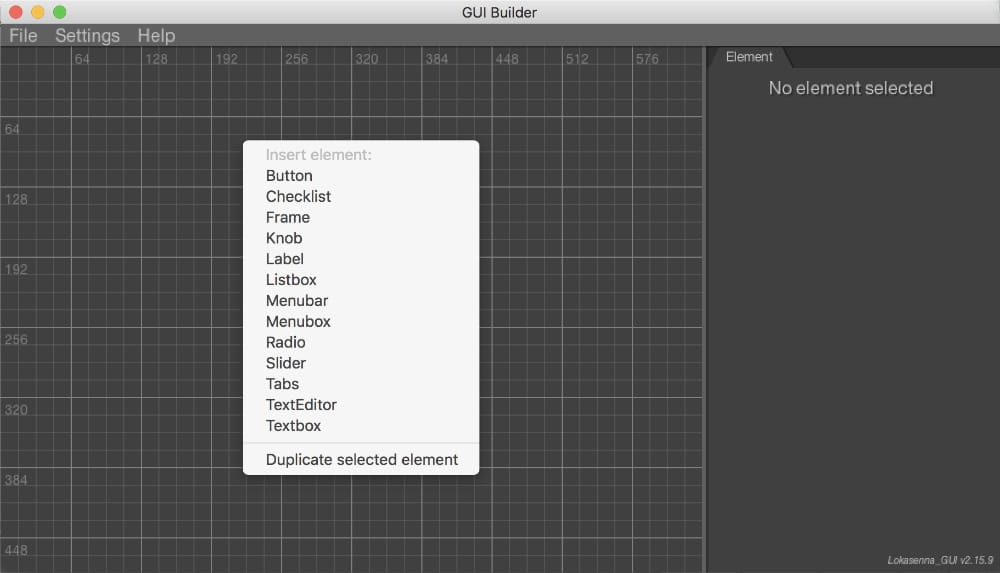
The first thing you need to do is to go to ReaPack->Browse Packages. Install the following packages:
- Lokasenna’s GUI library v2 for Lua
- Lokasenna’s GUI library v2 for Lua (developer tools)
Now go to the actions list using ? (shift-/). Select “Script: Set Lokasenna_GUI v2 library path.lua” and hit run.
Now select “Script: Lokasenna_GUI Builder.lua”. Hit Run.
Right click in the middle of the window that pops up, this is where you can add new GUI elements to the screen.
To move a GUI widget or select a GUI widget for editing you need to hold shift and click it.
Build the GUI
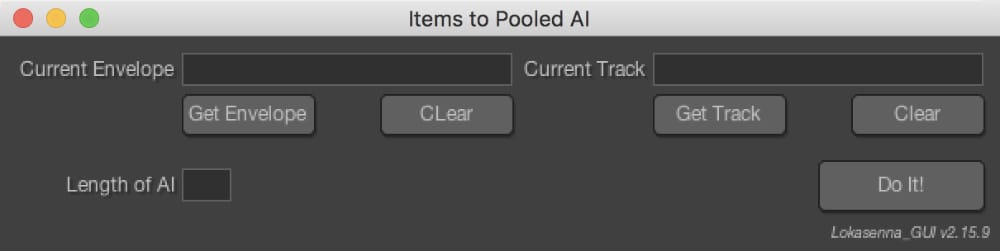
Build something like the GUI that you see above.
You will at least need these elements:
- A textbox to show the current selected Track
- A textbox to show the current selected Envelope
- A textbox to get the length of the AI
- A button to get the currently selected Track
- A button to get the currently selected Envelope
- A button to clear the currently selected Track
- A button to clear the currently selected Envelope
- A button to DO IT!
When you’re done with your GUI go to the menu item “File->Export” and export the file to a location you are familiar with.
It really is that easy!
Just play around with it and make a few rubbish attempts. It works quite nicely.
Use the GUI
1
2
3
4
5
6
7
8
9
10
11
12
13
14
15
16
17
18
19
20
21
22
23
24
25
26
27
28
29
30
31
32
33
34
35
36
37
38
39
40
41
42
43
44
45
46
47
48
49
50
51
52
53
54
55
56
57
58
59
60
61
62
63
64
65
66
67
68
69
70
71
72
73
74
75
76
77
78
79
80
81
82
83
84
85
86
87
88
89
90
91
92
93
94
95
96
97
98
99
100
101
102
103
104
105
106
107
108
109
110
111
112
113
114
115
116
117
118
119
120
121
122
123
124
125
126
127
128
129
130
131
132
133
134
135
136
137
138
-- Script generated by Lokasenna's GUI Builder


local lib_path = reaper.GetExtState("Lokasenna_GUI", "lib_path_v2")
if not lib_path or lib_path == "" then
    reaper.MB("Couldn't load the Lokasenna_GUI library. Please run 'Set Lokasenna_GUI v2 library path.lua' in the Lokasenna_GUI folder.", "Whoops!", 0)
    return
end
loadfile(lib_path .. "Core.lua")()

GUI.req("Classes/Class - Label.lua")()
GUI.req("Classes/Class - Button.lua")()
GUI.req("Classes/Class - Textbox.lua")()
-- If any of the requested libraries weren't found, abort the script.
if missing_lib then return 0 end

GUI.name = "Items to Pooled AI"
GUI.x, GUI.y, GUI.w, GUI.h = 0, 0, 605, 130
GUI.anchor, GUI.corner = "mouse", "C"


--[[
    *********************
    * Insert Code here! *
    *********************
]]--

GUI.New("get_env_btn", "Button", {
    z = 11,
    x = 110,
    y = 35,
    w = 80,
    h = 24,
    caption = "Get Envelope",
    font = 3,
    col_txt = "txt",
    col_fill = "elm_frame"
})


GUI.New("get_track_btn", "Button", {
    z = 11,
    x = 395,
    y = 35,
    w = 80,
    h = 24,
    caption = "Get Track",
    font = 3,
    col_txt = "txt",
    col_fill = "elm_frame"
})

GUI.New("clear_env_btn", "Button", {
    z = 11,
    x = 230,
    y = 35,
    w = 80,
    h = 24,
    caption = "Clear",
    font = 3,
    col_txt = "txt",
    col_fill = "elm_frame"
})

GUI.New("clear_track_btn", "Button", {
    z = 11,
    x = 515,
    y = 35,
    w = 80,
    h = 24,
    caption = "Clear",
    font = 3,
    col_txt = "txt",
    col_fill = "elm_frame"
})

GUI.New("do_it_btn", "Button", {
    z = 11,
    x = 495,
    y = 75,
    w = 100,
    h = 30,
    caption = "Do It!",
    font = 4,
    col_txt = "txt",
    col_fill = "elm_frame"
})

GUI.New("cur_env_txt", "Textbox", {
    z = 11,
    x = 110,
    y = 10,
    w = 200,
    h = 20,
    caption = "Current Envelope",
    cap_pos = "left",
    font_a = 3,
    font_b = "monospace",
    color = "txt",
    bg = "wnd_bg",
    shadow = true,
    pad = 4,
    undo_limit = 20
})

GUI.New("cur_track_txt", "Textbox", {
    z = 11,
    x = 395,
    y = 10,
    w = 200,
    h = 20,
    caption = "Current Track",
    cap_pos = "left",
    font_a = 3,
    font_b = "monospace",
    color = "txt",
    bg = "wnd_bg",
    shadow = true,
    pad = 4,
    undo_limit = 20
})

GUI.New("len_txt", "Textbox", {
    z = 11,
    x = 110,
    y = 80,
    w = 30,
    h = 20,
    caption = "Length of AI",
    cap_pos = "left",
    font_a = 3,
    font_b = "monospace",
    color = "txt",
    bg = "wnd_bg",
    shadow = true,
    pad = 4,
    undo_limit = 20
})
This is basically what is output from the GUI editor.
So what we need to do is insert our code into this file, and then connect the buttons to functions.
So where I have the comment that says “Insert code here”, place your current code in that location. We could keep our GUI code in a separate file and use a function called “loadfile” which lets you load a file into your current code. You can try doing this yourself, but for this tutorial we will just insert our current code into the generated GUI.
Make the buttons work
The next thing we need to do is add some code to the buttons so that they do something when you press it. Let’s look at what we need to do to the envelope button.
1
2
3
4
5
6
7
8
9
10
11
12
GUI.New("get_env_btn", "Button", {
    z = 11,
    x = 110,
    y = 35,
    w = 80,
    h = 24,
    caption = "Get Envelope",
    font = 3,
    col_txt = "txt",
    col_fill = "elm_frame",
    func = get_envelope
})
I have done two things here:
- Add a comma after
col_fill = "elm_frame". Every item, except the last item, needs a comma at the end. Since we’re adding a new item to the end, this is no longer the last item and it will need a comma - Add
func = get_envelopeas the last item. This tells the button that when it is pressed, we want it to run theget_envelope()function. CAREFUL. You wantfunc = get_envelopeand NOTfunc = get_envelope(). The latter will call the function immediately. We only want to pass the name of the function, so we leave out the parenthesis.
So go ahead and connect the buttons to your main function, to the get_track function, and you will need to create two “clear” functions. The information you need to create the “clear_envelope” and “clear_track” functions are in the next section.
At this point you can load the script, run it, and you’ll get a nice GUI… that doesn’t work at all.
Interact with the GUI - get_track
When the user presses the “Get track”, or “Get envelope” then we want the GUI to display the name of the track or envelope in the text box that we created.
1
2
3
4
5
6
7
8
9
10
11
12
13
function get_track()
    -- get the selected track. sel_track is a global variable that can be seen by every function!
    sel_track = reaper.GetSelectedTrack(0, 0)
    -- if there is no selected track, then we complain to the user
    if not sel_track then
        reaper.ShowMessageBox("Please select a track!", "Error", 0)
    else
        -- get track name
        local _, track_name = reaper.GetSetMediaTrackInfo_String(sel_track, "P_NAME", "", false)
        -- set GUI text box to track name
        GUI.Val("cur_track_txt", track_name)
    end
end
Here we’ve added an ‘else’ section to our code. If the sel_track exists then we want to change the GUI.
There is a trick here though. Look at this line:
1
local _, track_name = reaper.GetSetMediaTrackInfo_String(sel_track, "P_NAME", "", false)
What is that _?
The function GetSetMediaTrackInfo_String() returns two values. The declaration is:
1
boolean retval, string stringNeedBig = reaper.GetSetMediaTrackInfo_String(MediaTrack tr, string parmname, string stringNeedBig, boolean setNewValue)
We only need the track name, but it returns boolean retval, string stringNeedBig. We need to deal with both values though! That’s what _ lets us do.
local _, track_name says “Forget the first return value, assign the second value to track_name”.
This is a powerful feature of Lua, and it can be slightly confusing sometimes. Just know that if a function has multiple return values, then you need to somehow assign all of them to a variable. If you want to ignore one, then use _ in that place.
The return values are processed in order. So if we had a function like reaper.GetTempoTimeSigMarker() that is declared as:
1
boolean retval, number timepos, number measurepos, number beatpos, number bpm, number timesig_num, number timesig_denom, boolean lineartempo = reaper.GetTempoTimeSigMarker(ReaProject proj, integer ptidx)
If we want to use any of those values, we need to process all of them. Something like this:
1
local _, time_pos, measure_pos, _, _, sig_numerator, sig_denominator, linear_bool = reaper.GetTempoTimeSigMarker(0, 0)
This calls “GetTempoTimeSigMarker” and assigns
- retval will not be assigned
- time_pos = timepos
- measure_pos = measurepos
- beatpos will not be assigned
- bpm will not be assigned
- sig_numerator = timesig_num
- sig_denominator = timesig_denom
- linear_bool = lineartempo
We can now use the variables time_pos, measure_pos, sig_numerator, sig_denominator, linear_bool, in our code. They were all simultaneously assigned by the return function.
Lua lets us return many values from a function, and we can assign these multiple return values at once. We can also ignore return values by using _
Interact with the GUI - get_envelope
1
2
3
4
5
6
7
8
9
10
11
12
13
14
15
16
function get_envelope()
    -- get the selected envelope. sel_env is a global variable that can be seen by every function!
    sel_env = reaper.GetSelectedEnvelope( 0 )
    -- if there is no selected envelope, then we complain to the use
    if not sel_env then
        reaper.ShowMessageBox("Please select an envelope!", "Error", 0)
    else
        -- get the name of the selected envelope
        local _, env_name = reaper.GetEnvelopeName(sel_env, "")
        -- get the track that the envelope is attached to
        local parent_track, _, _ = reaper.Envelope_GetParentTrack(sel_env)
        -- get the name of the track
        local _, track_name = reaper.GetSetMediaTrackInfo_String(parent_track, "P_NAME", "", false)
        GUI.Val("cur_env_txt", track_name .. " - " .. env_name)
    end
end
I want to do more than just list the envelope name in the text box. I want to do something like “track_name - envelope_name”. So first we need to get the name of the envelope.
local _, env_name = reaper.GetEnvelopeName(sel_env, "") uses the _ trick. Look up “GetEnvelopeName” to see why we needed to do that.
Once we have the envelope name, we want the name of the track that the envelope is attached to. “GetSetMediaTrackInfo_String”s first argument is MediaTrack tr. That means we need a variable with a type of “MediaTrack”.
So I searched through the documentation until I found something that uses the envelope and returns a “MediaTrack”. Envelope_GetParentTrack() does this!
1
MediaTrack retval, optional number index, optional number index2 = reaper.Envelope_GetParentTrack(TrackEnvelope env)
We really only need the MediaTrack retval, so we use our _ trick to get that and ignore everything else.
Now that we have the name of the track and the name of the envelope, we can set the text box to track_name .. " - " .. env_name. Remember that .. just puts two strings together. We combine the track name with “ - “ and then the envelope name.
Clear the selected track and envelope
I’m not going to tell you how to do this! The code I publish at the end will not have this either.
You need to set sel_track and sel_envelope to nil and clear the GUI textboxes.
Remember to attach your clear_track() and clear_envelope() functions to the buttons too.
Get the length
1
2
3
4
5
6
7
8
9
10
11
12
13
14
15
16
17
18
19
20
21
22
23
function get_length()
    -- get the value from the GUI
    gui_len = GUI.Val("len_txt")

    -- If there's no value then we use the length of the shortest item
    if gui_len == "" then
        local item_count = reaper.CountSelectedMediaItems(0)

        for i=0, item_count - 1 do
            local sel_item = reaper.GetSelectedMediaItem( 0, i )
            local i_len = reaper.GetMediaItemInfo_Value( sel_item, "D_LENGTH" )
            if i == 0 then
                min_len = i_len
            else
                min_len = math.min(i_len, min_len)
            end
        end
        return min_len
    else
        -- if there is a value, we convert the string to a number and use it!
        return tonumber(gui_len)
    end
end
Part of setting up the GUI was that we wanted the user to be able to set the length of the automation items that are created.
We already have the code for finding the minimum length. All we need to do is get the value from the GUI. If the GUI does not have a value then we use the minimum length code we used.
Otherwise (else) we convert the “gui_len” to a number and return it to whereever the function was called.
Update Main
1
2
3
4
5
6
7
8
9
10
11
12
13
14
15
16
17
18
19
20
21
22
23
24
25
26
27
28
29
30
31
32
33
34
35
36
37
38
function main()
    -- if there is no selected track or envelope, then jump to ::continue:: and ignore everything in between
    if not sel_track or not sel_env then return end

    reaper.Undo_BeginBlock()

    reaper.Main_OnCommandEx(40297, 0 , 0) -- deselect all tracks
    reaper.SetTrackSelected(sel_track, true)
    reaper.Main_OnCommandEx(40421, 0 , 0) -- select all media items on the track

    -- count the number of selected media items
    local item_count = reaper.CountSelectedMediaItems(0)

    -- find out the length of the smallest Media Item, that is our Automation Item length
    local ai_len = get_length()

    -- loo from 0 to the number of media items, minus one.
    for i=0, item_count - 1 do

        -- get the media item in the selection that corresponds to the current index (i in our loop keeps
        local sel_item = reaper.GetSelectedMediaItem( 0, i )

        -- get the position of the media item.
        local i_pos = reaper.GetMediaItemInfo_Value( sel_item, "D_POSITION" )

        if i == 0 then
            -- First Automation item currently must be created with a pool_id of -1
            local first_ai = reaper.InsertAutomationItem( sel_env, -1, i_pos, ai_len )
            -- find out what the POOL_ID we need to use is, based on the AutomationItem we just created
            id = reaper.GetSetAutomationItemInfo( sel_env, first_ai, "D_POOL_ID", 0, false)
          else
            -- insert a new automation item on the selected envelope, with the ID we got,
            -- at the posistion of the current item in the loop with the length of the smallest Media Item
            reaper.InsertAutomationItem( sel_env, id, i_pos, ai_len )
        end
    end
    reaper.Undo_EndBlock( "Items to Pooled AI", 0 )
end
Since we have buttons that do get_track() and get_envelope() for us, we don’t need these in the “main()” block anymore.
When we use this, we will want the user to be able to undo the action. So before we do anything, we put reaper.Undo_BeginBlock() in. This tells REAPER that anything we do is going to be consolidated into a single undo stage.
After we do all of our work we put the code reaper.Undo_EndBlock( "Items to Pooled AI", 0 ). the first argument to Undo_EndBlock() will be what the undo shows up in REAPER’s undo history. (What’s the second argument? Find it, and figure it out, yourself!)
End
1
2
3
4
5
6
7
8
9
10
11
12
13
14
15
16
17
18
19
20
21
22
23
24
25
26
27
28
29
30
31
32
33
34
35
36
37
38
39
40
41
42
43
44
45
46
47
48
49
50
51
52
53
54
55
56
57
58
59
60
61
62
63
64
65
66
67
68
69
70
71
72
73
74
75
76
77
78
79
80
81
82
83
84
85
86
87
88
89
90
91
92
93
94
95
96
97
98
99
100
101
102
103
104
105
106
107
108
109
110
111
112
113
114
115
116
117
118
119
120
121
122
123
124
125
126
127
128
129
130
131
132
133
134
135
136
137
138
139
140
141
142
143
144
145
146
147
148
149
150
151
152
153
154
155
156
157
158
159
160
161
162
163
164
165
166
167
168
169
170
171
172
173
174
175
176
177
178
179
180
181
182
183
184
185
186
187
188
189
190
191
192
193
194
195
196
197
198
199
200
201
202
203
204
205
206
207
208
209
210
211
212
213
214
215
216
217
218
219
220
221
222
223
224
225
226
227
228
229
230
231
232
233
234
235
236
237
238
239
240
241
242
243
244
-- Script generated by Lokasenna's GUI Builder

local lib_path = reaper.GetExtState("Lokasenna_GUI", "lib_path_v2")
if not lib_path or lib_path == "" then
    reaper.MB("Couldn't load the Lokasenna_GUI library. Please run 'Set Lokasenna_GUI v2 library path.lua' in the Lokasenna_GUI folder.", "Whoops!", 0)
    return
end
loadfile(lib_path .. "Core.lua")()


GUI.req("Classes/Class - Label.lua")()
GUI.req("Classes/Class - Button.lua")()
GUI.req("Classes/Class - Textbox.lua")()
-- If any of the requested libraries weren't found, abort the script.
if missing_lib then return 0 end

GUI.name = "Items to Pooled AI"
GUI.x, GUI.y, GUI.w, GUI.h = 0, 0, 605, 130
GUI.anchor, GUI.corner = "mouse", "C"


function main()
    -- if there is no selected track or envelope, then jump to ::continue:: and ignore everything in between
    if not sel_track or not sel_env then return end

    reaper.Undo_BeginBlock()

    reaper.Main_OnCommandEx(40297, 0 , 0) -- deselect all tracks
    reaper.SetTrackSelected(sel_track, true) -- make sure our track is selected
    reaper.Main_OnCommandEx(40421, 0 , 0) -- select all media items on the track

    -- count the number of selected media items
    local item_count = reaper.CountSelectedMediaItems(0)

    -- find out the length of the smallest Media Item, that is our Automation Item length
    local ai_len = get_length()

    -- loo from 0 to the number of media items, minus one.
    for i=0, item_count - 1 do

        -- get the media item in the selection that corresponds to the current index (i in our loop keeps
        local sel_item = reaper.GetSelectedMediaItem( 0, i )

        -- get the position of the media item.
        local i_pos = reaper.GetMediaItemInfo_Value( sel_item, "D_POSITION" )

        if i == 0 then
            -- First Automation item currently must be created with a pool_id of -1
            local first_ai = reaper.InsertAutomationItem( sel_env, -1, i_pos, ai_len )
            -- find out what the POOL_ID we need to use is, based on the AutomationItem we just created
            id = reaper.GetSetAutomationItemInfo( sel_env, first_ai, "D_POOL_ID", 0, false)
          else
            -- insert a new automation item on the selected envelope, with the ID we got,
            -- at the posistion of the current item in the loop with the length of the smallest Media Item
            reaper.InsertAutomationItem( sel_env, id, i_pos, ai_len )
        end
    end
    reaper.Undo_EndBlock( "Items to Pooled AI", 0 )
end

function get_track()
    -- get the selected track. sel_track is a global variable that can be seen by every function!
    sel_track = reaper.GetSelectedTrack(0, 0)
    -- if there is no selected track, then we complain to the user
    if not sel_track then
        reaper.ShowMessageBox("Please select a track!", "Error", 0)
    else
        -- get track name
        local _, track_name = reaper.GetSetMediaTrackInfo_String(sel_track, "P_NAME", "", false)
        -- Set GUI text box to track_name
        GUI.Val("cur_track_txt", track_name)
    end
end

function get_envelope()
    -- get the selected envelope. sel_env is a global variable that can be seen by every function!
    sel_env = reaper.GetSelectedEnvelope( 0 )
    -- if there is no selected envelope, then we complain to the use
    if not sel_env then
        reaper.ShowMessageBox("Please select an envelope!", "Error", 0)
    else
        -- get the name of the selected envelope
        local _, env_name = reaper.GetEnvelopeName(sel_env, "")
        -- get the track that the envelope is attached to
        local parent_track, _, _ = reaper.Envelope_GetParentTrack(sel_env)
        -- get the name of the track
        local _, track_name = reaper.GetSetMediaTrackInfo_String(parent_track, "P_NAME", "", false)
        -- Set GUI text box to track_name + envelope name
        GUI.Val("cur_env_txt", track_name .. " - " .. env_name)
    end
end


function get_length()
    -- get the value from the GUI
    gui_len = GUI.Val("len_txt")

    -- If there's no value then we use the length of the shortest item
    if gui_len == "" then
        local item_count = reaper.CountSelectedMediaItems(0)

        for i=0, item_count - 1 do
            local sel_item = reaper.GetSelectedMediaItem( 0, i )
            local i_len = reaper.GetMediaItemInfo_Value( sel_item, "D_LENGTH" )
            if i == 0 then
                min_len = i_len
            else
                min_len = math.min(i_len, min_len)
            end
        end
        return min_len
    else
        -- if there is a value, we convert the string to a number and use it!
        return tonumber(gui_len)
    end
end

function clear_envelope ()


end

-- main()


GUI.New("get_env_btn", "Button", {
    z = 11,
    x = 110,
    y = 35,
    w = 80,
    h = 24,
    caption = "Get Envelope",
    font = 3,
    col_txt = "txt",
    col_fill = "elm_frame",
    func = get_envelope
})


GUI.New("get_track_btn", "Button", {
    z = 11,
    x = 395,
    y = 35,
    w = 80,
    h = 24,
    caption = "Get Track",
    font = 3,
    col_txt = "txt",
    col_fill = "elm_frame",
    func = get_track
})

GUI.New("clear_env_btn", "Button", {
    z = 11,
    x = 230,
    y = 35,
    w = 80,
    h = 24,
    caption = "Clear",
    font = 3,
    col_txt = "txt",
    col_fill = "elm_frame",
    func = clear_envelope
})

GUI.New("clear_track_btn", "Button", {
    z = 11,
    x = 515,
    y = 35,
    w = 80,
    h = 24,
    caption = "Clear",
    font = 3,
    col_txt = "txt",
    col_fill = "elm_frame",
    func = clear_track
})

GUI.New("do_it_btn", "Button", {
    z = 11,
    x = 495,
    y = 75,
    w = 100,
    h = 30,
    caption = "Do It!",
    font = 4,
    col_txt = "txt",
    col_fill = "elm_frame",
    func = DoIt
})

GUI.New("cur_env_txt", "Textbox", {
    z = 11,
    x = 110,
    y = 10,
    w = 200,
    h = 20,
    caption = "Current Envelope",
    cap_pos = "left",
    font_a = 3,
    font_b = "monospace",
    color = "txt",
    bg = "wnd_bg",
    shadow = true,
    pad = 4,
    undo_limit = 20
})

GUI.New("cur_track_txt", "Textbox", {
    z = 11,
    x = 395,
    y = 10,
    w = 200,
    h = 20,
    caption = "Current Track",
    cap_pos = "left",
    font_a = 3,
    font_b = "monospace",
    color = "txt",
    bg = "wnd_bg",
    shadow = true,
    pad = 4,
    undo_limit = 20
})

GUI.New("len_txt", "Textbox", {
    z = 11,
    x = 110,
    y = 80,
    w = 30,
    h = 20,
    caption = "Length of AI",
    cap_pos = "left",
    font_a = 3,
    font_b = "monospace",
    color = "txt",
    bg = "wnd_bg",
    shadow = true,
    pad = 4,
    undo_limit = 20
})

GUI.Init()
GUI.Main()
That’s everything!
That code works, and there’s still some that you need to fill in yourself as I described earlier.
I have also included (at least) 2 code paths that could lead to a crash. See if you can figure out where a user may do something that could crash the script. Read through the code and think to yourself “Does this variable always exist?” I tried to make this fairly easy to find for an intermediate developer. Beginners may need some time to find it.
You also need to think about what happens if a user already has some media items selected. That will mess everything up! Fix that.
MPL’s awesome code
1
2
3
4
5
6
7
8
9
10
11
12
13
14
15
16
17
18
19
20
21
22
23
24
25
26
27
28
29
30
31
32
33
34
35
36
37
38
39
40
41
42
43
44
45
46
47
48
49
50
51
52
53
54
55
56
57
58
59
60
61
62
63
64
65
66
67
68
69
70
71
72
73
74
75
76
77
78
79
80
81
82
83
84
85
86
87
88
89
90
91
92
93
94
95
96
97
98
99
100
101
102
103
104
105
106
107
108
109
110
111
for key in pairs(reaper) do _G[key]=reaper[key]  end
  ----------------------------------------------------------------------------
  function BuildPointsFromTable(t, time_start, time_end)
    if not t then return end
    local env =  GetSelectedEnvelope( 0 )
    if not env then return end
    DeleteEnvelopePointRangeEx( env, -1, time_start, time_end )

    -- clear AI
    local clear_id = {}
    for autoitem_idx = 1,  CountAutomationItems( env ) do
      local AI_pos = GetSetAutomationItemInfo( env, autoitem_idx-1, 'D_POSITION', 0, false )
      local AI_len = GetSetAutomationItemInfo( env, autoitem_idx-1, 'D_LENGTH', 0, false )
      if    (AI_pos >= time_start and AI_pos <= time_end)
        or  (AI_pos + AI_len >= time_start and AI_pos + AI_len <= time_end)
        or (AI_pos < time_start and AI_pos + AI_len > time_end) then
        clear_id[#clear_id+1] = autoitem_idx
      end
    end
    for i = #clear_id , 1, -1 do DeleteEnvelopePointRangeEx( env, clear_id[i]-1, -1, -1) end

    -- get max len
    local max_len = 0.1
    for i = 1, #t-1 do
      max_len = math.max(max_len, t[i+1].pos -  t[i].pos)
    end

    -- insert AI
    local pool_id
    for i = #t, 1, -1 do
        if i == #t then
          local new_AI = InsertAutomationItem(env , -1, t[i].pos, max_len )
          pool_id = GetSetAutomationItemInfo(env, new_AI, "D_POOL_ID", 0, false)
          GetSetAutomationItemInfo( env, new_AI, 'D_LOOPSRC', 0, true )
          GetSetAutomationItemInfo( env, new_AI, 'D_LENGTH', time_end - t[i].pos, true )

        else
          InsertAutomationItem( env, pool_id, t[i].pos,  t[i+1].pos -  t[i].pos )
          GetSetAutomationItemInfo( env, pool_id, 'D_LOOPSRC', 0, true )
        end
    end
    Envelope_SortPointsEx( env, -1 )
    UpdateArrange()
  end
  ----------------------------------------------------------------------------
  function GetPeaks(track ,ts_st, ts_end,window )
    local t = {}
    local accessor = CreateTrackAudioAccessor( track )

    local proj_SR = tonumber(format_timestr_len( 1, '', 0, 4 ))
    local buf_sz= math.floor(proj_SR * window)

    for pos = ts_st, ts_end, window do
      local buf = new_array(buf_sz)
      GetAudioAccessorSamples( accessor, proj_SR, 1, pos, buf_sz, buf )
      local sum = 0
      local cnt = 0
      for spl = 1, buf_sz do
        if buf[spl] then
          cnt = cnt + 1
          sum = sum + math.abs(buf[spl])
        end
      end
      t[#t+1] = {pos = pos, val = sum/cnt}
      buf.clear()
    end
    DestroyAudioAccessor( accessor )
    return t
  end
  ------------------------------------------------------------------------------------------------------
  function WDL_DB2VAL(x) return math.exp((x)*0.11512925464970228420089957273422) end  --https://github.com/majek/wdl/blob/master/WDL/db2val.h
  ----------------------------------------------------------------------------
  function FilterPeaks(t, threshold,hold_release)

    -- threshold
    local idremove = {}
    for i = 1, #t do  if t[i].val < threshold then  idremove[#idremove+1] = i  end end
    for i = #idremove, 1, -1 do table.remove(t,idremove[i]) end

    -- hold_release
    local cur_pos,last_cur_pos
    local idremove = {}
    for i = 1, #t do
      cur_pos = t[i].pos
      if last_cur_pos and cur_pos - last_cur_pos  < hold_release then idremove[#idremove+1] = i end
      last_cur_pos = cur_pos
    end
    for i = #idremove, 1, -1 do table.remove(t,idremove[i]) end
  end
  ----------------------------------------------------------------------------
  function InsertTriggeredAI(window, threshold, hold_release)
    local ts_st, ts_end = GetSet_LoopTimeRange2( 0, false, false, 0, 0, false )
    if ts_end - ts_st < 0.001 then return end

    local item = GetSelectedMediaItem(0,0)
    if not item then return end
    local tr = GetMediaItem_Track( item )
    local RMS_t = GetPeaks(tr,ts_st, ts_end, window )
    local threshold_linear = WDL_DB2VAL(threshold)
    FilterPeaks(RMS_t, threshold_linear,hold_release)
    BuildPointsFromTable(RMS_t,ts_st, ts_end )
  end
  ----------------------------------------------------------------------------


  ret,str = GetUserInputs('', 3, 'window,threshold,hold_release','0.002,-20,0.05')
  if ret then
    ui = {}
    for val in str:gmatch('[^,]+') do if tonumber(val) then ui[#ui+1]=tonumber(val) end end
    if #ui == 3 then InsertTriggeredAI(ui[1],ui[2],ui[3]) end
  end
mpl has taken the idea of this script and removed the need to pre-split the ‘triggering’ items. His script reads the audio, figures out the location of the peaks and puts automation items on the selected envelope.
It has some parameters to tune the peak detection.
Much nicer than what we’ve created and a further example of what is possible with ReaScript.
More Resources
X-Raym has a fantastic series on learning more about ReaScript.
Adam T Croft has some excellent content about learning ReaScript.
More LUA language resources (don’t bother reading the official docs, they are poorly written.)
Conclusion
That sure ramped up quickly didn’t it. That is kinda how programming works! You start with something small and then you slowly start building on it. Before you know it you have this giant piece of code that spans thousands of lines long and you don’t even realize that you did it.
Don’t be discouraged buy how daunting a project may seem, just start with the smallest thing you can think of and slowly build up from there.
It is quite a bit like music, where you need to just put down one small part and then build on it by adding more parts, and more parts, and more parts. Eventually you go back and you start to remove some things, refine some things and potentially clean up your project to make everything look nice.
If you are a musician, then you can be a programmer. You basically already do the exact same thing anyway!
Support Me!
This post took 28 hours to screencast, debug, write and edit. If you appreciate the information presented then please consider joining patreon or paying me for my time spent bringing you quality content!