More REAPER setting changes! Maybe one day I’ll get around to using the thing :)
Currently using REAPER 6.18
- 30 days of Starting over with REAPER
- Rants and GUI Tweaks (again)
- Designing MIDI commands
- MIDI Command Inventory
- Item Editing Design and Inventory
- Project Template, Preferences and Mouse Modifiers
- Hotkeys, again! ...?
- Look Ma! No Hands
- An evaluation and conclusion
Contents
- Introduction
- Default Project Template
- Mixing
- Mixing from the arranger
- Editing Changes
- Performance
- Workflow
- Mouse Modifier Setup
- Mouse: Media item - left click
- Mouse: Media item - left drag
- Mouse: Media item edge - left drag
- Mouse: Media item stretch marker - left drag
- Mouse: Envelope point - left drag
- Mouse: Envelope point - double click
- Mouse: Envelope segment - left drag
- Mouse: Envelope segment - double click
- Mouse: Automation item - left drag
- Mouse: Track - left click
- Mouse: Track - left drag
- Mouse: Ruler - left click
- Mouse: Ruler - left click
- Mouse: Ruler - left click
- Mouse: Project region - left drag
- Mouse: Project marker/region edge - left drag
- Mouse: Project tempo-time signature marker
- Mouse: Arrange View - right drag
- Mouse: Arrange view middle click
- Mouse: Arrange view middle drag
- Mouse: Edit cursor handle
- Mouse: MIDI…
- Conclusion
- Meta
Introduction
Reason followed by setting.
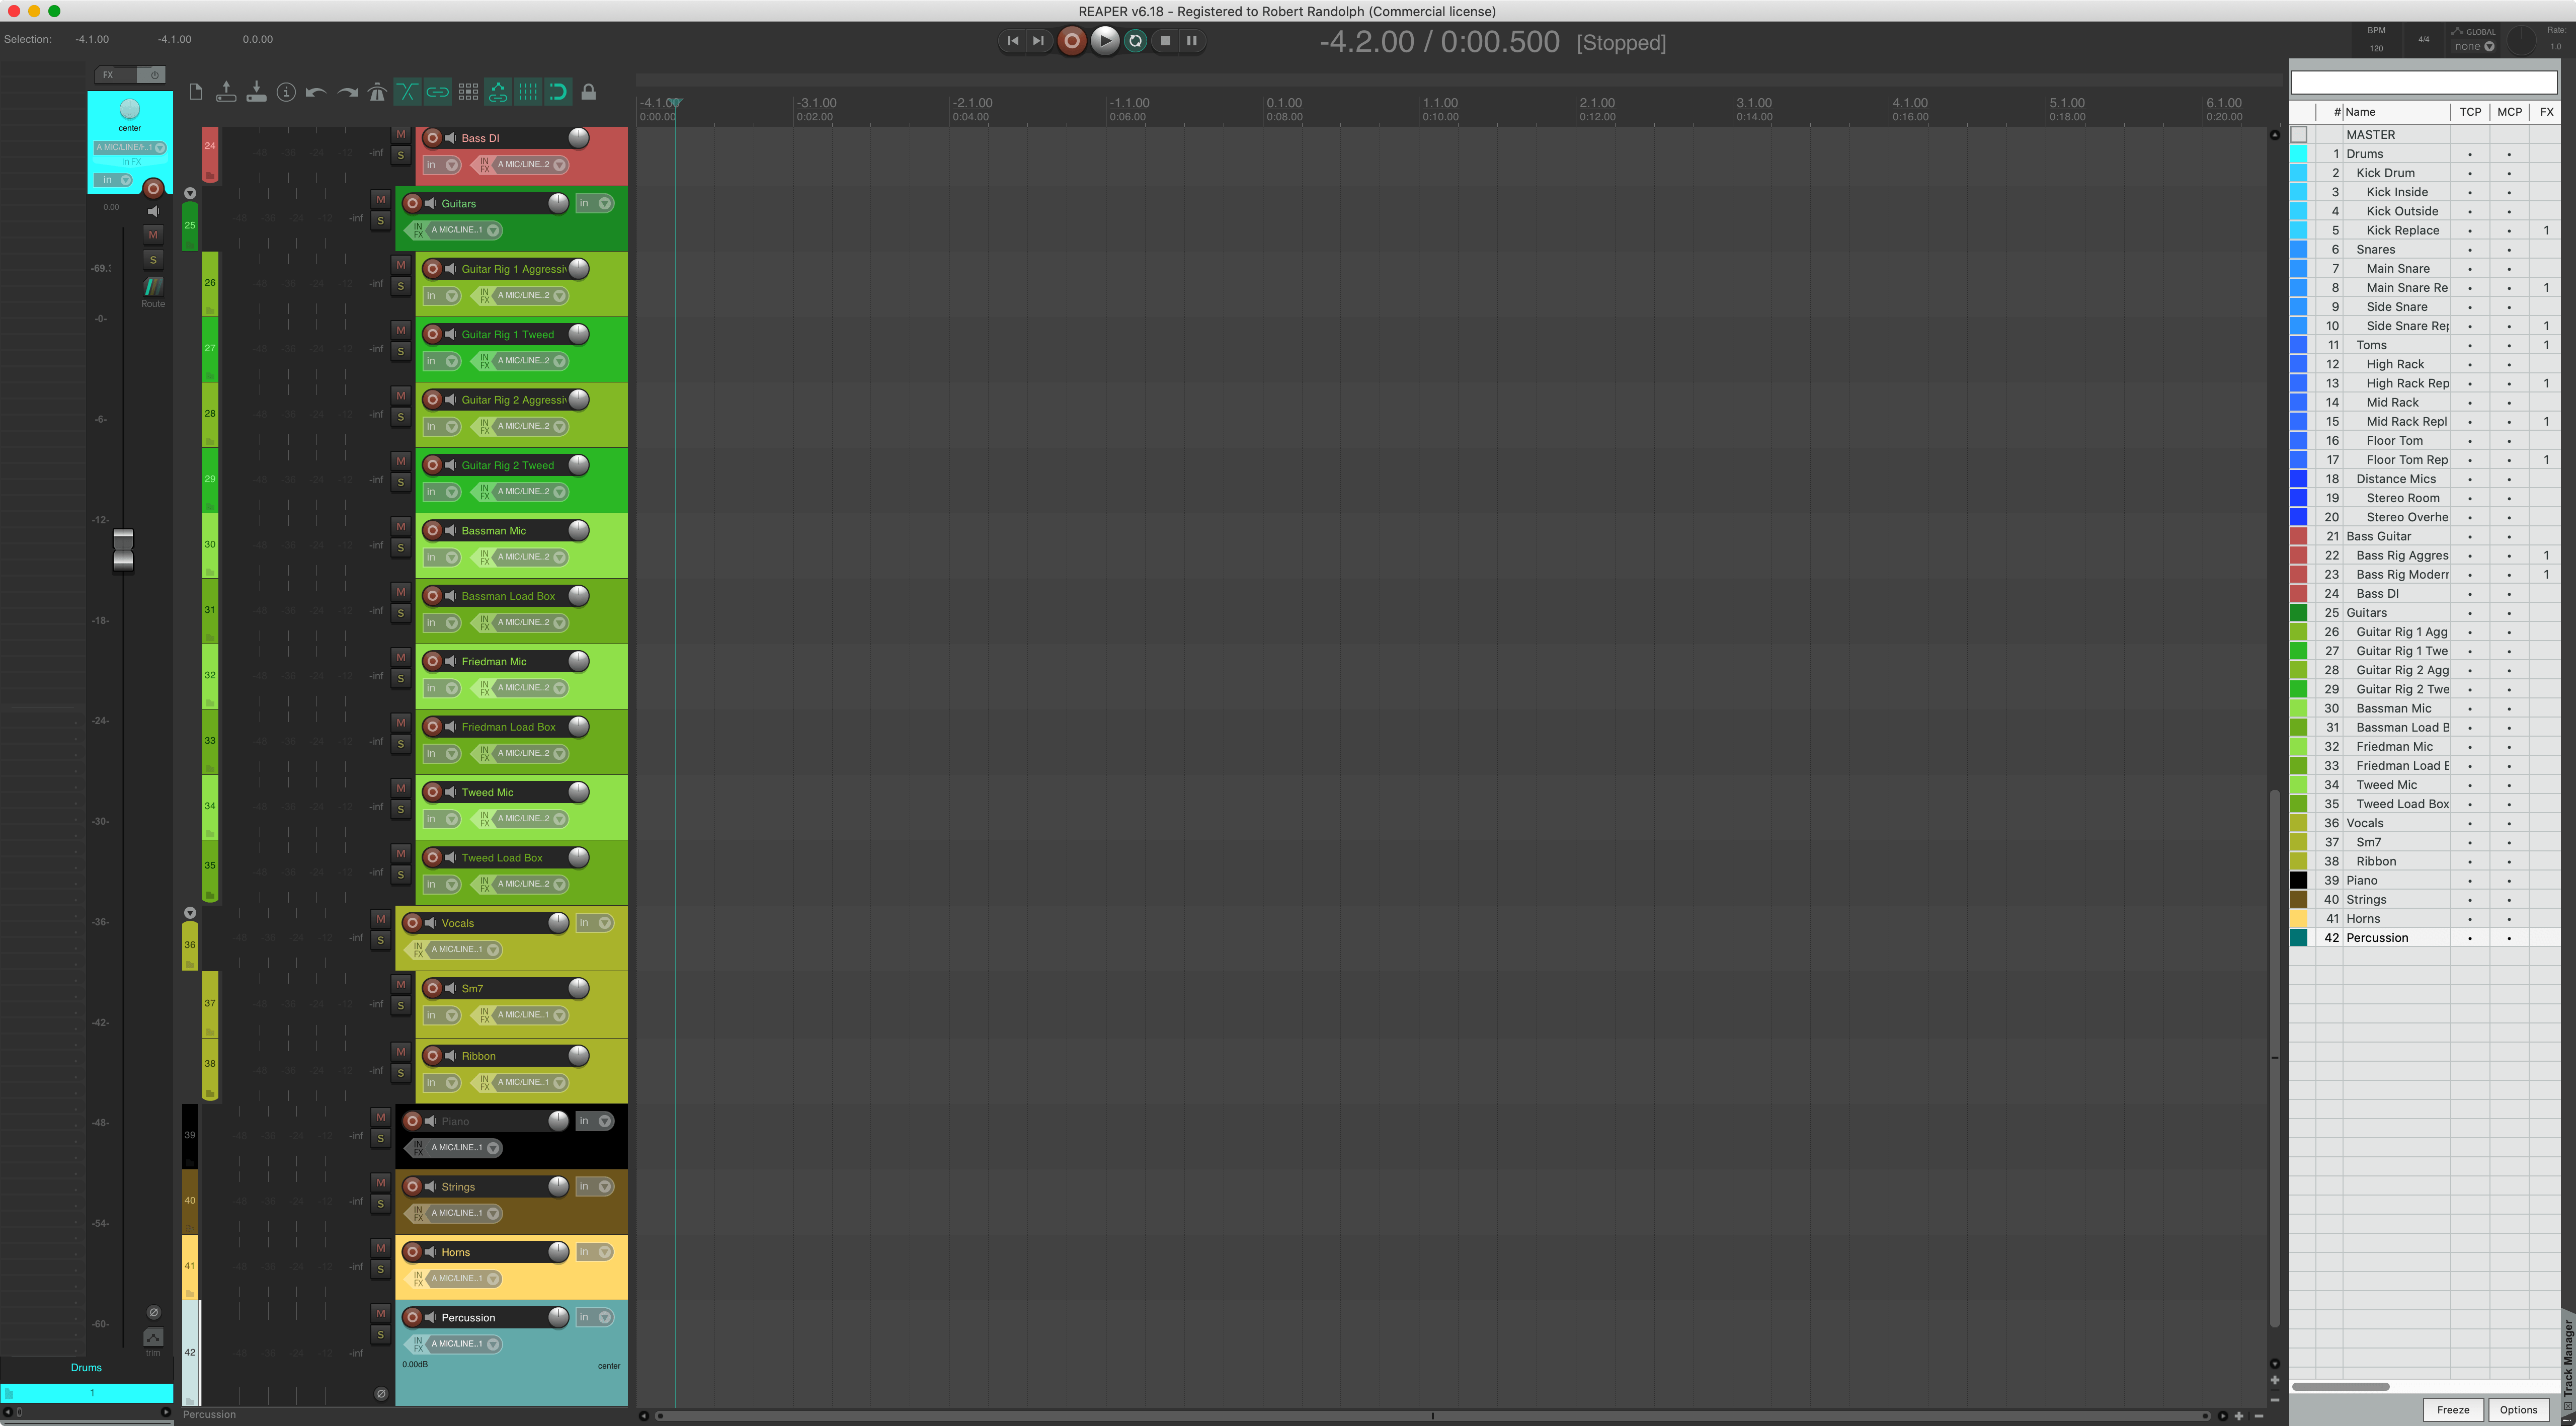
Default Project Template
Some of these changes are project specific changes. This means that I need to create a project template. My default template looks something like this:
- Drums
- Kick Drum
- Kick Inside
- Kick Outside
- Kick Replace
- Snares
- Main Snare
- Main Snare Replace
- Side Snare
- Side Snare Replace
- Toms
- High Rack
- High Rack Replace
- Mid Rack
- Mid Rack Replace
- Floor
- Floor Replace
- Distance Mics
- Stereo Room
- Stereo Overheads
- Kick Drum
- Bass Guitar
- Bass Rig Aggressive
- Bass Rig Modern
- Bass DI
- Guitars
- Guitar Rig 1 Aggressive
- Guitar Rig 1 Tweed
- Guitar Rig 2 Aggressive
- Guitar Rig 2 Tweed
- Bassman Mic
- Bassman Load Box
- Friedman Mic
- Friedman Load Box
- Tweed Mic
- Tweed Load Box
- Vocals
- Sm7
- Ribbon
- Piano
- Strings
- Horns
- Percussion
The “Rig” tracks are setup with effects to achieve a specific tone.
The “Replace” tracks have a drum replacement setup, which isn’t always used.
This is a very fast and dirty setup. My last template evolved to around 250 tracks in a couple weeks. The anemic orchestral section there will be filled up when I have some more time to have fun!
I also added some colour. I wanted to use SWS: Open color management window and SWS: Set selected tracks to color gradient, which was a terrible workflow. Two layers of modal dialog that must be used, closed, then another action used, then repeat!
There are some script options for gradient colours, but I gave up.
Project Template Setup
Preferences->Project->When creating new projects, use the following project file as a template:- to my project location.- New Project
Preferences->General->Startup Settings->Open project(s) on startup:
Project Settings
- Max that all of my devices support
- 48000
Project Settings->Project Sample Rate
- 48000
- My preferred starting tempo.
- *100
Project Settings->Project BPM
- *100
- I have a fast computer, let’s near max all the resampling parameters.
- HQ (512pt Sinc) PlaybackResample Mode
- HQ (512pt Sinc) Render Resample Mode
- Almost all of my stretch marker uses is on drums, so prefer transient aware stretch markers:
- Transient-optimized
Project Settings->Stretch marker mode:
- Transient-optimized
- I prefer the slight ‘bonus width’ from a light pan law, and the cleaner center channel that comes from passing mono signals down to stereo.
- -3.0
Advanced->Pan law:
- -3.0
- I like my projects to give me some leeway at the start of the project for things to happen, and the downbeat to not be on bar 3 or 4.
- -4
Project Settings->Project start measure
- -4
- Files should always be with their project!
- Copy media to project path
Project Settings->On import of media to project
- Copy media to project path
- This is a controversial one, but the first two DAWs I used let overlapping clips make sound, and I became used to that. I’m so used to it that it still catches me off-guard in DAWs that do not allow it. REAPER allows it, and I think it’s a much easier way to work while recording.
- Items always mix
Item mix Behaviour:
- Items always mix
Mixing
- I am a “scroller”. I use my mousewheel to scroll in every other application, but REAPER defaults to mousewheel controlling faders. When scrolling horizontally in the mixer, it’s possible to accidentally mousewheel a fader or some other parameter. I don’t want that to ever change the mix, only scroll.
Editing Behaviour->Mouse- OFF
Ignore mousewheel on all faders - OFF
Ignore mousewheel on track panel faders - OFF
Ignore mousewheel on transport edit fields
- OFF
- I like to aim where I am zooming, then scroll to zoom there.
- Mouse Cursor
Horizontal zoom center
- Mouse Cursor
Mixing from the arranger
I’ve decided to try “mixing from the arranger” for a while. This is the
- Master track is necessary for general work.
Right Click TCP->Show Master
- I don’t need to see levels of sends, and I don’t use multichannel audio.
SWS/NF: Disable multichannel metering (all tracks)(Action List)
- I just like the look of this better :)
- ON
Right Click Transport->Center transport controls
- ON
Mixer menu settings
Settings for the right click mixer menu
- I don’t want to see the master in the mixer, I can select it in the TCP
- OFF
Master Track -> Show in Mixer
- OFF
- Folders are already shown in the TCP, I don’t need to see indicators in the mixer now.
- OFF
Show folders
- OFF
- I want to see all tracks.
- ON
Show normal top level tracks - ON
Show tracks that are in folders - ON
Show tracks that have receives
- ON
- I have no way of easily scrolling in the Mixer, and rely on selecting tracks in the Arranger now, so I need these views linked.
- ON
Scroll view when tracks activated
- ON
- This doesn’t matter, but I have it on.
- ON
Auto-arrange tracks in Mixer
- ON
- This doesn’t matter, so I just don’t care.
- OFF
Group folders to the left
- OFF
- This doesn’t matter, but I have it off for when I want to use the mixer normally.
- OFF
Group tracks that have receives to left
- OFF
- This doesn’t matter, but I want to make sure that I don’t mistakenly click it and cause problems.
- OFF
Clickable icon for folder tracks to show/hide children
- OFF
- I want a single channel shown to the left.
- OFF
Show multiple rows of tracks when size permits - N/A
Show maximum rows even when tracks would fit in less rows
- OFF
- I want to see FX, duh?
- ON
Show FX inserts when size permits - ON
Show sends when size permits
- ON
- I do want to see FX parameters now that I have a lot of extra space! I don’t know how I’ll use these, but I know that I will not use them if I don’t see them.
- ON
Show FX parameters when size permits - ON
Group FX parameters with their inserts
- ON
- I don’t understand how this works when it’s turned on. It seems to just make sends disappear.
- OFF
Group sends with (before/after) FX Inserts
- OFF
- I don’t use track icons, so I turn them off.
- OFF
Show track icons in Mixer - ON
Show icon for last track in folder
- OFF
- The entire premise here is that I have the mixer docked to the left, so… do that.
- ON
Dock Mixer in Docker- Docked to LEFT for “Editor” Screenset.
- ON
Mixer Theme Adjust Settings
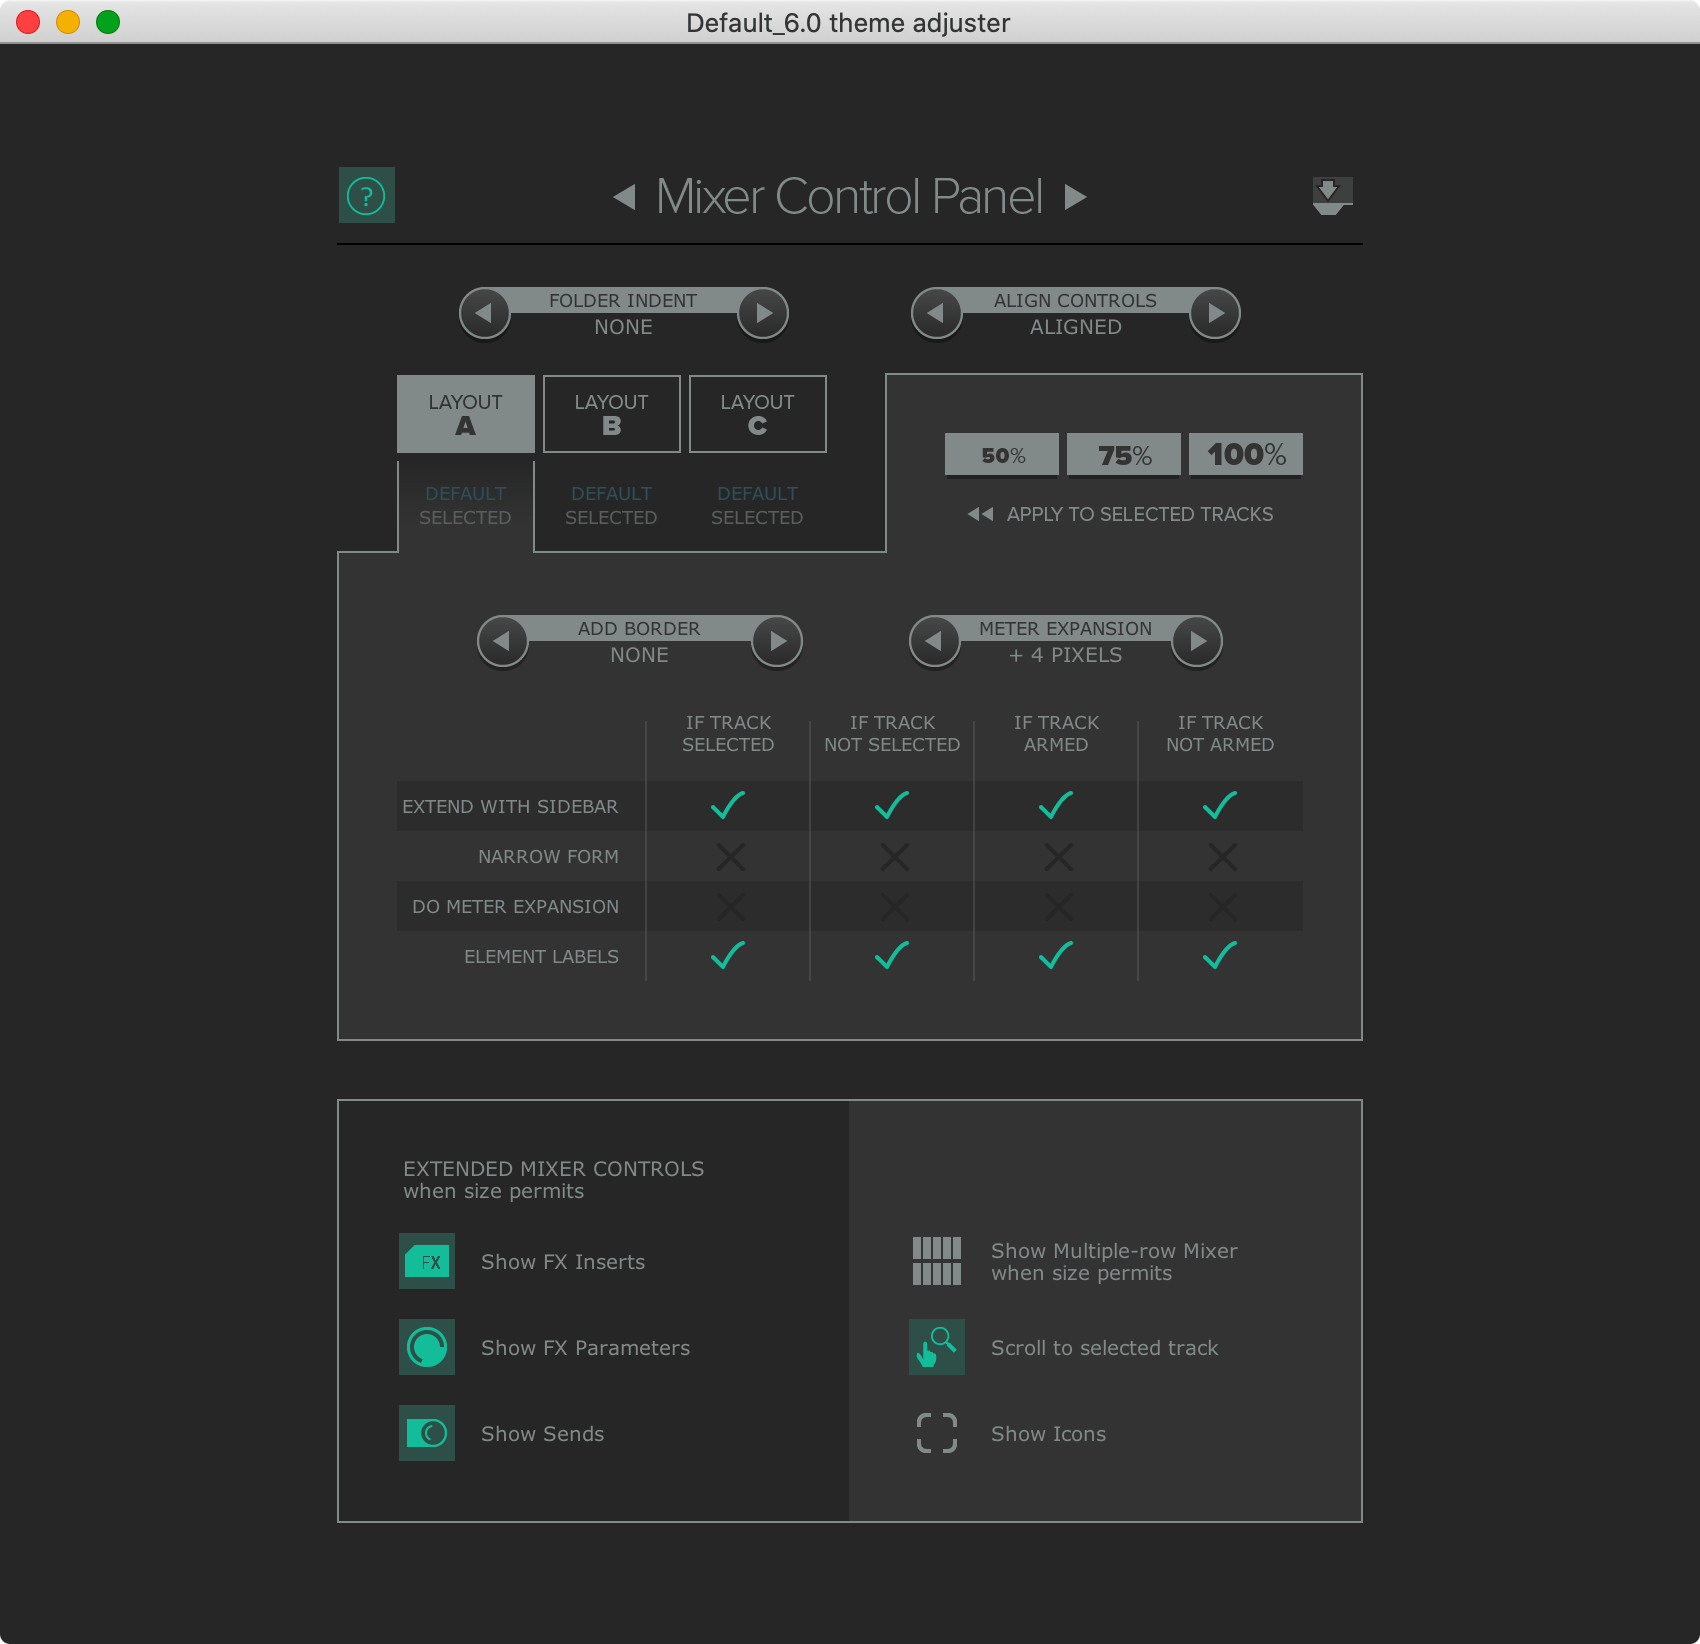
These are my settings for Layout A, and I’ve changed View->Screensets/Layouts->Layouts->Mixer Panel to “200% A” for my Editor screenset.
Notably:
- NONE
Folder Indent - NONE
Add border - ON
Extend with Sidebarfor everything. - OFF
Narrow Formfor everything. - OFF
Do Meter Expansionfor everything. - ON
Element Labelsfor everything.
FX Browser Settings
- I don’t like having FX windows all in a single box. With the Mixer on the left, I’ll be selecting specific FX and not using the FX chain window much.
- ON
Preferences->Plugins->Auto float new fx windows
- ON
- I only use VST and JSFX.
FX Window right click->Show in left-pane list- ON VST, VST3, JS, Instruments, Cockos, FX Chains.
- I like to start fresh when selecting FX, it’s fairly rare that I want the same search/settings when starting over.
- OFF
FX Window right click->Auto-clear search field on close - OFF
FX Window right click->Auto-clear folder view on close
- OFF
Shortcuts
I will need a few shortcuts to work with this, specific adding/selecting FX.
This is the first time I’ll be installing a script from reapack to do something, because it is VASTLY superior to REAPER’s own capabilities.
- Add “https://github.com/Neutronic/ReaScripts/raw/master/index.xml” to reapack’s repository list.
- Open
Extensions->ReaPack->Browse Packages - Find “Quick Adder V2”
- Mark for install.
- Apply.
I’ll likely be using this frequently, so I’ll immediately assign it to the shortcut of F12, which is an easy key to hit and out of the way of other commands.
Quickadder doesn’t allow “browsing”, and I occasionally want to browse. I’ll use REAPER’s default FX Browser for now and assign it to F11, which is right next to Quick Adder’s F12.
- F11
View: Show FX browser window
I also want a quick way to open existing FX. I’ll be assigning those to control-number. Note that no-modifier is grid, numberpad is markers, and command is FX.
I’m using Control specifically because I have Caps Lock remapped to Control. It’s easy for me to use Control with the top row of keys due to this remapping.
- Control-1
Track: Open/close UI for FX #1 on last touched track
Edit Screenset
Here’s my new editor screenset window. I don’t plan on using the “Mixer” screenset now.
Editing Changes
- I’ve had more issues tracking down fades that I didn’t put in place, than problems I’ve had solved by automatic fades. I prefer to add fades myself so I know exactly what’s happening.
Project->Media Item Defaults- OFF
Create automatic fade-in/faed-out for new items, length:
- OFF
- Time between hearing a take-fx change and hearing it is affected by this setting. I set this low as reasonable.
- 5ms
Preferences->Audio->Buffering->Media buffer size when per-take FX UI open
- 5ms
- I like to use REAPER’s free item positioning. This allows overlapping items to be segregrated into lanes. I find that this “Tracks in a track list” setup much easier to edit in.
Options: Show overlapping media items in lanes (when room)(Action List)
- I don’t like the explicit group selection method where you can still select a single track when there’s a group. If I have a group made, then I always want it working as a group until I turn it off.
Options: Selecting one grouped item selects group(Action List)
Performance
- I want to see pretty things when I’m recording, crank up the drawing rate.
- 30hz
Preferences->Audio->Recording->Show preview of recording items while recording, update frequency:
- 30hz
Workflow
- I use this format because it makes it easier to sort by track location, then track time.
- $tracknumber-$track-$month$day$year_$hour12-$minute$ampm
Preferences->Audio->Recording->Filename format for recorded files
- $tracknumber-$track-$month$day$year_$hour12-$minute$ampm
- I move time selection around while editing, but I am often looping an adjacent or overlapping section of audio. Loop and Selection can’t be linked for me.
- OFF
Preferences->Editing Behaviour->Link loop points to time selection
- OFF
Visual
- I have a difficult time seeing the selection bars, so I use these settings to make it more obvious:
- Solid edge on time selection highlight
Preferences->Appearance - Solid edge on loop selection
Preferences->Appearance - 4
Preferences->Appearance->Play Cursor Width - 1x
Preferences->Appearance->Pixels between items on adjacent track
- Solid edge on time selection highlight
- Reaper’s Spectrogram view mode is awesome. I find that it lets me recognize what’s in an item much better than a simple peak file. It still draws normal “peaks” but with colour to indicate the dominant frequency component at that time. These are the settings that I find to be the most distinctive.
View: Show peaks display settings(Action List)- Spectral Peaks
Display Mode - 2.9
Noise Threshold - Slide
Redto 80hz - Scale Peaks by Square Root
.. menu - Rectify Peaks
.. menu
- Spectral Peaks
- It’s 2020 still, continuous scrolling is still the way to go.
View: Continuous scrolling during playback(Action List)
Takes
- I use the Takes system extensively. This means switching between takes frequently audition which part is ideal. There’s a lag to this that seems to be affected by the following setting. It also affects the time after moving the cursor that you hear audio, so I set it as low as I feel comfortable with
- 10ms
Preferences->Audio->Buffering->Media buffer size:
- 10ms
- Takes in lanes is disgusting. It shows you a mess that you never really need to see. My workflow is to act like there’s an onion to peel, not a tetris game I need to reverse.
- OFF
Options: Show all takes in lanes (when room)(Action List)
- OFF
Mouse Modifier Setup
Ok, I have to use the cursor in order to use REAPER. It’s fairly clear that without (and possibly even with!) extensive scripting it would not be possible to use REAPER with a keyboard only.
I’ll be using different Modifier-Meanings™ as from the previous design session. I realized that I’m used to option for deletion, instead of control. I will write an article with updated shortcuts as I continue to think through them.
I’ve adjusted the modifier meanings so they don’t have “magic” meanings (‘other action’ type things). Each one has a specific meaning.
I have implemented all of these mouse modifiers in my setup. Previously discussed hotkeys have yet to be implemented.
- Shift is for selection or moving contents (effectively an implicit selection->restriction)
- Alternatively, when using vim-like keys Shift implies “capital letter”. Only used when no selection is available.
- Command is for changing values (creating/cloning/resetting/restricting)
- Option is for ignoring something, or deleting values.
- Alternatively, same function as command if it’s an OS shortcut (like
command-s)
- Alternatively, same function as command if it’s an OS shortcut (like
- Control is for changes to “size” of an action, such as ignoring snap or fine tune.
- Including deletion of something
I’m noting the changes from defaults
Open up Preferences->Mouse Modifiers if you want to follow along with these changes:
Mouse: Media item - left click
- Clicking something to select it is a core concept of cursor usage, but I use
Controlfor changing size/time.- Control - Select item and move edit cursor ignoring snap
- Shift+Cmd - None
Mouse: Media item - left drag
- I use Control for ignoring snap.
- Ctrl - Move item ignoring snap and time selection
- I use Command for creating new things, and control for ignoring snap
- Cmd - Copy item
- Cmd+Ctrl - Copy item, ignoring snap
- I use Shift for ignoring item boundaries and Control for ignoring snap
- Shift - Move item contents
- Shift+Ctrl - Move item contents ignoring snap
Mouse: Media item edge - left drag
- I use Control for ignoring snap.
- Ctrl - Move edge ignoring snap (relative edge edit)
- Shift - None
- I use Control for ignoring snap, and option for ignoring grouping.
- Opt - Move edge ignoring snap and selection grouping
- Opt+Control - Move edge ignoring snap and selection grouping
- I use Control for ignoring snap, option for ignoring groups, and I think command is the most logical for stretching an item.
- Cmd - Stretch item
- Cmd+Ctrl - Stretch item Ignoring snap
- Cmd+Opt - Stretch item ignoring selection-grouping
- Cmd+Opt+Ctrl - Stretch item ignoring snap and selection-grouping
Mouse: Media item stretch marker - left drag
- I use Control for ignoring snap.
- Ctrl - Move stretch marker ignoring snap
- I use Control for ignoring snap, and option for ignoring grouping.
- Opt - Move stretch marker ignoring selection/grouping
- Opt+Ctrl - Move stretch marker ignoring snap and selection/grouping
- I use Control for ignoring snap, option for ignoring groups, and I think command is the most logical for moving pairs
- Cmd - Move stretch marker pair
- Cmd+Ctrl - Move stretch marker pair Ignoring snap
- Cmd+Opt - Move stretch marker pair ignoring selection-grouping
- Cmd+Opt+Ctrl - Move stretch marker pair ignoring snap and selection-grouping
- I was unaware of the “Move contents under stretch marker” capability until I read this, and wow! How useful is that. It moves the contents between any adjacent stretch markers, allowing you to more precisely line up your stretch marker. Since this is acting on an implicit selection (and it’s my only key left!), I’ll use shift for this. As usual, control for ignoring snap, option for ignoring selection/groups.
- Shift - Move contents under stretch marker
- Shift+Ctrl - None, this command is always ignoring snap.
- Shift+Opt - Move contents under stretch marker ignoring selection-grouping
- Shift+Cmd - Move contents under stretch marker pair
Mouse: Envelope point - left drag
- I use Control for ignoring snap and fine movement.
- Default action - Move envelope point
- Ctrl - Move Envelope point ignoring snap
- Shift - Move envelope point on one axis only
- Shift+Ctrl - Move envelope point on one axis only ignoring snap
- Command for drawing envelope points.
- Cmd Freehand draw envelope ignoring snap
- Everything else empty.
Mouse: Envelope point - double click
- I use Option for deleting things.
- Ctrl - Action:
SWS/BR: Delete envelope point at mouse cursor- Doesn’t work??
- Ctrl - Action:
- Opening the editor is likely the most common use.
- Default action - Open envelope point editor
- Command to reset value.
- Cmd - Reset point to default value
Mouse: Envelope segment - left drag
- Move envelope segment by default.
- Default action - Move envelope segment
- I use Control for fine movement.
- Ctrl - Move envelope segment (fine)
- Option for ignoring things.
- Opt - Move envelope segment ignoring time selection.
- Command for creating values.
- Cmd - Insert envelope point
- Command for creating values, control for fine movement.
- Cmd+Ctrl - Insert envelope point ignoring snap
- Everything else empty.
Mouse: Envelope segment - double click
- Command to reset.
- Cmd - Reset envelope segment curvature
- Everything else empty.
Mouse: Automation item - left drag
- I use Control for ignoring snap
- Ctrl - Move automation item ignoring snap
- Cmd+Ctrl - Copy automation item ignoring snap
- Shift for ignoring region boundaries (implicit selection)
- Shift - Move automation item contents
- I almost always want to pool items if I’m automation items. For non-pooling, I use normal copy/paste shortcuts. Command for cloning, control for ignoring snap.
- Cmd - Copy and pool automation item
- Cmd+Ctrl - Copy and pool automation item ignoring snap
- Everything else empty.
Mouse: Track - left click
- All I want left click in an empty track selection to do is to deselect items and move cursor. I use hotkeys for time selection stuff. Control to ignore snap.
- Default action - Deselect all items and move edit cursor
- Ctrl - Deselect all items and move edit cursor ignoring snap.
- Everything else empty.
Mouse: Track - left drag
- I rather that left-click selects things like in basically every other product (REAPER doesn’t do th is by default!?!?)! Control for ignoring snap, shift for adding to selection.
- Default action - Marquee select items
- Ctrl - Marquee select items ignoring snap
- Shift - Marquee add to item selection
- Command for creating new things, and I always prefer pooling items when using the mouse. Keyboard for non-pooled copy/paste. Control for ignoring snap.
- Cmd - Draw a copy of the selected media item, pooling MIDI source data
- Cmd+Ctrl - Draw a copy of the selected media item, pooling MIDI source data
- Everything else empty.
Mouse: Ruler - left click
- Control for ignoring snap.
- Ctrl - Move edit cursor ignoring snap.
- Option for deleting things.
- Opt - Clear loop points
- Shift for changing selections, control for ignoring snap.
- Shift - Extend Loop points
- Shift+Ctrl - Extend Loop points ignoring snap
- Everything else empty.
Mouse: Ruler - left click
- I link time selection and loop, so I don’t need separate control. Control for ignoring snap.
- Default action - Edit loop point
- Ctrl - Edit loop point ignoring snap
- Shift for changing selections, control for ignoring snap.
- Shift - Move loop points
- Shift+Ctrl - Move loop points ignoring snap
- Everything else empty.
Mouse: Ruler - left click
- Command for creating things, so I use this for assigning (implicitly new) loop points to the region. I will almost always use a hotkey for this.
- Default action - None
- Cmd - Set loop points to region
- Shift for time selections.
- Shift - Set time selection to region
- Everything else empty.
Mouse: Project region - left drag
- Move region without copying by default, control for ignoring snap.
- Default action - Move project region but not contents
- Ctrl - Move project region but not contents ignoring snap
- Shift for moving contents, control for ignoring snap.
- Shift - Move contents of project region
- Shift+Ctrl - Move contents of project region ignoring snap
- Command for creating new things, control for ignoring snap.
- Cmd - Copy contents of project region
- Cmd+Ctrl - Copy contents of project region ignoring snap
I don’t see a reason to copy a region without its contents.
- Everything else empty.
Mouse: Project marker/region edge - left drag
- Control for ignoring snap.
- Default action - Move project marker/region edge
- Ctrl - Move project marker/region edge ignoring snap
- Everything else empty.
Mouse: Project tempo-time signature marker
- Control to ignore snap.
- Default action - Move project tempo/time signature marker
- Ctrl - Move project tempo/time signature marker ignoring snap
- Command for changing values.
- Cmd - Move project tempo/time signature marker, adjusting previous tempo
- Everything else empty.
Mouse: Arrange View - right drag
- I rarely use mouse for creating time selections, but use right-drag as a backup. Control to ignore snap.
- Default Action - Marquee select time
- Ctrl - Marque select time ignoring snap
- The thing I use the mouse the most for is drawing a selection to zoom. This is REAPER’s marquee zoom. I leave right-drag as select, even though I rarely use it. Since I’m moving the contents of the arranger visually, I use shift.
- Shift - Marquee zoom
- Everything else empty.
Mouse: Arrange view middle click
- Everything empty.
Mouse: Arrange view middle drag
- I use the middle-click “Pan Canvas” type action in graphics programs, so I copy this to REAPER.
- Default action - Hand scroll
- Everything else empty.
Mouse: Edit cursor handle
- Everything empty.
Mouse: MIDI…
To be continued…
Conclusion
Wow! First time I’ve ever managed a cohesive set of mouse modifiers in REAPER. This is fairly easy to use for me, as I always know (or close) what a modifier is going to do in a given context.
Might actually make mousing-around ok… in a “This form of torture isn’t as bad as ripping my toe nails out “ sort of way.
Meta
This post took:
- 14 hours to do