The Studio One Effects Review and Studio One Instruments Review appear to have been one of the more popular posts on my blog according to analytics. In a close second Place are the Digital Performer series.
So now I’m going to review the included audio effects in the latest from Steinberg: Cubase 9 Pro.
There’s 70+ of them. So hang on tight! (and please read the ‘Rating’ section first!)
Spoiler: Overall rating
Contents
- Rating
- Stereo Effects in Cubase
- AmpSimulator
- AutoPan
- Bitcrusher
- Brickwall Limiter
- Channel Strip
- Chopper
- Chorus
- Cloner
- Compressor
- Voxengo CurveEQ
- DaTube
- DeEsser
- Distortion
- DJ-Eq
- DualFilter
- EnvelopeShaper
- Expander
- ExternalEffect
- Flanger
- Frequency
- Gate
- GEQ-10
- GEQ-30
- Grungelizer
- Limiter
- LoopMash FX
- Magneto2
- Maximizer
- Metalizer
- MidiGate
- Mix6to2
- MixConvert V6
- MixerDelay
- ModMachine
- MonoDelay
- MonoToStereo
- MorphFilter
- MultibandCompressor
- MultibandEnvelopeShaper
- MultibandExpander
- MultiScope
- Octaver
- Phaser
- PingPongDelay
- Pitch Correct
- Quadrafuzz V2
- REVelation
- REVerence
- RingModulator
- RoomWorks
- RoomWorks SE
- Rotary
- SMPTEGenerator
- SoftClipper
- StepFilter
- StereoDelay
- StereoEnhancer
- StudioChorus
- StudioEQ
- TestGenerator
- ToneBooster
- Tranceformer
- Tremolo
- Tube Compressor
- Tuner
- UV22HR
- Vibrato
- VintageCompressor
- VST Amp Rack
- VST Bass Amp
- VSTDynamics
- WahWah
- Conclusion
- Support me!
Rating
1-100? Great. There’s going to be arbitrary ratings of ‘78’ or ‘33’ instead of ‘30’ or ‘80’.
Nope.
Well, yes. These are my subjective evaluations of these products, but the ratings are not random. First I start out with my rough rating on a piece of paper on a scale of 0-10. The scale roughly looks like this:
- 0-1: Garbage Tier plug-in that almost always does more harm than good. I may give a full point of ‘1’ if it seems like they put in some semblance of thought in to the concept.
- 2-3: There might be a redeeming quality that is rarely useful, but mostly garbage tier.
- 4-6: Mostly usable. Whether it’s a 4, 5 or 6 depends largely on the GUI.
- 7-8: Good with some unique feature, great GUI or other area of excellence.
- 9: I often would select this over a paid plug-in of decent repute, OR a 7/8 with a really good GUI or some other very unique feature.
- 10: I would pay for this at competitive market price.
So why don’t I just leave it at a scale of 0-10? Why good man, thank you for asking!
I already have a good idea of what I think about these plug-ins from hours of use already, but while writing this up I am constantly checking the manual, videos and using them. Often I’ll learn something about them that I missed in my initial experience with the plug-in. Sometimes it’s something small that may make me want to knock down the rating a bit, or something fairly major that makes me wanna knock it up… but not a full point. So… I use a scale of 0-100, and I modify my base rating as I’m going.
So for instance let’s take AmpSimulator right below. I gave this a rating of 62. I felt it was usable in some certain cases, a failure for it’s main task, and had an excellent GUI. I originally had this labelled a 4, but when I tried it with bass guitar I knocked it up to a 6. When I learned that you could drag the graphical display elements, I added 2 more points. If you could load impulses, I’d probably have given it another 5 points. If the amp/cabinet type displays were better then I may have given it another 2-3 points.
There is one other thing about these ratings that is very important: they are contextual to the class of process. While I may use Magneto II on every project in Cubase, and never use Pitch Correct that does not affect their rating. I only consider Magneto II in the context of saturation effects, and Pitch Correct in the context of pitch correction effects.
You may see me rate something that few people would use often as a 90, and another plug-in that’s very useful as a 48. This means that the ‘90 plug-in’ is fantastic when you need it, and the ‘48 plug-in’ is just good enough even if you use it constantly.
The overall rating is based how well the full package of Cubase Pro fulfills the needs of a musician, producer or recordist. A 0 means that you’re on your own and need to buy entirely third-party products to complete a production, and a 100 means that you’d be a moron if you replaced any of these plug-ins without trying them out really well first.
Stereo Effects in Cubase
Every effect that you put on a mono track is mono. Anything. Everything. Take Autopan for instance. It can not pan a mono track because there’s only 1 channel. It only works as an amplitude modulator (tremolo) on a mono channel.
To use a stereo effect on a mono track, you need to create an FX Channel with your track routed to it, then place the stereo effect on the FX Channel. Total nonsense. Many other DAWs allow you to use stereo effects on mono tracks without the added clutter and extra effort.
If I linked to this then I probably took 5-40 points off depending on how frequently you need to use this idiotic workaround to experience the full-effect of the plug-in in question.
edit: I was informed of another workaround Apparently most all VST3 plug-ins can be copied over from a mono to stereo track. When I tested this secondary workaround I was using primarily VST2 still and it did not work properly.
You can simply create a new stereo track, then drag over your effects and audio to the stereo track. Now you can use stereo effects on it.
Still very annoying, and this second workaround does not help if you want to live-monitor an effect.
EDIT July 29, 2018
Another workaround I’ve learned of is to use stereo audio tracks for basically everything. You can place mono tracks on stereo channels and the mono signal will go to both stereo channels. You can now use stereo effects on mono signals.
You still need to manually set this up, and you will need to record mono tracks to mono tracks and import will still put mono files on mono tracks.
You can use Mix6to2 for the purpose of using mono effects on stereo channels if needed by turning up the left channel in L/R and turning down the right channel in L/R.
Thank you to Laureano López for this tip!
AmpSimulator
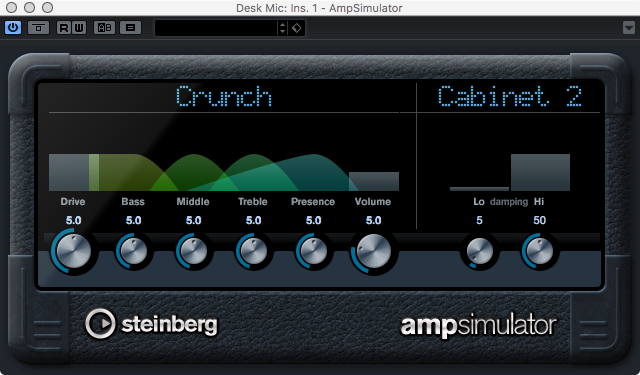
The “AmpSimulator” plug-in, not to be confused with the VST Amp Rack or VST Bass Amp, is nearly a decent enough plug-in.
I spent nearly an hour guitar twiddling with this when writing this post, because I was constantly so close to a decent, usable sound, that I thought maybe if I tweaked a bit more then I’d be happy with it.
I was not happy with it for guitar. Not for crunchy sounds, not for 80’s hair metal leads, not for clean reggae up-beats, not for modern djent sounds, not for anything.
What was I happy with is two-fold: the GUI and the sound on bass guitar.
The GUI is excellent. You can adjust the parameters via the knobs, the ‘type menus’ or the informative GUI. Both click/drag work and mouse-wheel. The GUI does a great job of communicating what is happening, and I feel that the amp styles are labelled reasonably. The only downside is that the cabinets are listed as ‘Cabinet 1’, ‘Cabinet 2’ etc.. and there is no integrated way to use your own cabinet impulse.
Bass guitar. I was surprised. I enjoyed using this more on bass more than the VST Bass Amp. The ‘American Clean’ and ‘Crunch+’ models offered some fantastic sounds for a variety of modern rock styles, and the ‘Broken Tube’ amp style was the gateway to that gritty indie bass guitar sound that is annoyingly popular sometimes.
AutoPan
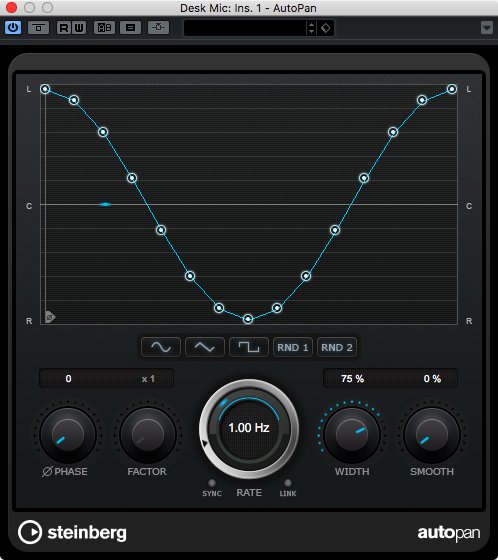
Awesome fun.
Autopan allows you to pan your signal in the stereo field over time with a user-defined ramp between channels. That’s not all, you can also use it as an amplitude modulator as well.
The GUI is excellent. It communicates what the plug-in is doing clearly, the controls are clearly labelled and it has the necessary parameters to use the process to its fullest in context.
A solid 8.
Oh? what’s that? I rated it 45? Let me tell you a story about how Cubase constantly annoys me..
When would you usually want to use Autopan? On a mono track of course. That sucks. It sucks a lot. If this was a third-party plug-in I would not fault it for Cubase’s shortcoming, but since you can only use this in Cubase I have to knock it down quite a bit.
Bitcrusher
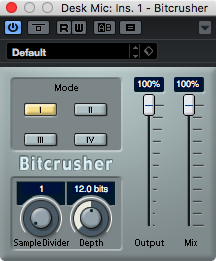
A simple bitcrusher. It truncates, it decimates, it does not dice or fry.
Bitcrusher does what it says on the tin, and it has a mix control! I’ve not felt the need to reach for another bit-crushing plug-in while in Cubase, even though it’d be nice to have some other neat features.
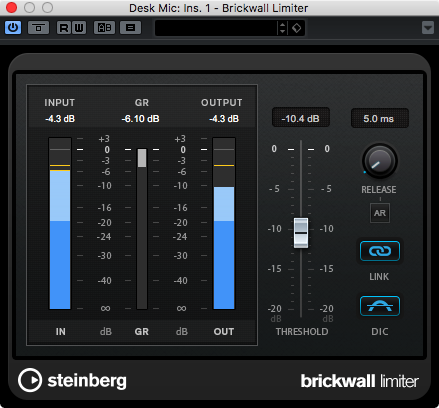
Brickwall Limiter
I struggled trying to rate the Brickwall Limiter.
I have access to amazing products like Pro-L, Elephant, Limitless, Invisible Limiter and others. Companies like Melda Production, Izotope, Flux, Slate Digital and others make some really great limiters as well.
Brickwall Limiter is not the best sounding Limiter out there. It gets really stuffy sounding at high gain reduction (I think due to the release behaviour). Even at moderate levels of reduction, it still imparts a sound to the material that I’m not a fan of. If given a blind A/B of limiters, I think someone could trick me in to picking this… but when using it myself I have trouble getting the sound I desire.
It does however have 1 redeeming feature: DIC (giggle). DIC (Detect Intersample Peaks) shows you when the recreated analog waveform would exceed an absolute ceiling of 0dbFS. On many cheaper playback devices this will cause clipping and audible crackling. DIC lets you see that clearly.
I will say that if Brickwall Limiter was 0 latency then I probably would have given it a 60-something rating. At the very least you would be able to have it on your master channel 24/7 as a safety measure. Unfortunately, Brickwall Limiter has a processing latency of ~1ms. As such I would not recommend having this always in your project since it would cause ~1ms of added latency to any channels going through that bus.
If you are reaching for this to increase the loudness of a signal, maybe try Maximizer instead. It doesn’t suck.
Channel Strip
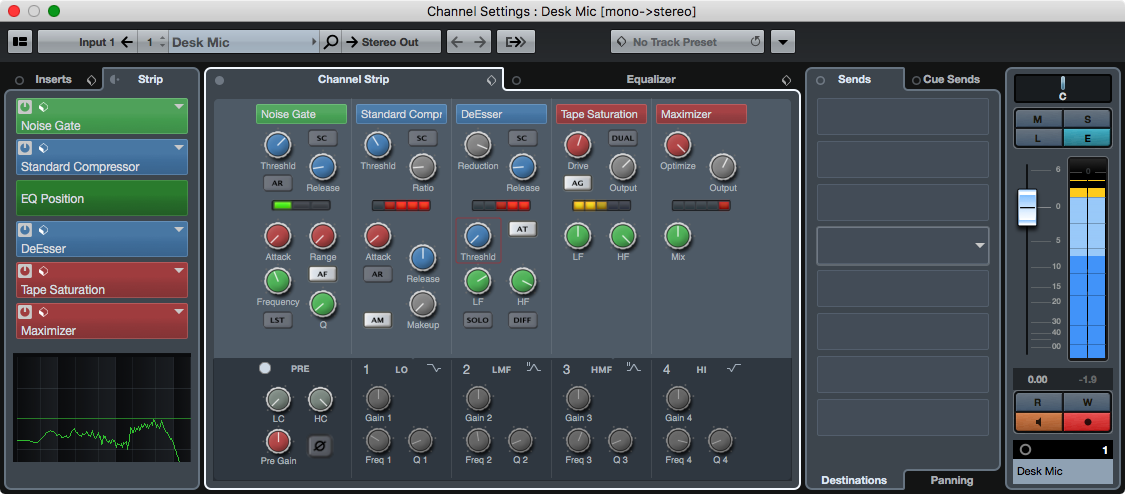
Not a plug-in, but instead a collection of plug-ins in Cubase. I am including it because it’s an integral part of Cubase Pro and I use it constantly
What is the Channel Strip? It’s all this stuff in 6 sections, with each section having mutually exclusive options.
EQ
- 5-band EQ
Gate
- Noise Gate
Compressors
Envelope
Saturation
- Magneto II
- Tape Saturation
- Tube Saturation
Limiters
That’s a lot of stuff. It is extremely useful, and it’s on every audio track
While each of these modules may have limited controls, they do present the majority of parameters that you would use 80% of the time.
Not a single one of these things, except Magneto II is a worth the rating I gave the channel strip, having them all in one place on every audio track is exceptionally useful.
The Channel Strip is not only shown in the Editor window as I pictured above, but it’s shown as a proper strip in the mixer. Very handy.
This is one of my favorite features of Cubase Pro. When working in Cubase, I almost always go for the Channel Strip first unless I have have a specific idea in mind. That’s probably a 50% ‘grab first’ rate, which is exceptionally high in my world. I couldn’t say how often I stick with it, but I am definitely satisfied with their presence in the software.
I should point out though that there are some vital parameters missing from some of the strips. For instance the ‘VintageCompressor’ mode has no ratio, and the Maximizer is missing Release and Recover controls. It’s rarely an issue in practice, but it would be nice if you could spawn your strip-version in to a plug-in version easily. Currently you can only setup a plug-in version manually and copy settings by saving/loading presets. This is also the only way to find out what those hidden setting’s values are… or how to change them yourself.
Chopper
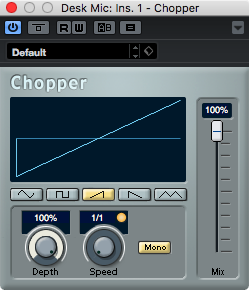
This is basically just a mini-version of Autopan (in link mode, or on a mono track). There’s no need for it to be in Cubase except for backwards-compatibility.
Chorus
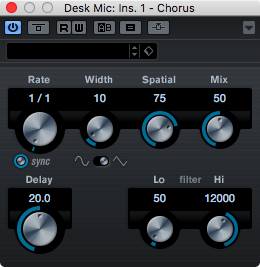
Chorus is a very basic chorus. I rarely have a desire to use this, but it is competently done for a simple effect.
For what it does, it’s probably included somewhere in a VST Library example.
Cloner
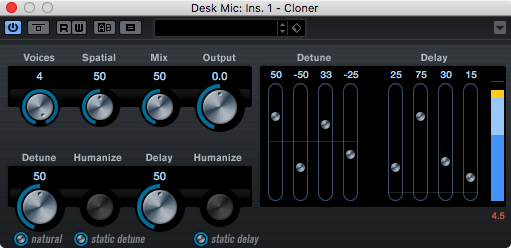
This is what I’m talking about (almost). Cloner is a harmony plug-in with chorus. It offers 4 pitched delay feedback lines. The voices are detuned, fed in to separate delay lines and panned around the stereo field.
Cloner has functions to modulate the delay time and detune for a more interesting and natural sound, as well as an alternate detuning algorithm.
Cloner is fun to use, even if rarely used. A solid 75.
Oh? what’s that? I rated it 38? Let me tell you a story about how Cubase constantly annoys me..
Compressor
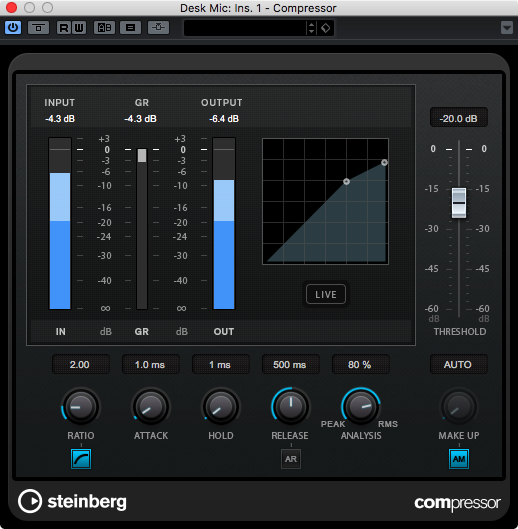
I am slightly obsessed with compressors. I love using them, and I’m highly critical of them as well.
The Compressor in Cubase Pro is useful. It offers variable Peak/RMS detection, auto-release, toggle-able soft-knee, an OK auto-makeup-gain, look-ahead and a decent GUI.
I am always a fan of editable transfer function graphs, and Compressor has one.
I never knew it, but having the threshold setting on the right side really bothers me. I knocked off 15 points for it. Every single time that I’ve opened Compressor I’ve forgotten about that, which caused me to lose my train of thought and look for the damn threshold control. It seems like a small thing, but to me it’s a big thing.
Look-ahead can be turned off by turning on the ‘Live’ mode. The look-ahead is useful when you have very short attack settings that can cause unpleasant pops when the compressor begins to act.
Overall I found the Compressor useful on sources with minimal transient content: Vocals, Guitar, Horns etc… It’s not very much fun on percussion, slap bass, any sort of shouty vocals and similar material.
Honestly, I don’t think I would ever reach for the Compressor except out of curiosity (which is why I’ve used it a good bit already). There’s so many better options out there from third-parties and in Cubase itself.
Voxengo CurveEQ
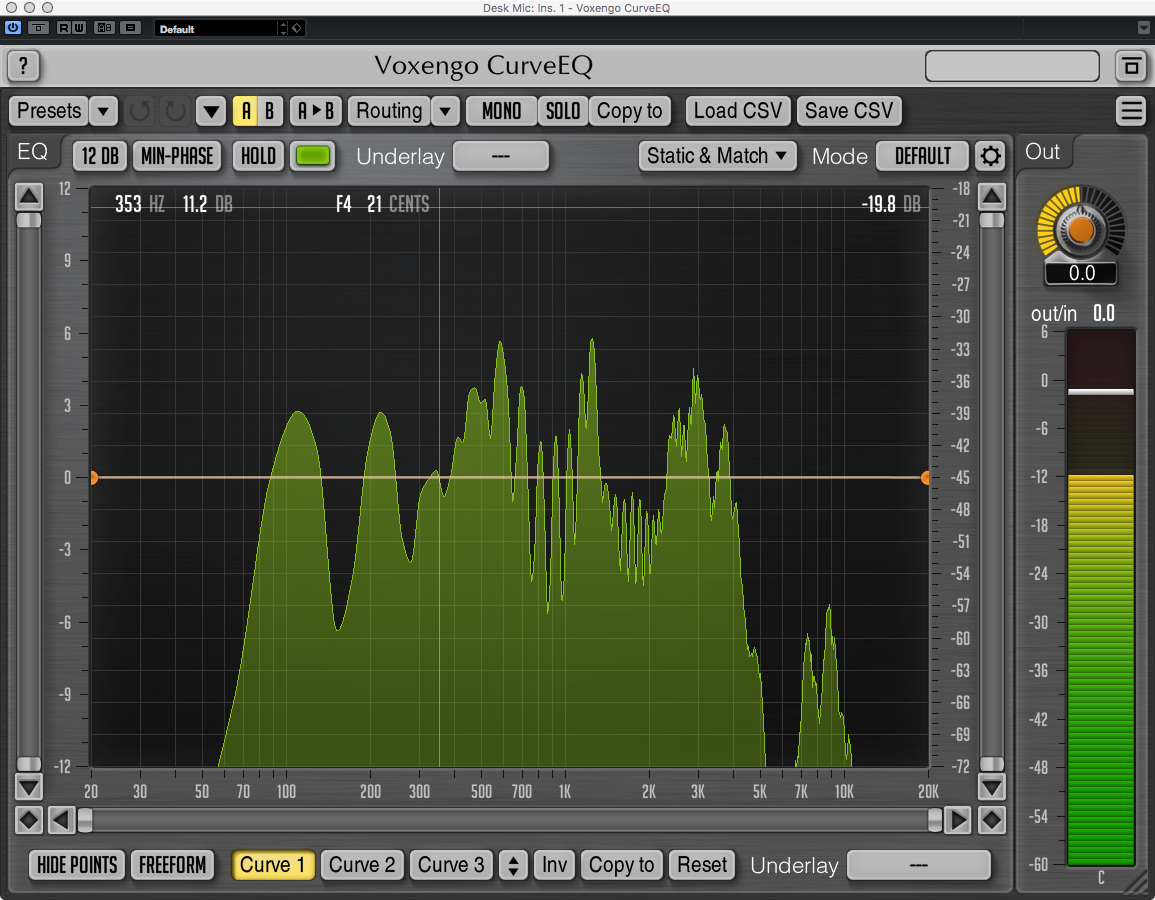
Voxengo CurveEQ is included in Cubase Pro. Holy wowie.
CurveEQ is one of my absolute favorite plug-ins. I’ve used it for nearly a decade, over which time it’s been constantly improved.
I could write a huge section on this plug-in, but instead I am going to restrain myself and simply point out some of the super cool/useful things about it in a list.
- Excellent animated frequency graph with a plethora of exceptionally useful settings.
- Scaleable GUI
- Extremely intuitive and fast workflow
- Multiple combining layers, which allow you to keep your curves uncluttered.
- Multi-channel processing
- Mid-side processing
- Spectrum matching
- Importable curves (that you can generate easily, as they are CSV format)
- Linear AND minimum-phase filtering
- Excellent sound
This is simply the best thing included in Cubase Pro. Not only would I purchase this separately, but I have. I paid full price for it plus upgrades. I would do it again without hesitation.
DaTube
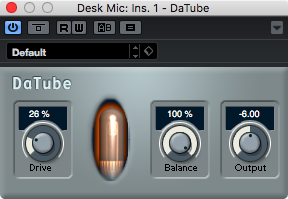
This just appears to be some tanh style tube saturation with a mix knob (called balance here).
It’s not bad, and every time I try it I decide I like it a bit more.
DeEsser

I don’t work with sung vocals too often. When I do, I tend to build my own de-essers with U-he Presswerk and Pro-Q 2 or use Pro-MB alone in dynamic phase mode.
I do frequently use de-esser style workflows for bright cymbals, string squeeks on guitar, voice-overs and some other things.
The DeEsser in Cubase works well for all of these tasks.
The DeEsser has a couple cool features on top of basic-de-essing that make it worth a ‘first grab’.
- Diff mode: lets you hear what is being reduced/removed from the signal.
- Look-ahead: toggle-able and when on helps you avoid those wispy SSSKK type sounds.
- Build in side-chain filter: these are often not included in other de-essers, but are very useful. A sidechain filter allows you to increase/decrease the sensitivity of the effect to specific areas of the analyzed band. Very useful for non-vocal duties.
- Frequency values can be entered via note “A4” or note and cent offset “G#5 -40”.
Distortion
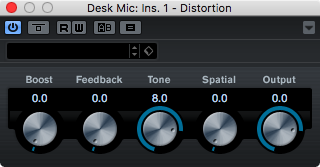
I like distortion, but I do not like Distortion. I can’t find any use for this where I would not prefer to use something else, anything else, instead.
DJ-Eq

A very simple filter plug-in. With a great GUI.
You get 3 bands that you can adjust from -32dbFS/+6dbFS or simply ‘kill’ (set to -32dbFS) The frequency is not adjustable.
Nothing special, but it does the job of a Kill-EQ decently. It would be nice if the kill values were much lower though.
DualFilter
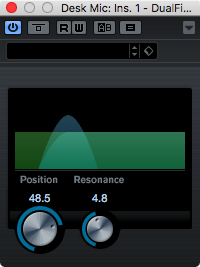
Next to useless.
EnvelopeShaper
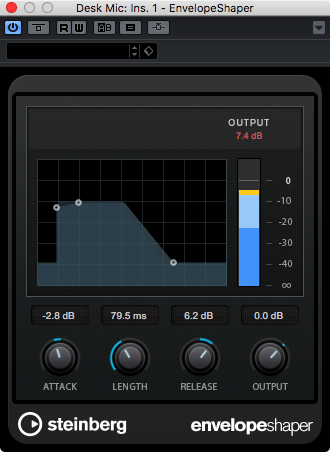
Fun! A sidechainable transient processor.
I’m not sure there’s much to explain here are the GUI is clear about the function of the processor.
The real usefulness here is that the signal causing the effect to enact, and the signal the effect is acting on can be different via sidechaining. An example of this is using your kick drum signal to control the EnvelopeShaper, but have the envelope shaping actually occur on your bass channel.
EnvelopeShaper is very simple plug-in that does what it says on the tin.
Expander
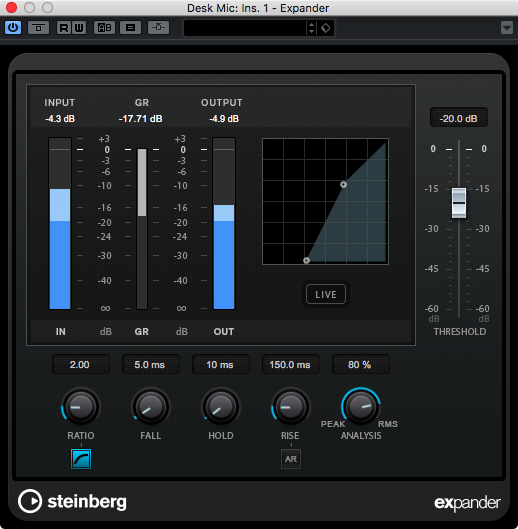
You can think of an expander as almost a compressor in reverse. As sounds get louder, an expander makes them even louder still.
See the Compressor review for a general idea of the Expander. It has the same options and flaws…
The big difference here is that I rarely have a desire for an expander to have a specific sound or flair or feeling or whatever fuzzy-nonsense word you want. The Expander offers clean expansion with an excellent GUI.
Given that I don’t think I’ve intentionally ever purchased an expansion-only plug-in before, and this is sufficient for most uses, I have rated it 80. Then taken 15 off for that idiotic threshold on the right.
ExternalEffect
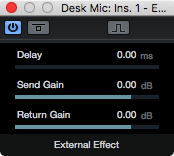
Such a simple plug-in that many DAWs get wrong. ExternalEffect allows you to route audio out of your DAW, then back in, and compensate for the latency of doing this process.
You set this up in the VST Connections window, and you can name each ExternalEffect as you please. It will show up in your effects list with the name that you give it.
Once on a track and with the routing setup, you can have the plug-in send a ping through the bus then automatically compensate for the I/O latency.
Simple. Effective. Extraordinarily useful. Accurate.
I took off 3 points because setting it up in the VST Connections window is a minor pain, but you basically only need to do this once.
Flanger
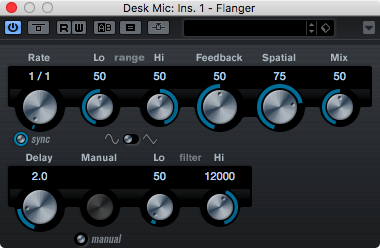
A basic flanger. I’d probably write nothing more, except this is sidechainable.
The modulation can be triggered by an external source, which sometimes can sound rather neat.
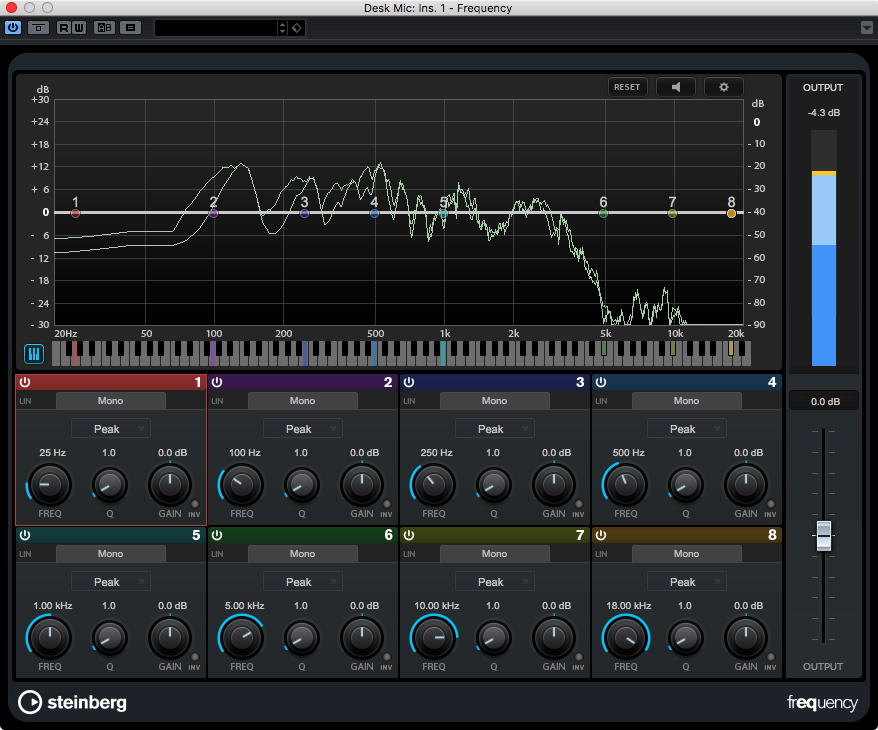
Frequency
It’s the big boy. This is one of the flagship plug-ins in Cubase Pro 9. Frequency is a rather full-featured EQ plug-in that looks similar to some commercial offerings out there.
Let’s look at some of the earmark features offered with Frequency
- Auto-listen: solos the frequency band when edited
- Mid/side processing
- Linear Phase mode per band
- Keyboard: allows you to set frequency bands to specific notes.
- Up to 96db/oct high/low pass filters.
- Label that shows current cursor value in hz, level, note + cents
- Excellent spectrum with multiple options: bar and line modes, peak hold, variable smoothing, slope (I always use 6db/oct)
I am rather happy with this plug-in. If I didn’t already have a major preference for Fabfilter Pro-Q 2 then I’d likely be mostly happy just using Frequency in Cubase.
I particularly enjoy that the spectrum is very responsive with minimal smoothing.
The keyboard function is useful if you’re dealing with an instrument that booms out when the player hits a specific note, or a singer that always feels the need to sing that G#4 like a diseased banshee.
Great addition to Cubase Pro.
Gate
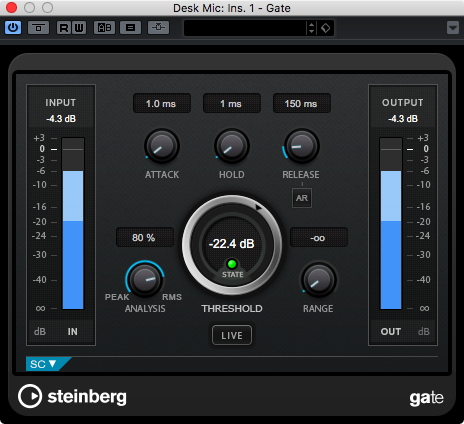
Gates are so useful, and the Gate in Cubase is a great gate.
Gate has the features that you would expect from a basic gate plug-in: attack, hold, release and threshold. It adds a few other useful additions though.
- Peak/RMS modes: When working with some signals like guitar or VO work, having an RMS or near-RMS mode makes for better results.
- Lookahead: Without lookahead, you are doomed to lose part of your attack transient when the gate turns on to let your signal through.
- Range: Rather than totally muting the signal when the gate is off, it is attenuated by the amount set by the range parameter.
There is really nothing particularly unique about the Gate despite these non-basic features, but unless you are working with very busy multi-tracked drums, then the Gate plug-in is likely more than sufficient.
GEQ-10
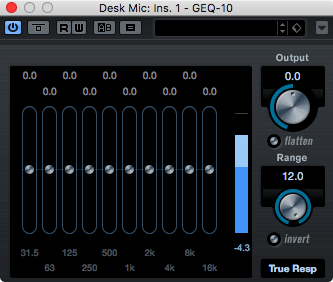
Graphical EQs are a bit of a divisive topic. Some folks (primarily people that started working in live sound) think that they are amazing, and others find very little value in them. The GEQ-10 is a versatile addition to Cubase that will satisfy the former and may convert the latter.
Besides the bank of 10 filters, which seems straightforward enough, GEQ-10 comes with multiple modes for the filters. See the manual for how these modes work, but know that they add a great deal of versatility and usefulness to this plug-in.
GEQ-10 also includes a function to invert the current curve, and scale all filter bands via the range knob.
As far as graphic EQs go, this is actually better than many third-party offerings.
GEQ-30
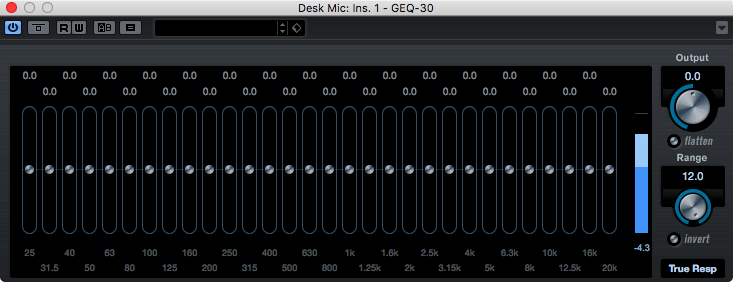
Look up. This is just GEQ-10 with 20 more filters.
Grungelizer
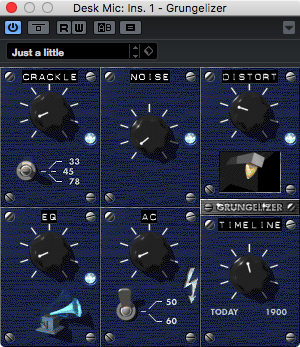
Grungelizer makes your audio sound awful. It adds crackle, pitch shifting, noise, distortion, high-pass and adds hum.
Well, that’s what it’s supposed to do. I can’t think of a time where I’d ever want to use it, but it’s there if you want it.
Limiter
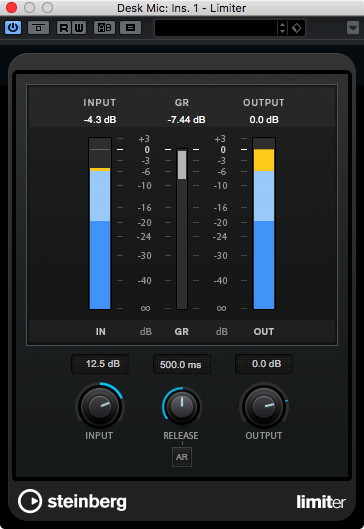
Limiter is a basic zero latency limiter. If you recall the Brickwall Limiter review, you may think that I’m going to rate the Limiter lower, and you’d be wrong.
Unlike the Brickwall Limiter, which seems to be purposed for use as a final stage limiter at the mastering stage, Limiter is a simple limiter that you can actually use on your audio temporarily because of its zero-latency behaviour.
Does Limiter sound good? Not really. Would I render anything with it on there? Probably not. Do I use it? Yes. It’s an excellent temporary protection against annoying clipping sounds.
It will not protect your hearing as it does not reduce the energy of the signal (except in extreme scenarios), but it will reduce the number of clipping events.
LoopMash FX
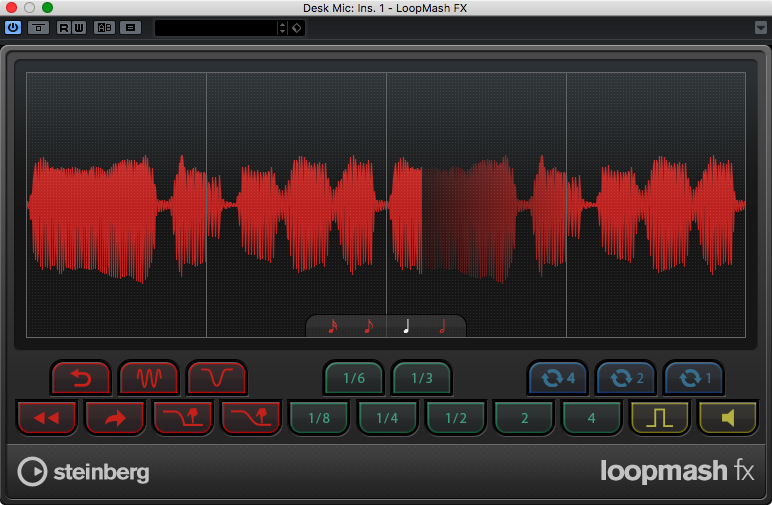
LoopMash FX is an interesting plug-in. It’s basically a ‘glitch’ plug-in of sorts.
LoopMash FX (not to be confused with LoopMash) takes the input audio in real time and slices it up in to slices determined by the associated parameters. With those implicit slices you can do a number of things such as: stutter, backspin, tape start, reverse, scratch, slowdown, slur etc…
The beauty of LoopMash FX is that it all happens in real time. You can apply these effects to a live-input source if you wish. The parameters can be automated so that you can perform these effects in real-time and save the ‘effect performance’ for future playbacks. You can map the parameters to an external controller and use this as a live ‘glitcher’ as well.
While I’ve used LoopMash FX in a couple projects, I opened it while writing this review to make sure I recalled all of the capabilities of it. I clearly made a mistake, since I ended up playing around with it for about an hour. It’s just fun, especially so if you have a controller to use it with.
LoopMash FX is a great deal of fun, and if you’re doing any sort of modern musical styles, it will very likely come in handy.
Magneto2
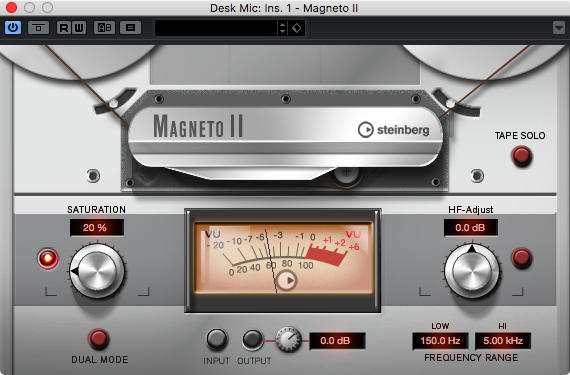
I am a magneto addict. I love using it on everything. Let’s talk about Magneto II.
First let’s talk about what it’s not: A good tape emulation. I’ve worked with a number of tape machines, from janky little 1/4” machines to a couple nice MCI and Studer machines. Magneto II does not do a good job of emulating the complete sound of any tape machine that I’ve worked with.
I was disappointed with Magneto II at first because it’s a fairly poor holistic emulation of tape, but due to its presence in the Channel Strip, I ended up using it regardless.
Magneto II does impart a tape-like saturation that is pleasant, and it imparts some sort of not-very-tape-like filter to the signal. Once you forget that Magneto II is supposed to be some sort of tape emulation, you can transcend to a state of satori.
Magneto II also includes a fun ‘Dual Mode’ that lets you go smashy-smashy on signals. Sometimes it’s fun, sometimes it’s awful. Luckily it’s a toggle.
I know that there’s quite a few people that do not like Magneto, and I completely understand this. If you are looking to make ‘clean’ sounding music, want a tape-like plug-in to ‘warm up’ your signal or are looking to tape-smash things, then Magneto is not going to satisfy you. If you want to make things a bit more aggressive, then Magneto II is awesome.
I like Magneto II. I use it very frequently, and if it was for sale, I would happily pay ~$100 for it. Not because it sounds like tape though… I use U-he Satin for that.
Maximizer
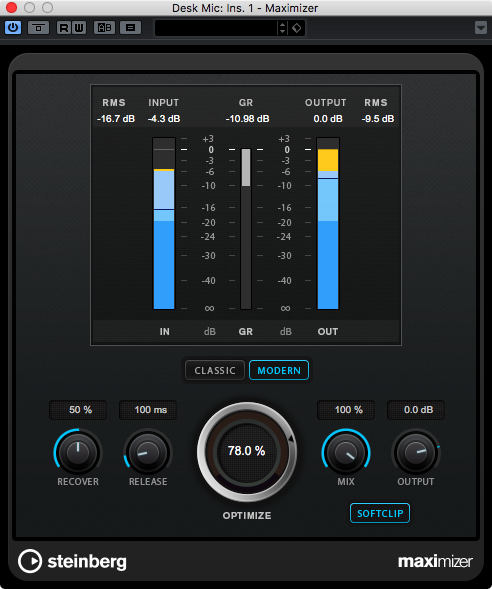
If you are reaching for the Brickwall Limiter, then it’s probably Maximizer that you want instead.
Maximizer is the decent ‘sound more louder’ plug-in in Cubase. It is not a transparent limiter, but instead it seeks to maximize the loudness of the signal through various processes that impart a relatively nice effect.
I am not a fan of the ‘Classic’ mode in Maximizer. The ‘Modern’ mode sounds better to me on nearly all of the material that I’ve tried.
As I mentioned in the Brickwall Limiter review though, I have access to a lot of ‘sound more louder’ plug-ins. I do not reach for Maximizer often, but if it was all I had then I think that I would be relatively satisfied with the results I’d be capable of.
Metalizer
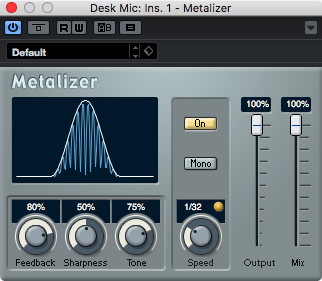
Metalizer is some sort of modulated filter that makes things sound… well, metallic. I find it difficult to be un-biased since I’m quite certain one of my favorite bands has used this on a number of tracks.
Metalizer does provide a unique effect that’s sometimes (rarely) useful and difficult to replicate precisely through 3rd party products.
When you need it, or are inspired to FSU, Metalizer is a neat tool to have access to.
MidiGate
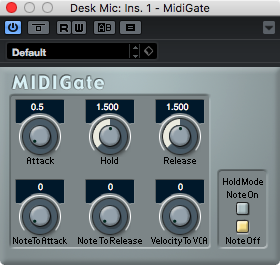
MidiGate is a very simple plug-in that attenuates your signal when it receives midi. Any midi, even from midi-generating plug-ins. Is your imagination working yet?
Some of you reading this may be yawning, and some might be jumping up and down in excitement.
MidiGate is a blast to play with, and an exceptional tool to have when working with electronic music styles. Exercise your creative juices and MidiGate will reward you.
Mix6to2
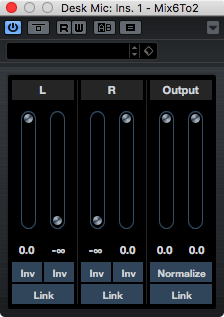
Turn multi-channel surround in to 2-channel stereo.
I don’t work in surround, but I’m sure this is useful?
MixConvert V6
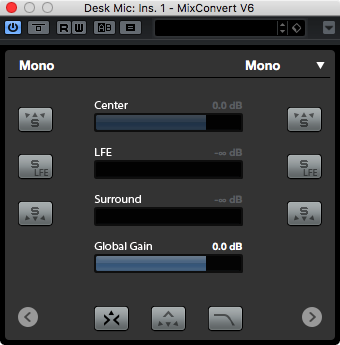
Now this is much more useful. MixConvert V6 allows you to transform a variety of multi-channel formats in to other multi-channel formats.
MixerDelay

MixerDelay isn’t what is may sound like by the title alone, but instead another tool for multi-channel audio.
MixerDelay allows you to adjust levels and delay of channels in a multi-channel audio stream. Pretty useful, but this really should be a part of the mixer itself.
ModMachine
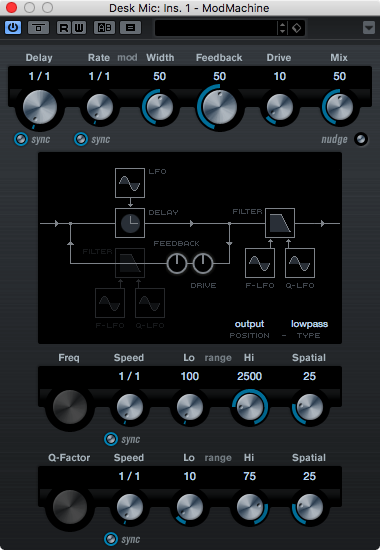
ModMachine is a multi-featured modulation box. It’s not as cool as some other mod boxes in other DAWs, but does have some of its own tricks, namely distortion.
The GUI is pretty self-explanatory, so I won’t spend too much time on this. It sounds good, the GUI is decent and I’m giving it a 55.
Oh? what’s that? I rated it 35? Let me tell you a story about how Cubase constantly annoys me..
This thing is basically useless without mono-stereo. Stupid Cubase.
MonoDelay
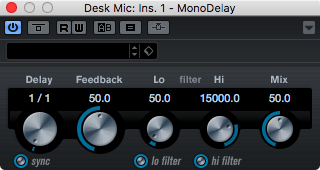
A very simple delay with feedback. It repeats your signal based on the parameters and it has 2 filters.
Surprisingly, it’s useful sometimes.
MonoToStereo
What a useless piece of garbage. Let me just share with you what the manual says.
This effect turns a mono signal into a pseudo-stereo signal. The plug-in can be used on a mono file or a stereo file with equal channels.
Oh… Maybe this solves that thing that makes me want to burn Cubase in to a pile of bit-ash!
Then you keep reading and all your hopes and dreams are shattered.
NOTE: This plug-in works only on stereo tracks.
Useless nonsense.
Yes it does have Haas Effect-like capabilities, but if you want that then you probably are not working with a stereo track as it is.
Ugh. Awful.
MorphFilter
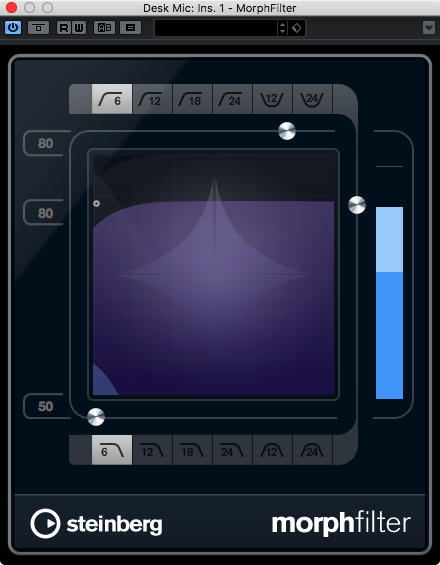
MorpheFilter allows you to compensate for Cubase’s lack of macro controls. Check out what Studio One offers and you will understand why MorphFilter is just a filler for missing features.
That said, in the context of Cubase, MorphFilter is a useful tool. It’s similar to the DJ-Eq with some added filters and the magic morph slider.
The ‘morph’ in MorphFilter allows you to ramp between 2 different filter setups. You can automate the morph parameter or control it with an external controller.
MorphFilter’s GUI has many of the excellent features of other Cubase plug-ins such as easy interaction with the graphic display. The X/Y control dot lets you change both the cross-over frequency and morph state of the plug-in with a single control.
MultibandCompressor
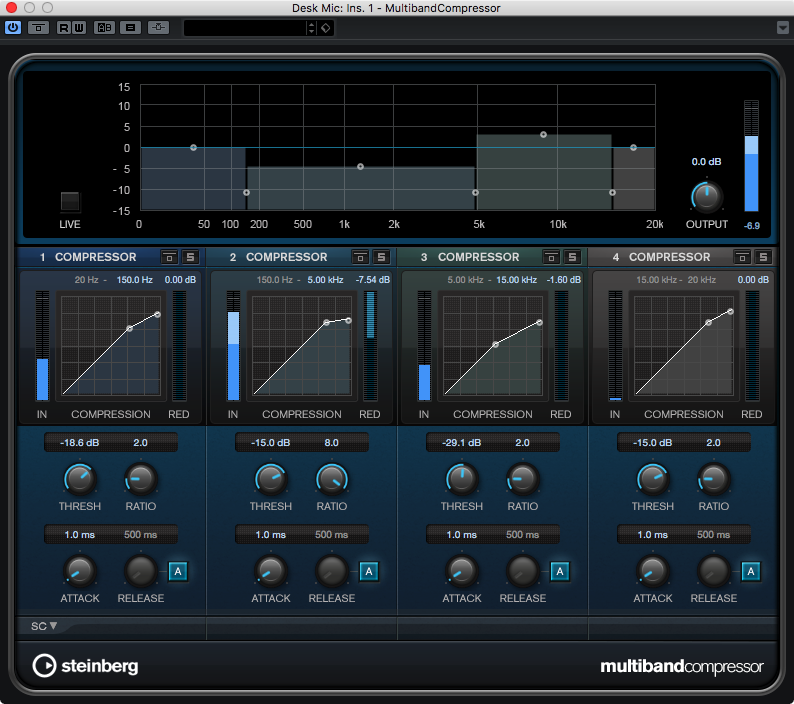
I hate multiband compressors. The basic premise of throwing 3+ filters on your signal to reconstruct it again is usually enough to turn your mix in to a squishy mess of squishy squish squishiness. Yeah, cross-overs are everywhere (even in places I review well, but once you start messing with the envelope of the signal as well, all bets are off.
That said, I’m going to try to be unbiased here and review this as if I would ever intentionally use a multi-band compressor on my own volition.
MultibandCompressor is a good multi-band compressor feature-wise. It has most of the basics of the Compressor, per-band solo/bypass, an decent GUI and a very useful feature: per-band sidechain filters. The per-band sidechain filters are what make this actually a useful tool on individual instruments. Let’s take an example of a drum room mic.
Often room mics are boomy, washy, echoey messes of pure awesomeness. A major issue with them though is that washes of cymbals can cause the kick/snare/toms to be covered up a bit more than you would like. MultibandCompressor to the rescue!
Take your 3rd band, turn on the sidechain filter and set it to around 200hz (you can click the label and enter this manually, nice) with a q of 1.0. Set the frequency range to about 3khz-10khz. Ratio to 5. Attack to 0.1. Live Mode off. Hit play and set the threshold until it starts working.
What’s happening here? We now have an area from 3khz-10khz that is being compressed in response to a signal consisting of primarily 200hz information. When our kick/snare hit, the cymbals walls is tamed. Very useful. Now you can use your favorite room mic smasher to go to town on that mic. No need for a high-shelf that will just dull the whole sound.
For single-instrument fixes, the MultibandCompressor is useful. Just please, for the love of god, do not use it on full mixes.
MultibandEnvelopeShaper
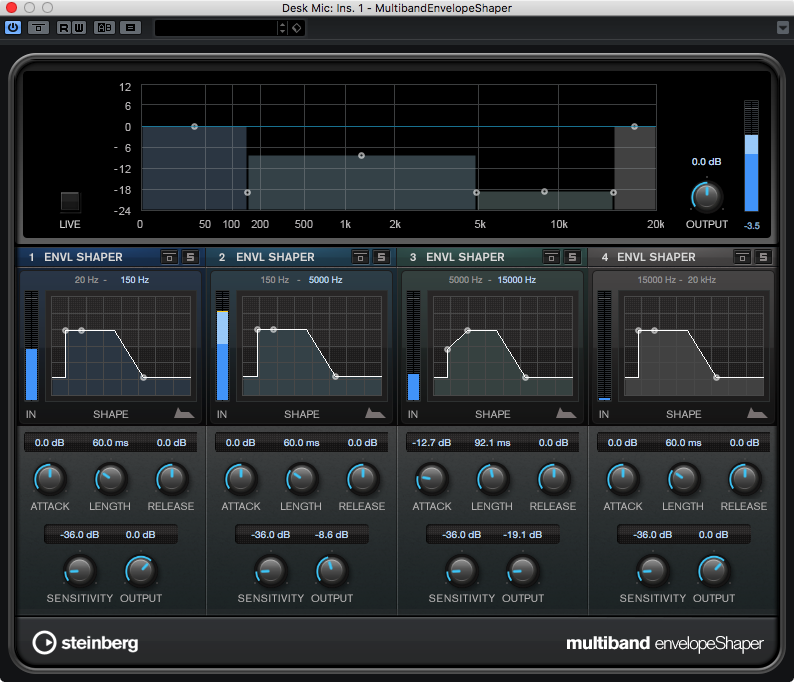
Another multi-band tool. Four EnvelopeShapers split across 4 bands. All the same features as the MultibandCompressor but with the EnvelopeShapers as modules.
I find this plug-in to be both unique and useful in rare cases. In those rare cases though, there’s not much else that will get you what you need as fast.
MultibandExpander
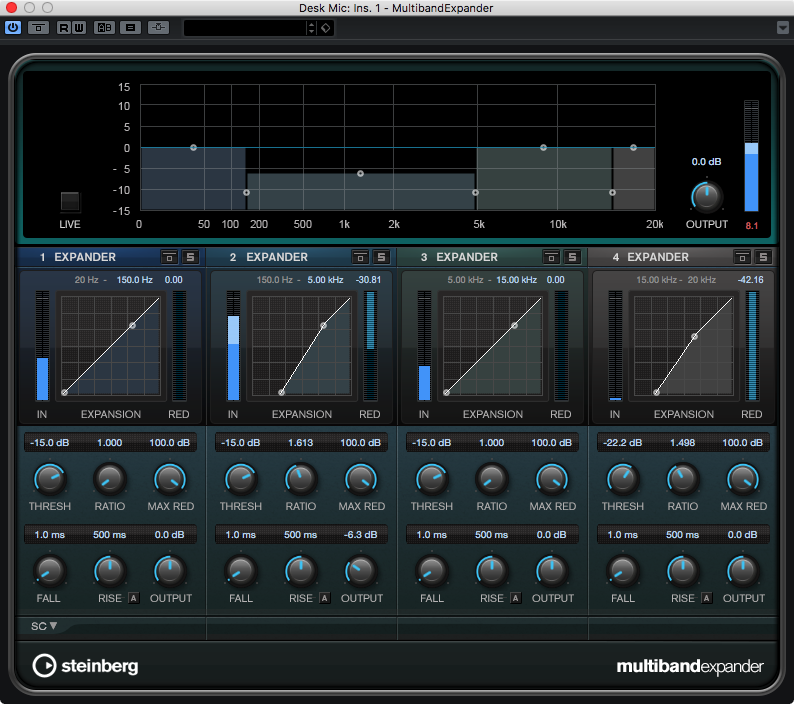
Yet another multi-band tool! Four Expanders split across 4 bands. All the same features as the MultibandCompressor but with the Expanders as modules.
Like the MultibandEnvelopeShaper, there’s rare cases where this is useful, but when you need it you will be glad that it’s there.
MultiScope
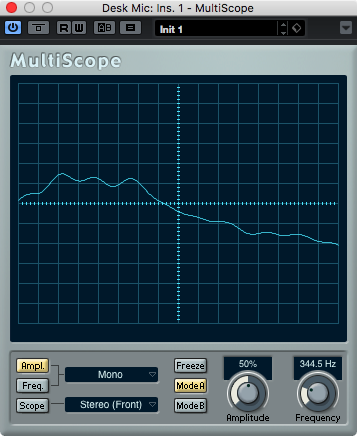
MultiScope is a simple oscilloscope. It isn’t <a href=”/music/2016/05/31/Studio-compOnents-review.html#scope-1010>as useful as some other DAWs offerings</a> but it will do the job when you need it.
MultiScope does have some other functions that are nice though: a spectrograph and [goniometer](https://en.wikipedia.org/wiki/Goniometer_(audio). The goniometer is particularly useful at times, and it works on multi-channel audio as well.
Octaver
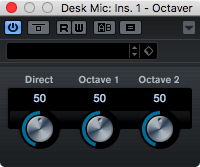
Octaver adds up to 2 poor-sounding pitch shifted signals to your signal. I could not find any use for this. I rather duplicate the track and pitch shift with another algorithm.
Phaser
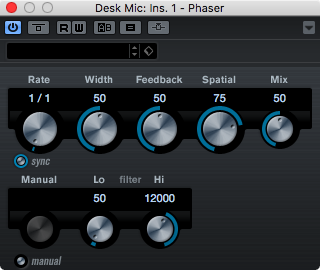
Phase is a simple phaser. Nothing special, no analog niceties, a mediocre filter and limited options.
PingPongDelay
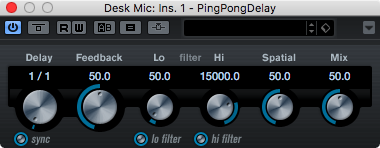
PingPongDelay is a great plug-in to have around. I doubt that the clichéd ‘sound bouncing between channels’ effect will ever go away, and PingPongDelay lets you get it with minimal effort.
It would be nice if it had some dirtying-up options, maybe some good filters, or some other neat stuff, but as it’s presented it’s still useful for cleanly bouncing audio between stereo channels.
A solid 50.
Oh? what’s that? I rated it 30? Let me tell you a story about how Cubase constantly annoys me.. Yet another effect that’s basically useless except on mono tracks.
Pitch Correct
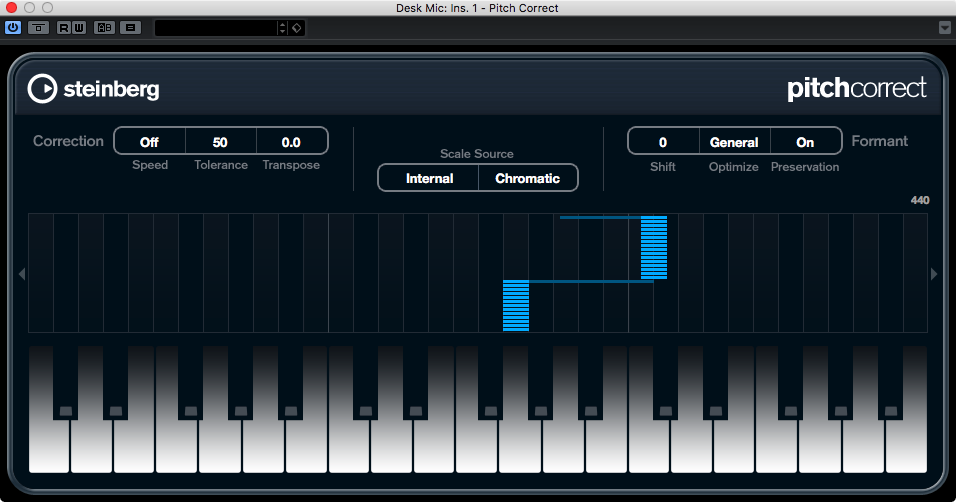
Autotune!. Eh, not quite.
Pitch Correct does what it says on the box, it corrects pitch of audio. It does so fairly accurately and with a decent GUI.
Pitch Correct can correct to the nearest-note, to a(n imported) scale, to midi input, follow chord track or simply transpose. With the ability to use the chord track, Pitch Correct is truly a unique and useful tool.
Pitch Correct also has the necessary tools to preserve, or change, formant. You can do fun things like make yourself sound similar to the average voice of the opposing sex, or crazy effects in either direction.
While Pitch Correct is not Autotune, it does as much as the average musician will need, and the integration with the chord track adds a unique element that can make it indispensible.
Quadrafuzz V2
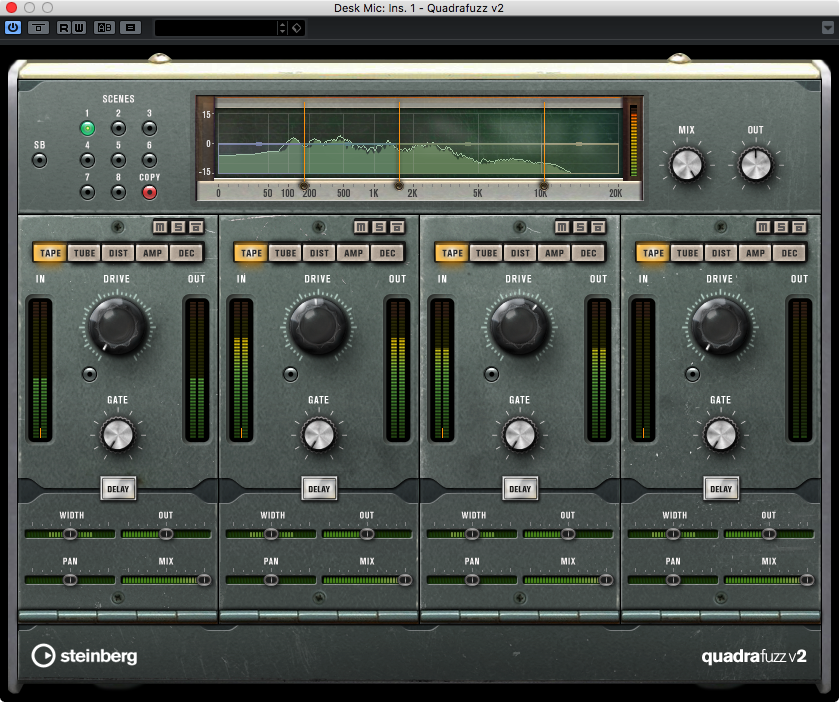
Quadrafuzz is a real thing. Quadrafuzz V2 is Steinberg’s idea of what it could be as a plug-in.
You get 4 bands of either tape, tube, distortion, guitar amp-like distortion or decimation. Each band also has a delay, true-stereo distortion capability, pan, mix and a gate. The different distortion types have their own various settings for varied levels of total, or partial, destruction. There are multiple ‘scenes’ as well, which let you quickly jump between settings without resorting to presets.
Quadrafuzz v2 is a tremendously useful plug-in if you work with anything that you want to make dirty in any way. It also works as a multi-band gate should you need something like that. One thing that bothers me is that the tape and tube distortion modes sound far too similar for their monickers.
I’d happily pay ~$50 for something like Quadrafuzz v2. It makes its way at least once, often more, on every project that I’ve done in Cubase.
REVelation
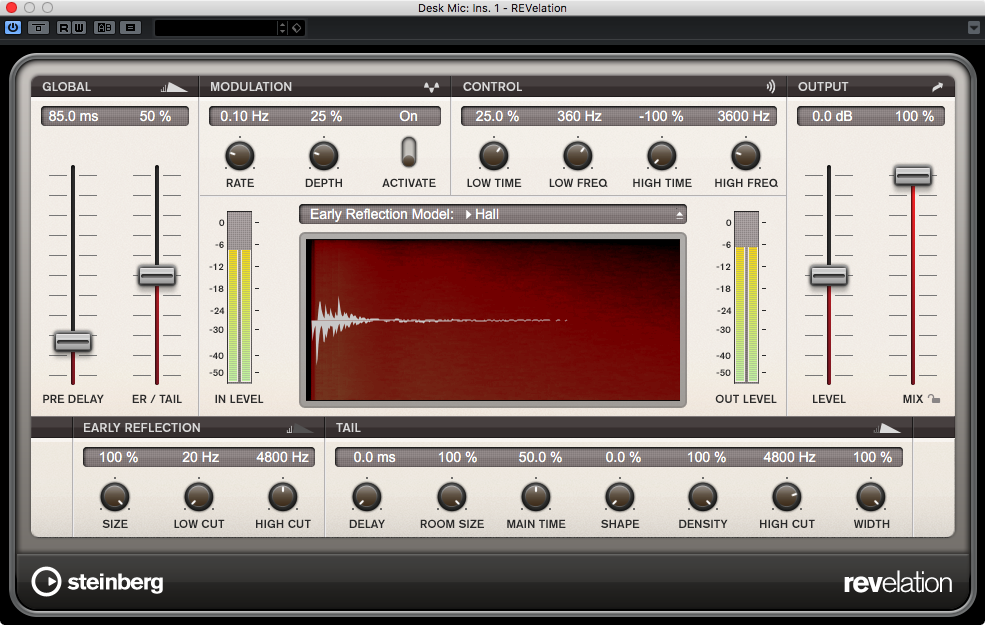
REVelation and REVerence are both reverbs, REVelation is the algorithmic sibling of the two and a pretty good attempt at that.
I’m assuming that you’ve used an algorithmic reverb before and cover only the sound and marginally unique features offered.
First the features. REVelation offers a few bonus features that make it easy to use and enhance the workflow surrounding it.
- Mix lock: You can lock the mix parameter’s value to allow auditioning of presets at the same mix value.
- Tail Modulation
- Separate and relatively detailed ER/Tail controls.
- Informative impulse response display with high-frequency component information (the red part)
The GUI is clearly labelled and easy to grok at a glance.
Soundwise, REVelation is just above the middle of the pack. I feel like it’s more at home when trying to recreate the sound of large spaces. Small/medium size spaces almost invariably sound metallic and it’s difficult to balance the ER right for some reason.
While I own a few dozen reverb plug-ins, and I never reach for REVelation myself, I do think that for a wide-range of productions it is likely to be a utilitarian reverb that will work satisfactorily.
I am not taking off points because of how Cubase constantly annoys me.. You normally should be using this on a stereo FX Channel anyway.
REVerence
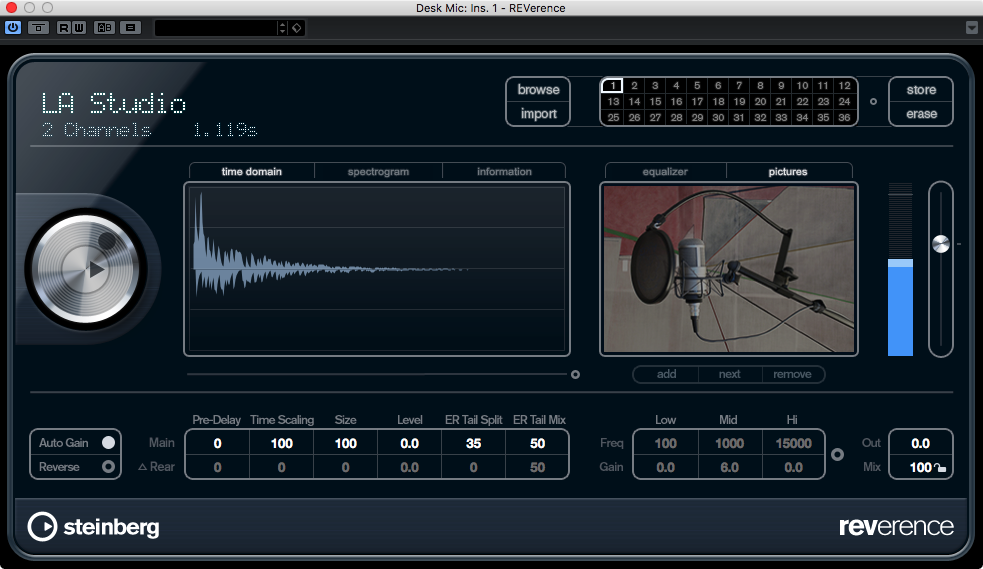
REVelation and REVerence are both reverbs, REVerence is the convolution reverb sibling of the two and a pretty poor attempt at that.
I am biased. One of my absolute favorite plug-ins is a convolution reverb.. I feel that Reverberate is worth the purchase for any DAW user, and is irreplaceable. I will be judging REVerence with the assumption that you own Reverberate, because I strong believe that you should.
REVerence is not an amazing plug-in, but it does have some features that set it apart from other DAW-included convolution reverbs.
- Programs: see manual for more information.
- Reverse impulse.
- ER/Tail split: you can determine where the Tail begins
- Spectrogram view of the impulse
- 3-band EQ on the reverb-effected signal
- Surround capability
- Mix lock: You can lock the mix parameter’s value to allow auditioning of presets at the same mix value.
- True Stereo impulse support: true stereo reverbs process both channels through each channel of the reverb, then route them accordingly. L is your signal, l is the reverb processor, so your signal is processed like: L->l, L->r, R->l, R->r, then these 4 channels are downmixed back to stereo as is indicated. This means that your true stereo impulses are 4 channel audio.
REVerence is an unusually capable convolution plug-in for a DAW inclusion. While I still would probably never reach for it due to my ownership and rabid fanboyism of Reverberate, it is still an excellent plug-in if you lack the money to make a third-party purchase.
I am not taking off points because of how Cubase constantly annoys me.. You normally should be using this on a stereo FX Channel anyway.
RingModulator
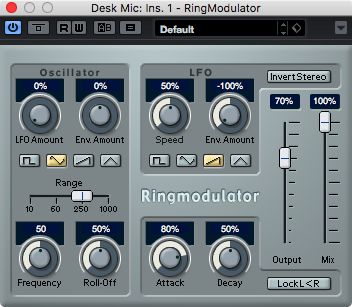
RingModulator multiplies the incoming signal by a generated signal. RingModulator offers decent control over the signal generation.
RingModulator is a decently useful effect in some circumstances and there’s not many third-party replacements for it.
RoomWorks
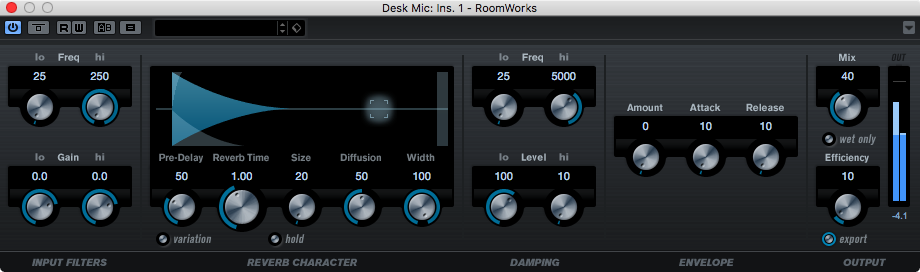
Just use REVelation instead.
I was able to sometimes get something useful out of RoomWorks, but it’s always a fight against a glassy and occasionally metallic sound that pervades most settings.
RoomWorks SE
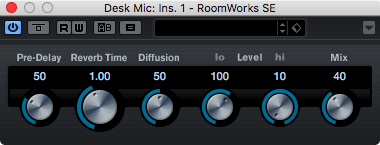
It’s like RoomWorks, but worse. Nice.
Rotary
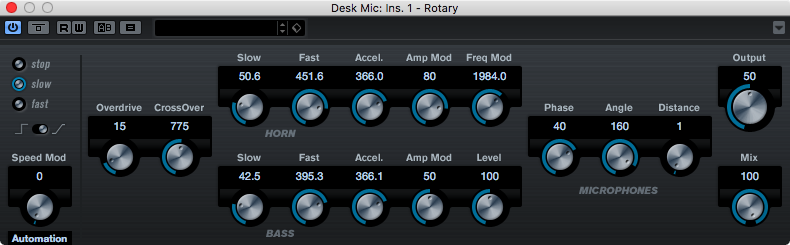
Every DAW somehow has an emulation of the Leslie rotating speaker. I rarely see or hear them used, but it’s there.
Rotary is a fairly complete emulation. I have used a real Leslie twice in my life, but the specifics of the sound or what may make an emulation accurate escape me. I’m just not a fan of the sound.
So at best I could give this a 50, assuming that it’s useful to some folks, however…
Oh? what’s that? I rated it 30? Let me tell you a story about how Cubase constantly annoys me.. Seriously, this is really annoying. Even when writing this it was a PITA to re-route signals and setup FX Channels just to use a single plug-in.
SMPTEGenerator
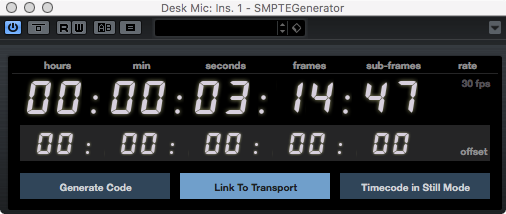
SMPTEGenerator generates SMPTE Timecode.
I do not have the capability to test this thoroughly here. It does work with the various SMPTE-capable devices that I have here. The GUI is nice and it has a ‘still’ mode which is very useful.
SoftClipper
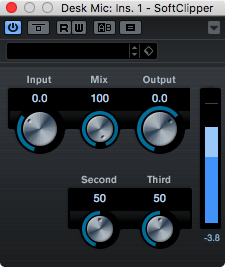
SoftClipper is a simple overdrive (basically a waveshaper) with controls over the second and third harmonic. It sounds pretty decent. I particularly like using it on fairly steady bass instruments such as Bass Guitar or synths.
Anything with high-end though, it starts to sound a bit nasty. I suspect an oversampling option would help here a lot.
Every time I use it though, I like it a little bit more.
StepFilter
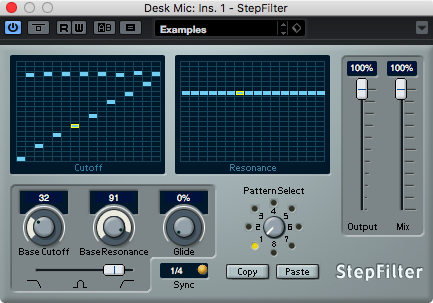
It’s just a filter… that you can sequence!
StepFilter is a mediocre filter with separate step sequencers for the frequency and resonance. The GUI is clear and well-labelled.
Besides the mediocre filter, the UI does have one bit of an issue: if you try to adjust one step and move your mouse slightly in to the next column then the adjacent step moves. This can make it very difficult to do any sort of precise sequencing.
There are 8 patterns per preset and you can automate/external control the pattern switching.
There is a mix knob. Thank you Steinberg.
If there were different filter types, or a single better sounding filter then this would be around an ~80+. As it is though, it’s not so useful. Very close though.
Be sure to check my review of the Midi Effects for the section on Step Designer though! (someone remind me if I forget to update that to a link) That post will not be coming any time soon. Thank you Jeanne Dekerle for reminding me!
StereoDelay

On a stereo track, it’s useful. It’s just MonoDelay with a processor for the right and left channels.
Wouldn’t it be great if you could use this on mono tracks though!?.
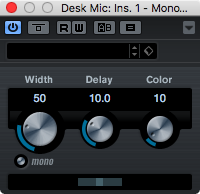
StereoEnhancer
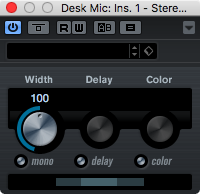
Another Haas Effect-and-then-some type plug-in to make your tracks fail catastrophically when collapsed to mono.
Unless your track is already mono.
StudioChorus
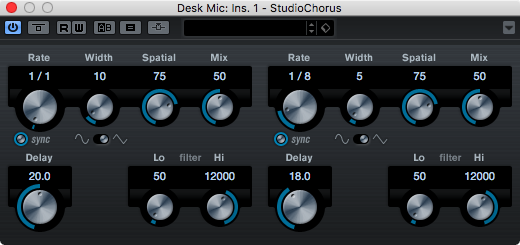
A Stereo chorus. It’s just 2 Chorus plug-ins tacked together with a sloppy whip stitch.
It would be kinda cool on mono tracks though.
StudioEQ
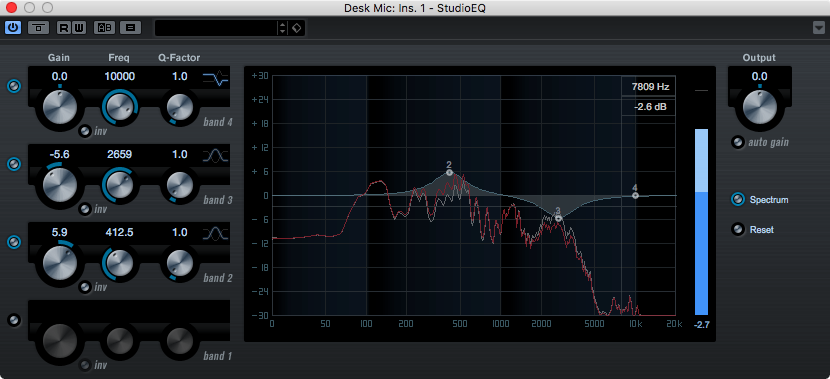
This exists for non-Pro version so Cubase and backwards compatibility.
The GUI is annoying to use and it’s inferior in every way to Frequency. If you are a Cubase Artist (or lower) user, it’s worth upgrading for Frequency among other features.
StudioEQ is a pretty weak attempt at an EQ.
TestGenerator
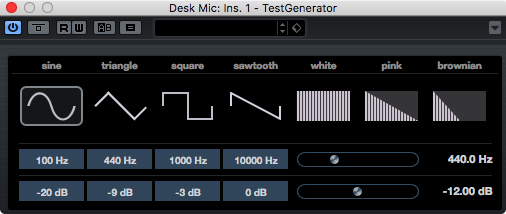
I love this plug-in. I use it often for testing things, reinforcing kick drums and some other miscellaneous tasks.
The little shortcut buttons for frequency and amplitude are great. I would like if the shortcut buttons could be edited, but it’s a minor gripe.
I would not pay for this plug-in, but I am rating it highly for it’s inclusion and excellent implementation.
ToneBooster
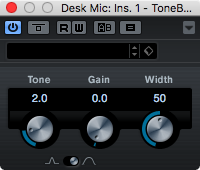
There is almost no reason to use this over other options.
Tranceformer
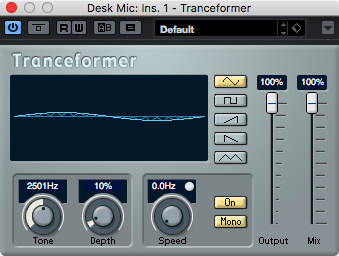
Transformer is a style of Ring Modulator where the modulator is modulated. It sounds …
It sounds bad. I am incapable of making sounds with this that I would want to use on anything. It’s an interesting concept though.
Tremolo
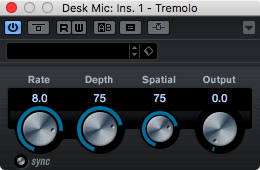
Tremolo is a very basic modulation of amplitude. It does what says.
It even can modulate the signal’s place in the stereo field. I knocked off 20 points for that.
Tube Compressor
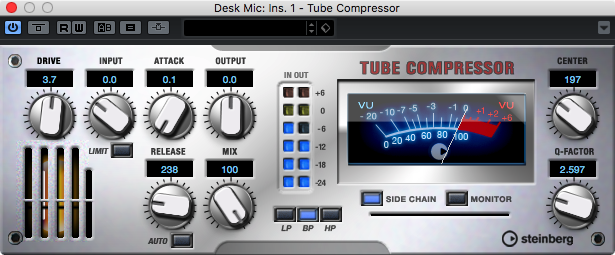
I don’t believe that this is an emulation of an actual tube compressor. It sounds more like a vintage-y style compressor with some tube-like saturation on it. That’s not bad though, since this sounds alright sometimes.
It has all the basic controls, plus drive, mix(!!) and a sidechain filter. Yes, it has a mix control. Not even [Compressor][#compressor] has a mix control for some reason.
The sidechain filter is fairly useful for how basic it is, and the sound of the drive is fairly pleasant. I frequently use the Tube Compressor via the Channel Strip, but rarely via the normal plug-in GUI, so I do not access this functionality frequently. It’s nice to have it there when you need it though.
Tuner
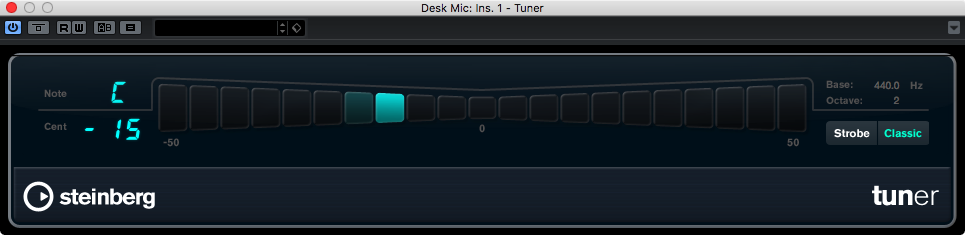
Tuner is a simple guitar tuner. It works well on other sources such as bass guitar, many brass instruments, woodwinds, violin and analog synthesizers as well.
It has a fairly standard ‘Classic’ mode and the even more classic Strobe Style that many of use grew up with.
Tuner works well, displays pertinent information, has 2 display modes and lets you set the base tuning frequency. Nice to have.
UV22HR
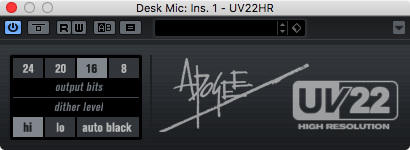
UV22HR is a dither that was super cool 15+ years ago. These days it’s not as hip, but it still does the job well. It is interesting that Steinberg makes this Apogee product available in Cubase Pro too.
In 99.9% of modern music, 99.99% of listeners will never notice if/what dither is used, and those few times where it is a very necessary process to be applied, there are more modern noise-shaped dithers that people seem to prefer.
My rating reflects my appreciate that this is available, and that Steinberg didn’t instead bungle implementing their own dither implementation (like some other DAW makers have).
Vibrato
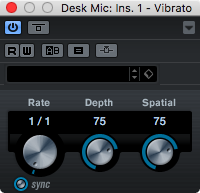
It’s like Tremolo except for pitch. Very simple plug-in that even modulates stereo signals in a spacial-enhanced way.
I made sure to take off points for that stereo feature.
VintageCompressor
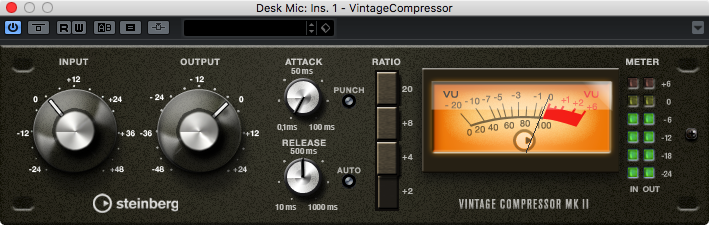
VintageCompressor looks an awful lot like an 1176 and it does a poor job at sounding like one.
That said, it is a good plug-in.
It has a ‘punch’ mode that appears to change the attack curve, which I find to be very useful on drums. The Release setting manages to not sound ‘farty’ at low release values. It does not support ‘all buttons in’ like you’d think an 1176-style plug-in would, but that’s ok.
I think it’s nice that the attack/release values are labelled, since I’ve seen a lot of people become confused by the standard 1176 labelling, but this isn’t an 1176.
Even as a compressor nut, I reach for the VintageCompressor frequently. The Channel Strip uses a ‘+2’ ratio, which I like for most sources, and I almost always access this via the Channel Strip.
VST Amp Rack
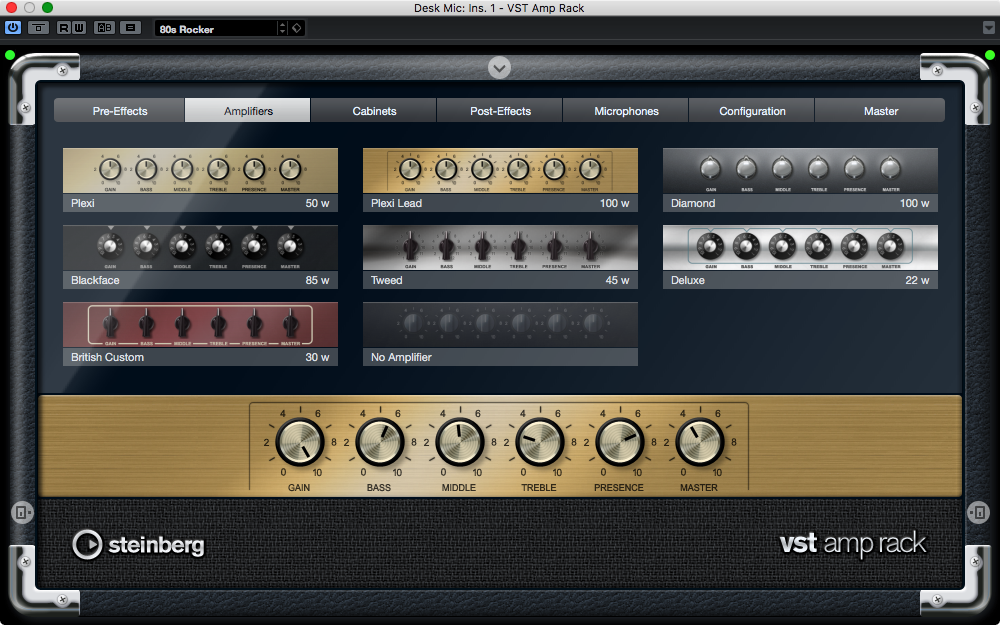
Maybe you’ve seen the dumpster fire of a thread that I’ve started about plug-in amp simulations. It should be no surprise that I will be overly critical regarding one of the flagship plug-ins included in Cubase 9 Pro.
I am going to address each amp sim individually, each effect, the cabinet & microphones section as a whole and then a total overview.
I test these primarily with a 2012 Gibson Midtown, a (real) ‘52 Telecaster, and a frankenmonster of an Epiphone Explorer that I absolutely love.
Amps
So I originally named the amps that these are modelled after, but I took that out. When viewing these as models of a specific amp, their value is greatly diminished. Some of them sound pretty decent on their own, but as an emulation of a specific amp they fall flat. I will consider these on their own merits and not as an attempt at replicating a specific real amp.
- Plexi: Decent crunch sound for most rock styles. Benefits from good cab impulses more than any other model.
- Plexi Lead: Plexi, but tuned for playing higher up on the fretboard and with more gain basically. Useful, and the best amp sim here as long as you don’t expect it to sound like a Mar… uh, real amp with a brassy faceplate.
- Diamond: Ewww. I love that 90’s/00’s high-gain tone. Diamond does not get it right. With a bunch of pedals and some tweaking I was able to get it
- Blackface: At lower gain, the blackface just doesn’t sound right to me. It is missing that deep speaking growl that you get with a real amp of this type. I know I said that I wouldn’t compare these to the matching real amp, but when you see the black face then you expect a certain feel. Standing on its own it’s pretty unremarkable and thin sounding.
- Tweed: My main amp is a tweed-style amp. I tried not to be biased, but this really does not get the tweed sounds right. When I blindfold ran through presets though, I did end up on some tweed amps that I liked. The tweed amp really needs an appropriate cab impulses or it sounds thin and fizzy.
- Deluxe: It’s alright. A very vanilla sound.
- British Custom: Decent with various types of distortion in front of it. I was able to get some neat lead sounds out of this as well.
Effects
- Wah Wah: Fun, but no auto-wah option. Wish the filter was a bit dirtier and more aggressive.
- Volume: Besides the obvious thought of hooking this up to an external pedal, Volume is useful for gain-staging between effects.
- Compressor: A fairly weak compressor. I rather dislike this effect pre or post. There’s a lot of guitar sounds that depend on that pumping compression feeling that this effect can not do.
- Limiter: I use the limiter a lot. As a post-effect it’s obviously useful, but before certain effects (distortions) it can greatly change the tonality of what comes next.
- Maximizer: Maximizer in the is the key to getting VST Amp Rack to sound good for any crunchy or lead or all-out-destruction type sound. Nearly every single amp/effect benefits from the Maximizer feeding it some extra gain. For really clean sounds it’s not necessary, but even then it is a nice bandaid for getting many of the amp’s gain/volume settings to better match the real amp’s behaviour. Without Maximizer I would have given VST Amp Rack half the points.
- Chorus: It’s ok. The fact that you can sync the modulation to tempo makes it much nicer.
- Phaser: It’s ok. The fact that you can sync the modulation to tempo makes it much nicer.
- Flanger: It’s ok. The fact that you can sync the modulation to tempo makes it much nicer. The mix knob makes it even nicer still.
- Tremolo: It’s ok. The fact that you can sync the modulation to tempo makes it much nicer. I wish it had more modulation shapes.
- Octaver: It sucks. It sounds bad, pretty simple.
- Delay: Basic delay. The fact that you can sync the modulation to tempo makes it much nicer. Modulation, distortion, rhythmic changes etc… could all make this so much better. It’s unfortunate that turning the pedal off clears the buffer. There’s some neat things that you can do with various stompboxes that do not clear the buffer when you turn the pedal off.
- Tape delay: Same as above, except this appears to apply a low-pass to the feedback line. Boring.
- Tape ducking delay: Same as the two above. The only difference is that the delay feedback signal’s amplitude is inversely proportional to the input signal. The louder you play, the softer the delay. The softer you play, the louder the delay.
- Overdrive: I tried to like Overdrive. I really did. I used all sorts of tricks to try and get it sounding decent, because sometimes even the coolest of real pedals require special TLC to get to their optimal state. I couldn’t make Overdrive sound good. No matter what it has this deep rumbly grit to it that sounds like a fried diode. You certainly won’t get that creamy sound most people associate with the word ‘overdrive’. You always just get the sound of plugging your DS-1 in to AC power. (Yes… I know what that sounds like in various iterations)
- Fuzz: Much like the Overdrive, I tried my best. It sounds strangely reminiscent of what a fuzz pedal may sound like to someone with tinnitus and awaiting their appointment with Beltone. While I am critical of a lot of things in this review, I understand that some developers simply have difference experiences or expectations, or they may be working on tight deadlines. In the case of Fuzz, I’m really curious what the developer was thinking or what they expected. It sounds wrong in any circumstance to me.
- Gate: Gate never works right. The release always sounds unnatural and there’s no range setting. If you need a gate, use the Gate plug-in before or after VST Amp Rack as needed.
- Equalizer: A very basic, non-parametric EQ. Basically worthless. There needs to be a better EQ!
- Reverb: Reverb does not sound appropriate for a guitar signal. Anything clean sounds metallic and unpleasant. The big thing is there is no spring setting!. How?! Why!? What are you doing Steinberg!?
Cabinets & Microphones
There’s a reason why I cover all of the cabinets at once. They all suck.
If your experience with VST Amp Rack includes using any of the included cabinets, it’s bound to be poor. Here’s how to get a decent-enough sound out of VST Amp Rack for free:
- Go download some decent free impulses (Godhack, Redwirez and God’s Cab are decent)
- Set it to no Cabinet
- Put REVerence on an insert after VST Amp Rack
- Load your impulse in to REVerence.
- Turn off Auto-Gain in REVerence
- Turn the master volume down to ~-6db for most impulses.
- Enjoy.
Overall
There are some nice features VST Amp Rack has that add to the experience:
- Pre and Post effects section with ‘peek’ (hover over lower left/right of the UI)
- Small/large GUI modes
- Configuration for stereo mode… infuriating.
- Master section with a parametric EQ, tuner and volume.
VST Amp Rack as an all-in-one solution for guitar amp simulation is awful. Probably a 5-10%. Once you bypass the cabinet/microphone stage and use your own impulses, it’s vasty improved. It’s basically usable!
While I have other plug-in amp sims that I prefer much more, I think that VST Amp Rack is useable for a decent number of styles of music. You just need to be familiar with how to tweak a rig and have the patience to do it.
Of all the plug-ins that I’ve subtracted points because of Cubase’s idiotic mono->stereo processing, VST Amp Rack took the biggest hit. 40 points off because of how painful it is to use VST Amp Rack with a mono-guitar input to produce stereo sounds. Yes there’s ways to group things and organize things, but being required to decouple your input track from your ‘FX’ track is a workflow killer.
VST Bass Amp
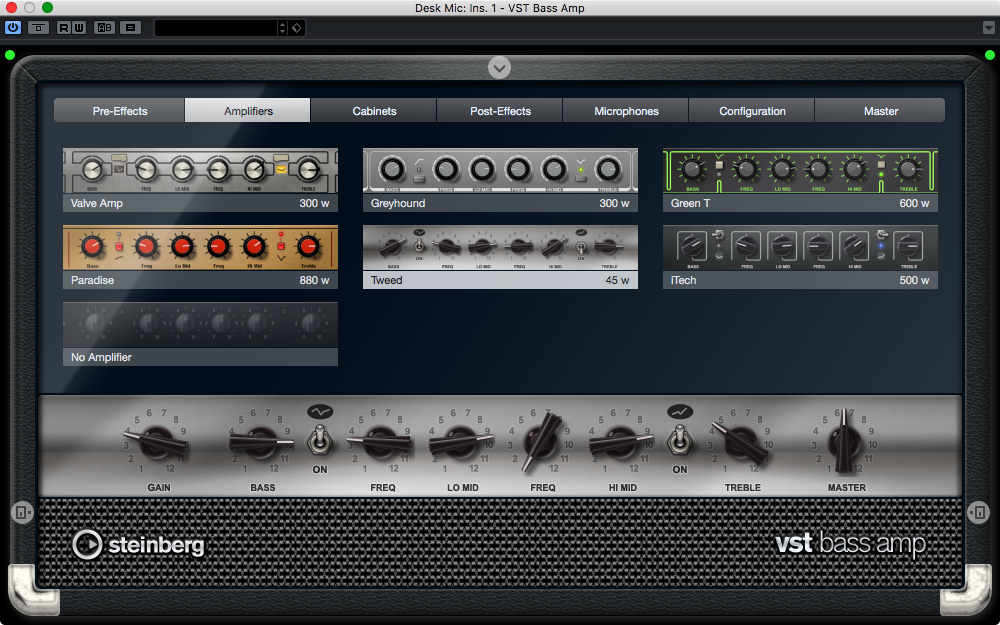
Bass amps are an easier target to model usually, since the dynamic response and harmonic richness expected of them is less. However, I am primarily a bass player and I don’t tolerate low-quality bass amp modellers.
Like the VST Amp Rack I will cover the amps and effects individually, then all of the cabinets, and an overview.
I tested this all with my Custom Shop Fender Jaguar Bass through a jensen transformer based DI I made, a Little Mark 800 and a Markbass SA450.
Amps
Like the VST Amp Rack review, I will try not to compare these to the real amps. I have owned (or own) every single amp and a few variations of what’s being attempted to model here. I know that I will have some bias I can not overcome, but I’ve tried.
- ValveAmp300: This should have a warm, slightly overdriven sound. It just sounds fizzy and unpleasantly dirty. ‘Should’ aside, I was never able to get a pleasant sound out of this.
- Greyhound: Very plain sound, and high-gain settings sound unpleasant.
- Green-T: The best sounding of the bunch, largely because it doesn’t screw up the sound as much as all the rest.
- Paradise: Argh… one of my favorite real bass amps. Why must this one sound so bad. All of these except Green-T and iTech have the same dirty hazy sound that permeates every seting.
- Tweed: Digital trash. Disgusting.
- iTech: At lower gain settings, it’s almost decent. Almost. Not quite.
Effects
- Wah Wah: A wah with the filter tuned for bass. Very boring.
- Envelope Filter: More or less an auto-wah. The filter is controlled by the incoming signal’s amplitude. Also very boring. One of my favorite effects to use on bass, and a major disappointment.
- Volume: Same as with VST Amp Rack. Good to use for gain-staging between effects.
- Compressor: One of the most important bass effects, and basically useless. Weak compression, no sidechain.
- Compressor MB: A multiband compressor with confusing controls, poor sound and a crossover that leaves a gap in your signal.
- Maximizer: Same as with VST Amp Rack, except every single amp model sounds worse when over-driven in the pre-stage.
- Chorus: Weak bass chorus.
- Phaser: Thin sounding phaser.
- Flanger: The flanger is decent. Not many styles of music utilize flanger on bass, but if you need it then the Flanger effect will often work satisfactorily.
- DI Driver: The saving grace of VST Bass Amp! Turn off the amps and turn off the cabs. This is all you need. I am not normally a fan of the bass driver sound in real life, but thankfully this doesn’t sound exactly like it! The overdrive sounds decent, the controls work well. No cab needed. Useful sound that sounds largely like whatever you input to it, but a bit better.
- Enhancer: Scooped mids sound? It works for that.
- Octaver: Basura.
- Delay: Same delay as elsewhere.
- Tape Ducking Delay: Same tape ducking delay as elsewhere
- Overdrive: Awful. It just makes every bass signal sound fizzy and like a broken distortion pedal… did they re-use the guitar Overdrive for this?!
- Magneto II: Yes please
- Gate: Still useless
- Equalizer: Still useless
- Graphical EQ: A graphical EQ made by someone that isn’t familiar with what the filter banks should be set at. If you’re used to using one of the 2 major graphical EQ styles on bass, you’re going to be unhappy with this.
- Reverb: Still useless. Doesn’t even seem to be tuned for bass signals as it’s extra muddy here.
Cabinets
Once again, all of the Cabinets and Microphone selections here are useless. Check the section here on Cabinets & Microphones on how to use 3rd party impulses freely in Cubase.
If you’re using VST Bass Amp though, just skip the amps/cabs/mics and use the DI Driver. I strongly feel that it’s the only decent thing in the whole package.
Overview
The single redeeming factor is ironically the DI Driver. I dislike the hardware version of the DI Driver, but the VST Bass Amp version sounds much better than any of the amps/cabs/mics. The rating given is solely based on the DI Driver’s usefulness. I would have scored this a 5% otherwise. VST Bass Amp is lazily implemented and an insult to any serious bassist.
Since bass signals are rarely stereo processed, I didn’t subtract any points due to Cubase’s mono->stereo deficiencies. Thank goodness, it could have had a negative score.
VSTDynamics
If you took Compressor, Gate and Limiter and smashed them all in to one plug-in, you’d not end up with this. It’d be far better.
VSTDynamics is a a lesser version of everything already included in Cubase. It might make sense since Cubase has an 8-insert (6 pre-fader, 2 post-fader) limit, but I suspect that is a rare situation.
It’s not a terrible plug-in, but everything it does is done better already in Cubase in some other capacity. I do think that many people working in a fast-and-furious live recording environment may find the convenience and relatively clean sound of this beneficial.
I do not use this plug-in. I spent a decent amount of time with it before/while writing this review, and that’s the last it will see of me. Despite that, I do see value in its inclusion and I have rated it as such.
WahWah
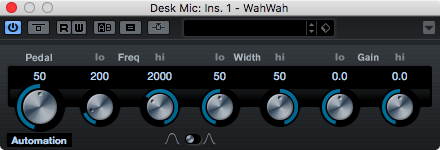
WahWah is a filter sweep plug-in at its core. You set a ‘low’ position’s frequency, resonance, and gain, then the complementary settings for the ‘high’ position.
There is a ‘pedal’ parameter that allows you to variably sweep between the high and low settings. What’s left is a wah-wah pedal.
The filter in this is once again fairly mediocre. It offers nothing that you would get from a better filter emulation on a high-quality synth/filter plug-in.
Despite my negative feelings about the WahWah plug-in, I still manage to have a bit of fun with it any time I accidentally select it and while writing this review. It got bumped up a notch or two simply for the fun factor.
Conclusion
Overall, the effects in Cubase Pro present most of what your average engineer, producer or musician would need to make a decent sounding album.
There are some things that I think you may need to supplement with third-party options at a bare minimum:
- Better Modulation effects
- A couple extra compressors with some unique tones.
- Guitar/bass amp sims.
- Better distortion/saturation options
Even those will depend on what you require in your production.
Obviously there is a big issue with effects in Cubase when you want to make a mono signal into stereo. I did not adjust the overall score based on this though. I was tempted to, but I decided that I’ve already docked a few 100 points off because of it already.
There are a number of plug-ins that I think give Cubase Pro real value. I’ve estimated their value based on competitive third-party offerings.
- ~$100 Channel Strip. Not because it’s an awesome collection of effects. They are decent enough, but it is very convenient.
- $80 CurveEQ
- ~$50 VintageCompressor
- ~$50 Quadrafuzz v2
- ~$50 Pitch Correct
- ~$100 MultibandCompressor, MultibandEnvelopeShaper, MultibandExpander
- ~$100 Magneto II
- ~$50 LoopMash FX
- ~$50 Frequency
Just those alone offer a value of ~$630. Obviously that’s inflated and unrealistic, but there is some real value in what Cubase Pro offers for built-in effects. The value had a large influence on my final grading of this review.
If you purchase Cubase 9 Pro, then you are given an arsenal of tools that will easily provide you with the majority of what you need to make any modern musical style. Some creativity may be necessary for certain sounds, but that’s simply what music is about. Steinberg does not provide you with many excuses to not make what you want.
`This post took 50+ hours to research, photograph, write and edit. 3 full work days of writing and editing alone. It’s over 10,000 words with 70+ carefully taken images. If you appreciate the information presented then please consider joining patreon or donating!
`
Support me!
If you appreciate the information presented then please consider joining patreon or donating!