Originally I wanted to frame this as an objective review, but it became clear as I was writing it is that I simply was being far too positive about this product.
So what I present to you here today is my favorite product of 2018; EARevolve by EAReckon.
I think that many people may not see this as a useful plug-in to have in their arsenal, however this is an incredibly useful plug-in that I think anybody will find to be an invaluable part of their plug-in collection.
Rather than just say all this garbage, how about I try and convince you…
THIS IS A MEDIA HEAVY POST!!!!!!!
Clicking through will load 41.1MB of data.
There are a lot of examples. I’ve optimized everything as much as reasonable possible, but there is a lot of content here.
Contents
- THIS IS A MEDIA HEAVY POST!!!!!!!
- Disclosure
- Video
- What it is
- The features
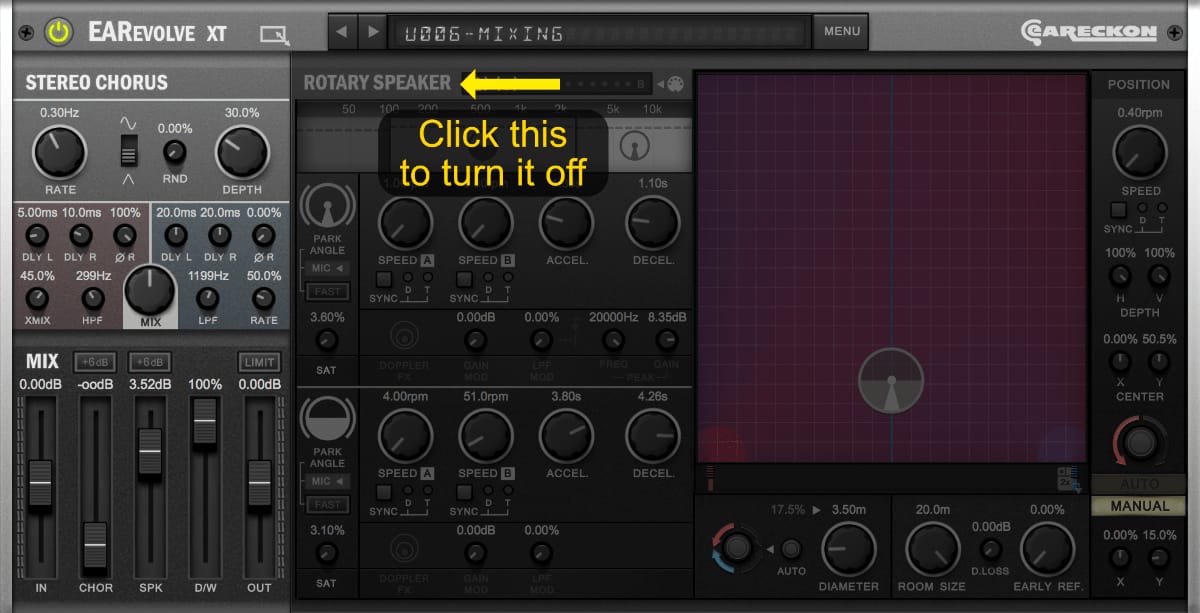
- Rotating Speaker
- More than a Rotating Speaker
- Conclusion
- Support Me!
Disclosure
I helped Beta test this plug-in, so I did not pay for it. I Beta test hundreds of plug-ins every year, and I have never been more excited for anything than this.
Video
EARevolve video review available!!
What it is
EARevolve is a rotary speaker simulator that places the Rotary speaker inside a virtual room. From that point you can control the Rotary speaker as you may expect, but you can also control its placement inside of the room.
It’s not just a virtual room, but a virtual room that is recorded with virtual microphones that you have control over.
The features
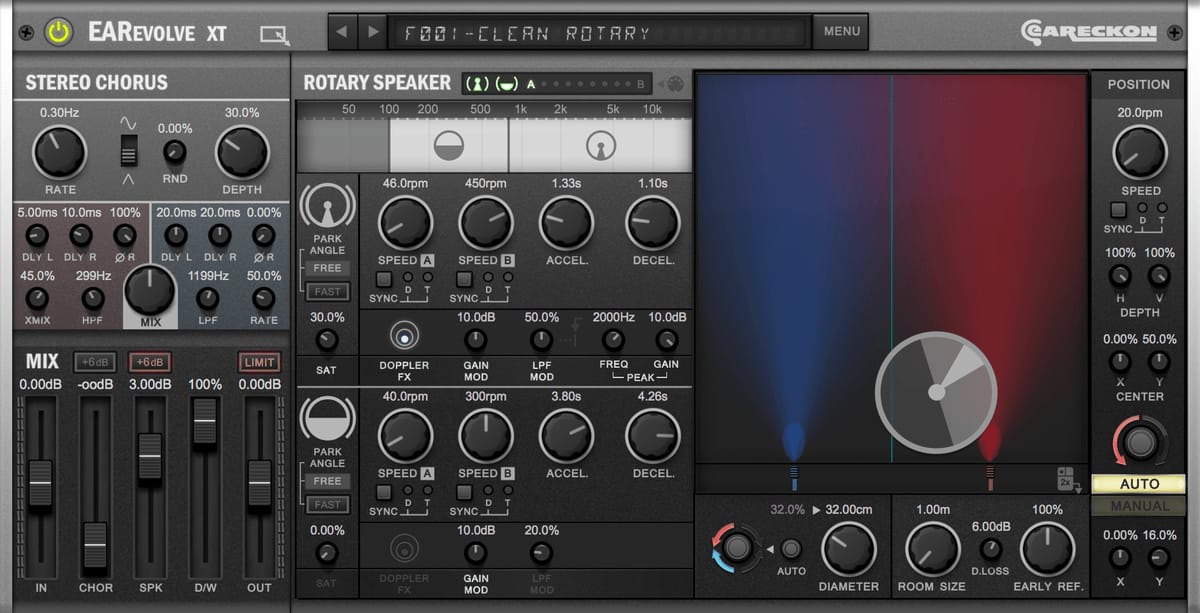
Chorus
You don’t get just one chorus, but TWO stereo choruses! Earevolve offers you two stereo choruses in parallel, with four total LFOs (left stereo and right stereo), which gives you a true stereo chorus.
There is a master rate and depth for the pitch modulation, and you get a choice between triangle and sinewave for the modulation shape. You can add a small amount of randomness to the modulation shape to give it a much more rich sound.
From there you have two sections with a left and right delay along with the ability to invert the polarity of the right side signal. The left and right delay sections can be cross mixed with each other. There is a low pass and a high pass filter, and you can control the ratio of the LFO between the two choruses.
One of the cool things is that the crossmix only cross mixes frequencies above 500Hz so you don’t end up with that exaggerated warbling sound.
The chorus section is very easy control yet it offers lush and wide stereo sounds. For the simplicity and results you can get with the chorus section alone I think that earevolve is nearly worth the money.
I basically don’t grab another chorus anymore.
Band Control

This is where the fun really begins, here is where you set the frequency ranges for the horn and drum split.
There are three bands:
- The low band - this band is passed with no processing. Having the low frequencies passed with no processing a maintain a sound with a mono low-end. Having two speakers produce the exact same information gives you more volume with less signal. You really want to take advantage of that with your low-end.
- The drum band - this is the low-frequency drum that rotates.
- The horn band - this is the high frequency horn that rotates.
Each band has independent volume controls.
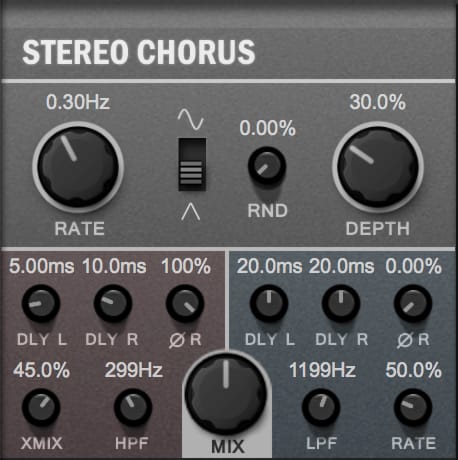
Horn and Drum Controls
The horn and drum each have two speeds. The speeds can be synced to host tempo, including dotted notes and triplets. If your project is “on the grid” then it’s often fairly important to use the sync options.
Since there are two speeds, you will often be changing between those two speeds. This is what the acceleration and deceleration controls offer you. acceleration is how long it takes to get to a higher speed, and deceleration is how long it takes to get to a lower speed.
Over in the Room Controls section there’s a button that let’s you switch the direction of the horn/drum rotation, as well as automatically (randomly) change the direction. The direction change is dependent on the accel/decel controls.
Brakes

You have a spinning horn and a spinning drum, and they each have two speeds. This is where you can select between the speeds or simply put the brakes on.
You can apply the brake either the horn or drum individually, and they will come to a stop at the position you defined in the parking controls. How fast it comes to a stop depends on the deceleration and if the park angle fast button is pressed.
The state of the horn and drum can be controlled via MIDI along with the speed between A and B. See the manual for this information.
This is such a small control but I suspect it is often overlooked, however this is one of the main parts of EARevolve if you want to use the rotating drums feature.
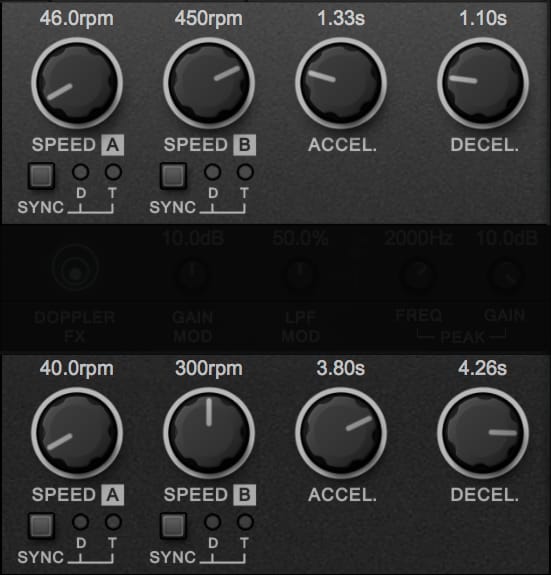
Modulation
The horn and drum each have two types of modulation: gain modulation and a low pass filter.
The gain modulation makes it so that when the horn or the drum is facing away from the mic, then the volume will change. The more gain modulation that you have, the lower the volume will be when the horn or the drum is facing away.
The low-pass filter modulation does the same thing. When the horn or drum is facing away from the microphones the low-pass filter is fully active.
The combination of these two features gives you an authentic feel of movement as the horn in the drum rotates. This modulation can be overwhelming sometimes so it’s nice that you can adjust the intensity of it.
The horn has an additional feature, a peak-shaped boost at the selected frequency with the selected gain. If you press that very faint downward facing arrow then you can change where the low-pass filter is allowed to move.
By default the low-pass filter fully-open will be put at the far right of the Horn’s band selection. If you click the downward facing arrow, then the filter at fully open will be set to the peak filter frequency.
Horn Mod Graph
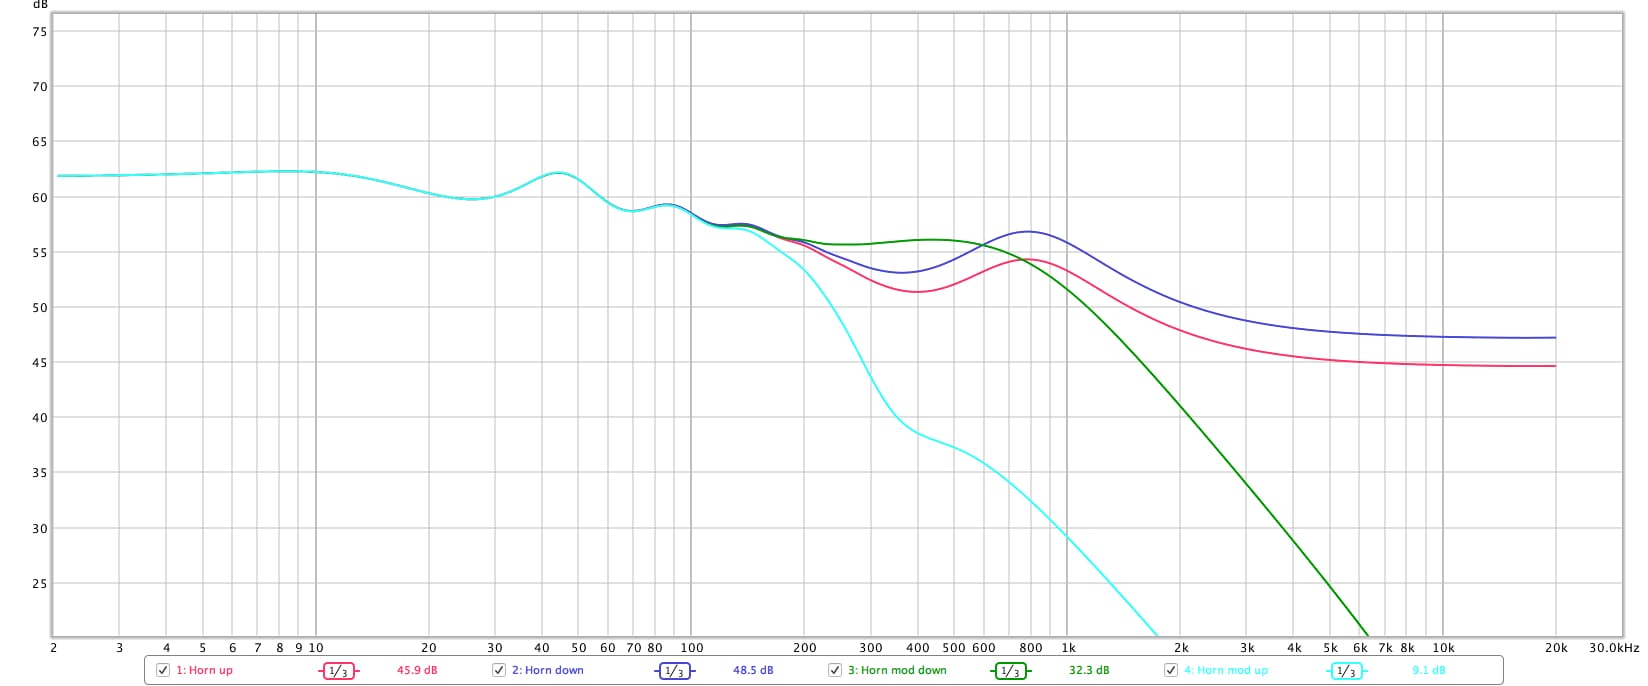
In an attempt to explain how the low pass filter mod works with the peak filter, I am probably going to confuse some of you and hopefully enlighten others.
Above I have a frequency response graph which shows how EARevolve reacts with various settings. All of these have the low pass filter mod set to 100%. So here is what the lines in the graph mean:
- Horn up - the horn is facing away from the microphones with the peak filter off
- Horn down - the horn is facing towards the microphones with the peak filter off
- Hown Mod up - the horn is facing away from the microphones with the peak filter on and the low-pass filter linked to the peak filter.
- Hown Mod down - the horn is facing towards the microphones with the peak filter on and the low-pass filter linked to the peak filter.
In general you can see that the low pass filter modulation causes high frequencies to be reduced when the horn is facing away from microphones. However, when the low-pass filter is linked to the peak filter the low-pass filter ends up being cornered right where the peak filter is.
Utilizing this very small feature, that is surprisingly difficult to see, can make a large difference in the realism and the usefulness of the rotating horn.
Doppler
The Doppler effect is a curious thing, and you’ve probably experienced it many times in your life. when something that is emitting a sound approach as you, then the pitch increases the closer it gets to you. As the thing making the sound moves away from you than the pitch becomes lower.
Surely you’ve heard this as a fire engine or as an ambulance has gone zooming by, or perhaps as any sort of motor vehicle zooms by.
This is caused because the thing that is making the sound is moving in the direction of the sound so each little bit of air that is moved get squished slightly. Imagine that you are in the ocean and you slam your hands down the water to make a big wave, then you run up to catch that wave and you slam your hands just behind it again. Now you will have two waves that are much closer to each other. This is similar to how the Doppler effect works.
The emitter of the sound is moving in the direction of the sound and so each new pulse of air that is moved happens a bit closer to the previous air that was moved. This shortens the wavelength, and as we can guess the shorter the wavelength the higher the frequency.
I’ve made a little animation above that demonstrates this.
This effect happens all the same when it’s a speaker that is spinning. As the speaker spends towards you the pitch increases. As the speaker spins away from you, the pitch decreases.
EARevolve also has this capability, you can increase or decrease the amount of Doppler effect that occurs as the horn or the drums speeds by you, and then away from you.
The Doppler effect is a cool thing to use, but sometimes it can make your part sound strangely out of tune, so you can simply just turn it off. I suggest trying it on then turning it off if necessary.
Parking Controls

When the horn and drum are stopped, you can control where they stop. This is where the parking controls come in. You have a few options here.
- Manual - this allows you to freely set the angle of the horn and drum.
- Towards Room Center - this causes the horn or drum to always face the center of the room .
- Away from Room Center - this causes the Horner drum to always face away from the center of the room.
- Towards Mic - this setting makes the horn or drum face the point between the two microphones.
- Off - when this is turned off, which you can do by clicking the label, the horn or drum will come to its natural resting position when stopped.
Secret Feature
This isn’t shown in the GUI, but if you look in the parameter list in your DAW and you will find a parameter named “MIDI Mode”. You can set this parameter to “DDJ”.
Now you can use a DJ controller to control the horn and drum. CC24 controls the Drum, and CC25 controls the Horn.
Values from 0-63 will move the element either slightly (0) or in a large amount (63) in a clockwise direction. From 64 to 127 do the same thing, but counter clockwise.
You will need a controller that sends out incremental messages. Each CC sent moves the element. The ION Discover DJ controller works out of the box, but you can probably setup any controller.
In the video above I threw together something with a switching quadrature encoder. For every rotary indent, it sends out MIDI CC 25 with a value of either 63 or 65 depending on the rotating direction. If I push the switch inwards then it sends out MIDI CC 24 instead.
It’s a cool feature that few people will be able to take advantage of, but if you are capable of it then it is really fun.
Code and Schematic
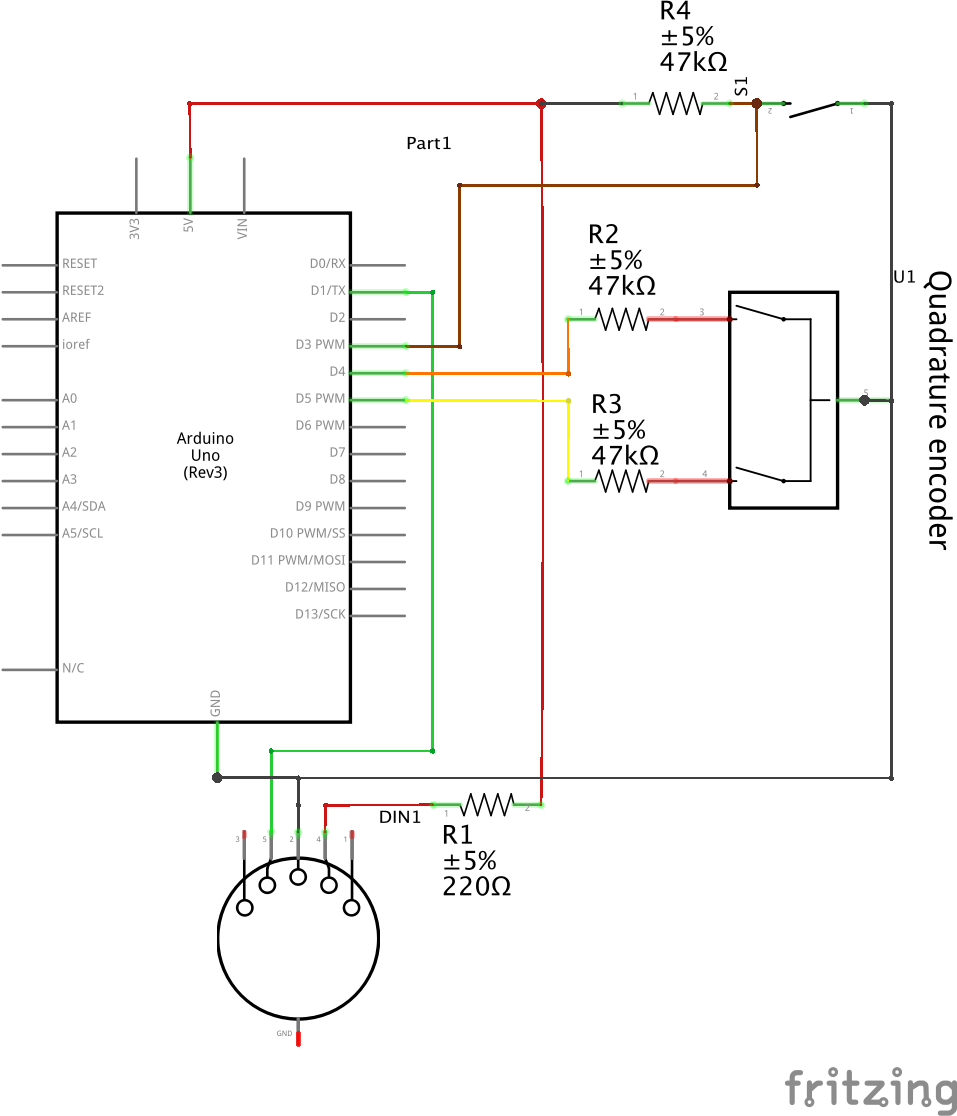
Circuit is above, code below. I did my best to redo the code I wrote to be more readable for a non-programmer (using examples from arduino documentation). My original code was used interrupts and a bitshifting to handle the encoder.
I explain how MIDI works a bit more in this post.
1
2
3
4
5
6
7
8
9
10
11
12
13
14
15
16
17
18
19
20
21
22
23
24
25
26
27
28
29
30
31
32
33
34
35
36
37
38
39
40
41
42
43
int val;
int encoder0PinA = 3;
int encoder0PinB = 4;
int switchPin = 5;
int encoder0Pos = 0;
int encoder0PinALast = LOW;
int n = LOW;
int reading;

void setup() {
  pinMode (encoder0PinA, INPUT);
  pinMode (encoder0PinB, INPUT);
  pinMode (switchPin, INPUT);
  Serial.begin (31250);
}

void loop() {
  n = digitalRead(encoder0PinA);
  reading = digitalRead(switchPin);
  if ((encoder0PinALast == LOW) && (n == HIGH)) {
    if (digitalRead(encoder0PinB) == LOW) {
      encoder0Pos--;
      if (reading == HIGH)
        ccSend(0xB0, 0x18, 0x46);
      else
        ccSend(0xB0, 0x19, 0x46);
    } else {
      encoder0Pos++;
      if (reading == HIGH)
        ccSend(0xB0, 0x18, 0x3C);
      else
        ccSend(0xB0, 0x19, 0x3C);
    }
  }
  encoder0PinALast = n;
}

void ccSend(int cmd, int pitch, int velocity) {
  Serial.write(cmd);
  Serial.write(pitch);
  Serial.write(velocity);
  Serial.flush();
}
Room Controls
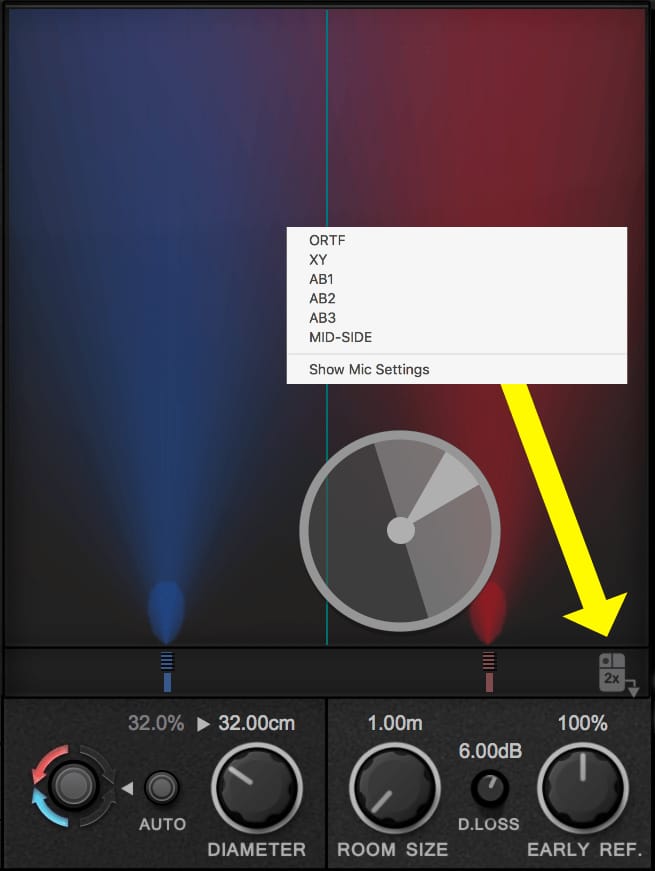
The room section is where the fun starts. your rotating speaker system is put inside a realistically modeled room that is recorded with realistically modeled microphones.
One of the first things you might notice is that there are microphones pointing into the room with a neat little graphic showing the pickup pattern of the microphones. you can click and drag these microphones down at the bottom to move them around, and on the far right side of the microphone area you can right click to select a number of presets and pickup patterns. This allows you to adjust the intensity of the rotating speaker sound, and the rotating speaker sound being moved around the room… but we’ll get to that later.
You can change the size of your speaker, and you can change the position of the speaker inside of the room by manually dragging the speaker around or using the speaker position controls. These two capabilities allow you to change the influence of the horn and roam relative to the microphones.
Since moving a sound source away from a microphone reduces the volume of that sound source in real life, this is also emulated in EARevolve. However, you can use the D. Loss parameter to change the amount of volume loss that occurs as the speaker moves away from the microphones.
For a room to sound like a room you need some reflections, something like a light reverb, and EARevolve provides that at a variable level by using the early reflections knob.personally I find that using this is extremely important if you want to have a realistic sound.
Microphone controls
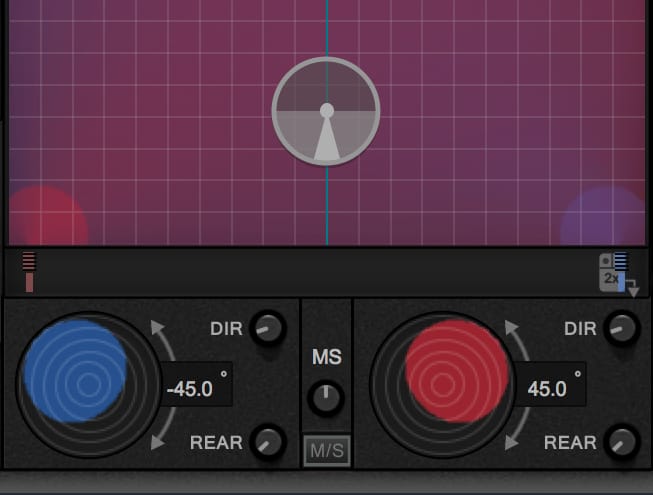
You can show my controls by right clicking the little mouse icon in the microphone bar.
The directionality of the microphones is configurable along with the rear axis projection.
The microphones can be configured in a mid-side configuration, while still retaining the control over the directionality of the microphones.
I covered the concept of color patterns in another post. EARevolve gives you complete control over the polar patterns of the two microphones used in the virtual room, what an incredibly cool concept!
Speaker Position Controls

What if you had a rotating speaker but the rotating speaker can rotate in a room? That’s exactly what EARevolve allows you to do, and is one the most fantastic parts of this entire product.
So let’s start from the bottom up. First you have the X and Y controls which allow you to change the position of the speaker inside of the room, and this is the default mode, “manual”.
Now when you click that auto button something very cool happens: the speaker with the rotating drum and rotating horn starts to move around the room. you can control the direction that it spins and you can control the center of rotation using the controls labeled X and Y.
The speaker doesn’t have to spin in a pure circle either. The H and V controls allow you to squish the circular path that the speaker follows.
The speed of the movement can be set freely or can be synced to your host tempo, also allowing dotted and triplet rhythms.
All of this is done in the context of having a pair of microphones set up in manner that you wish and then having the sound stimulated near perfectly. If you go back and look at the parking controls than you may wonder what happens if you use the free or the mic modes while the horn and drum are stopped. As the speaker is spinning it will follow towards or away from the center of the room or the microphones, as you have set it up.
This is a really cool feature that allows you a range of sounds from the subtle modulation to incredibly extreme nonrepeating modulated sounds.
Rotating Speaker
So let’s just get this out of the way: EARevolve is a fantastic rotating speaker simulator. You get an authentic sounding room with a comprehensive set of controls for the horn and drum, and some nice extras like the ability to turn off the Doppler effect, vary the low-pass filter and control how much the volume changes as the horn or drum spins.
If you play in organ and you are in need of a fantastic leslie like speaker, then you really need to just buy this plug-in. Yes there are some other fantastic products on the market that may be able to get you a more authentic sound (x42-whirl), but in the context of a recorded production nothing will serve you as well as EARevolve.
Unfortunately I think many people see this product and believe that it is nothing more than a rotary speaker simulator. Even if that was the case it would still be worth the money, because not enough people take time to learn how Rotary speaker simulators can improve their productions.
Let me show you some examples of how nothing more than the Rotary speaker part can improve some sounds, then we’ll move on to discuss how EARevolve can be used for a plethora of other production tasks.
Examples
I have two examples here: guitar and a synthesizer.
There is a vintage Rotary speaker sound, a modern Rotary speaker sound in a really big unreal rotating speaker sound.
MANUAL for the Comparator is here
REMEMBER! all of these examples are volume matched to the same LUFS value so you won’t be fooled by the ‘louder is better’ phenomenon.
More than a Rotating Speaker
Extraordinary Mixing
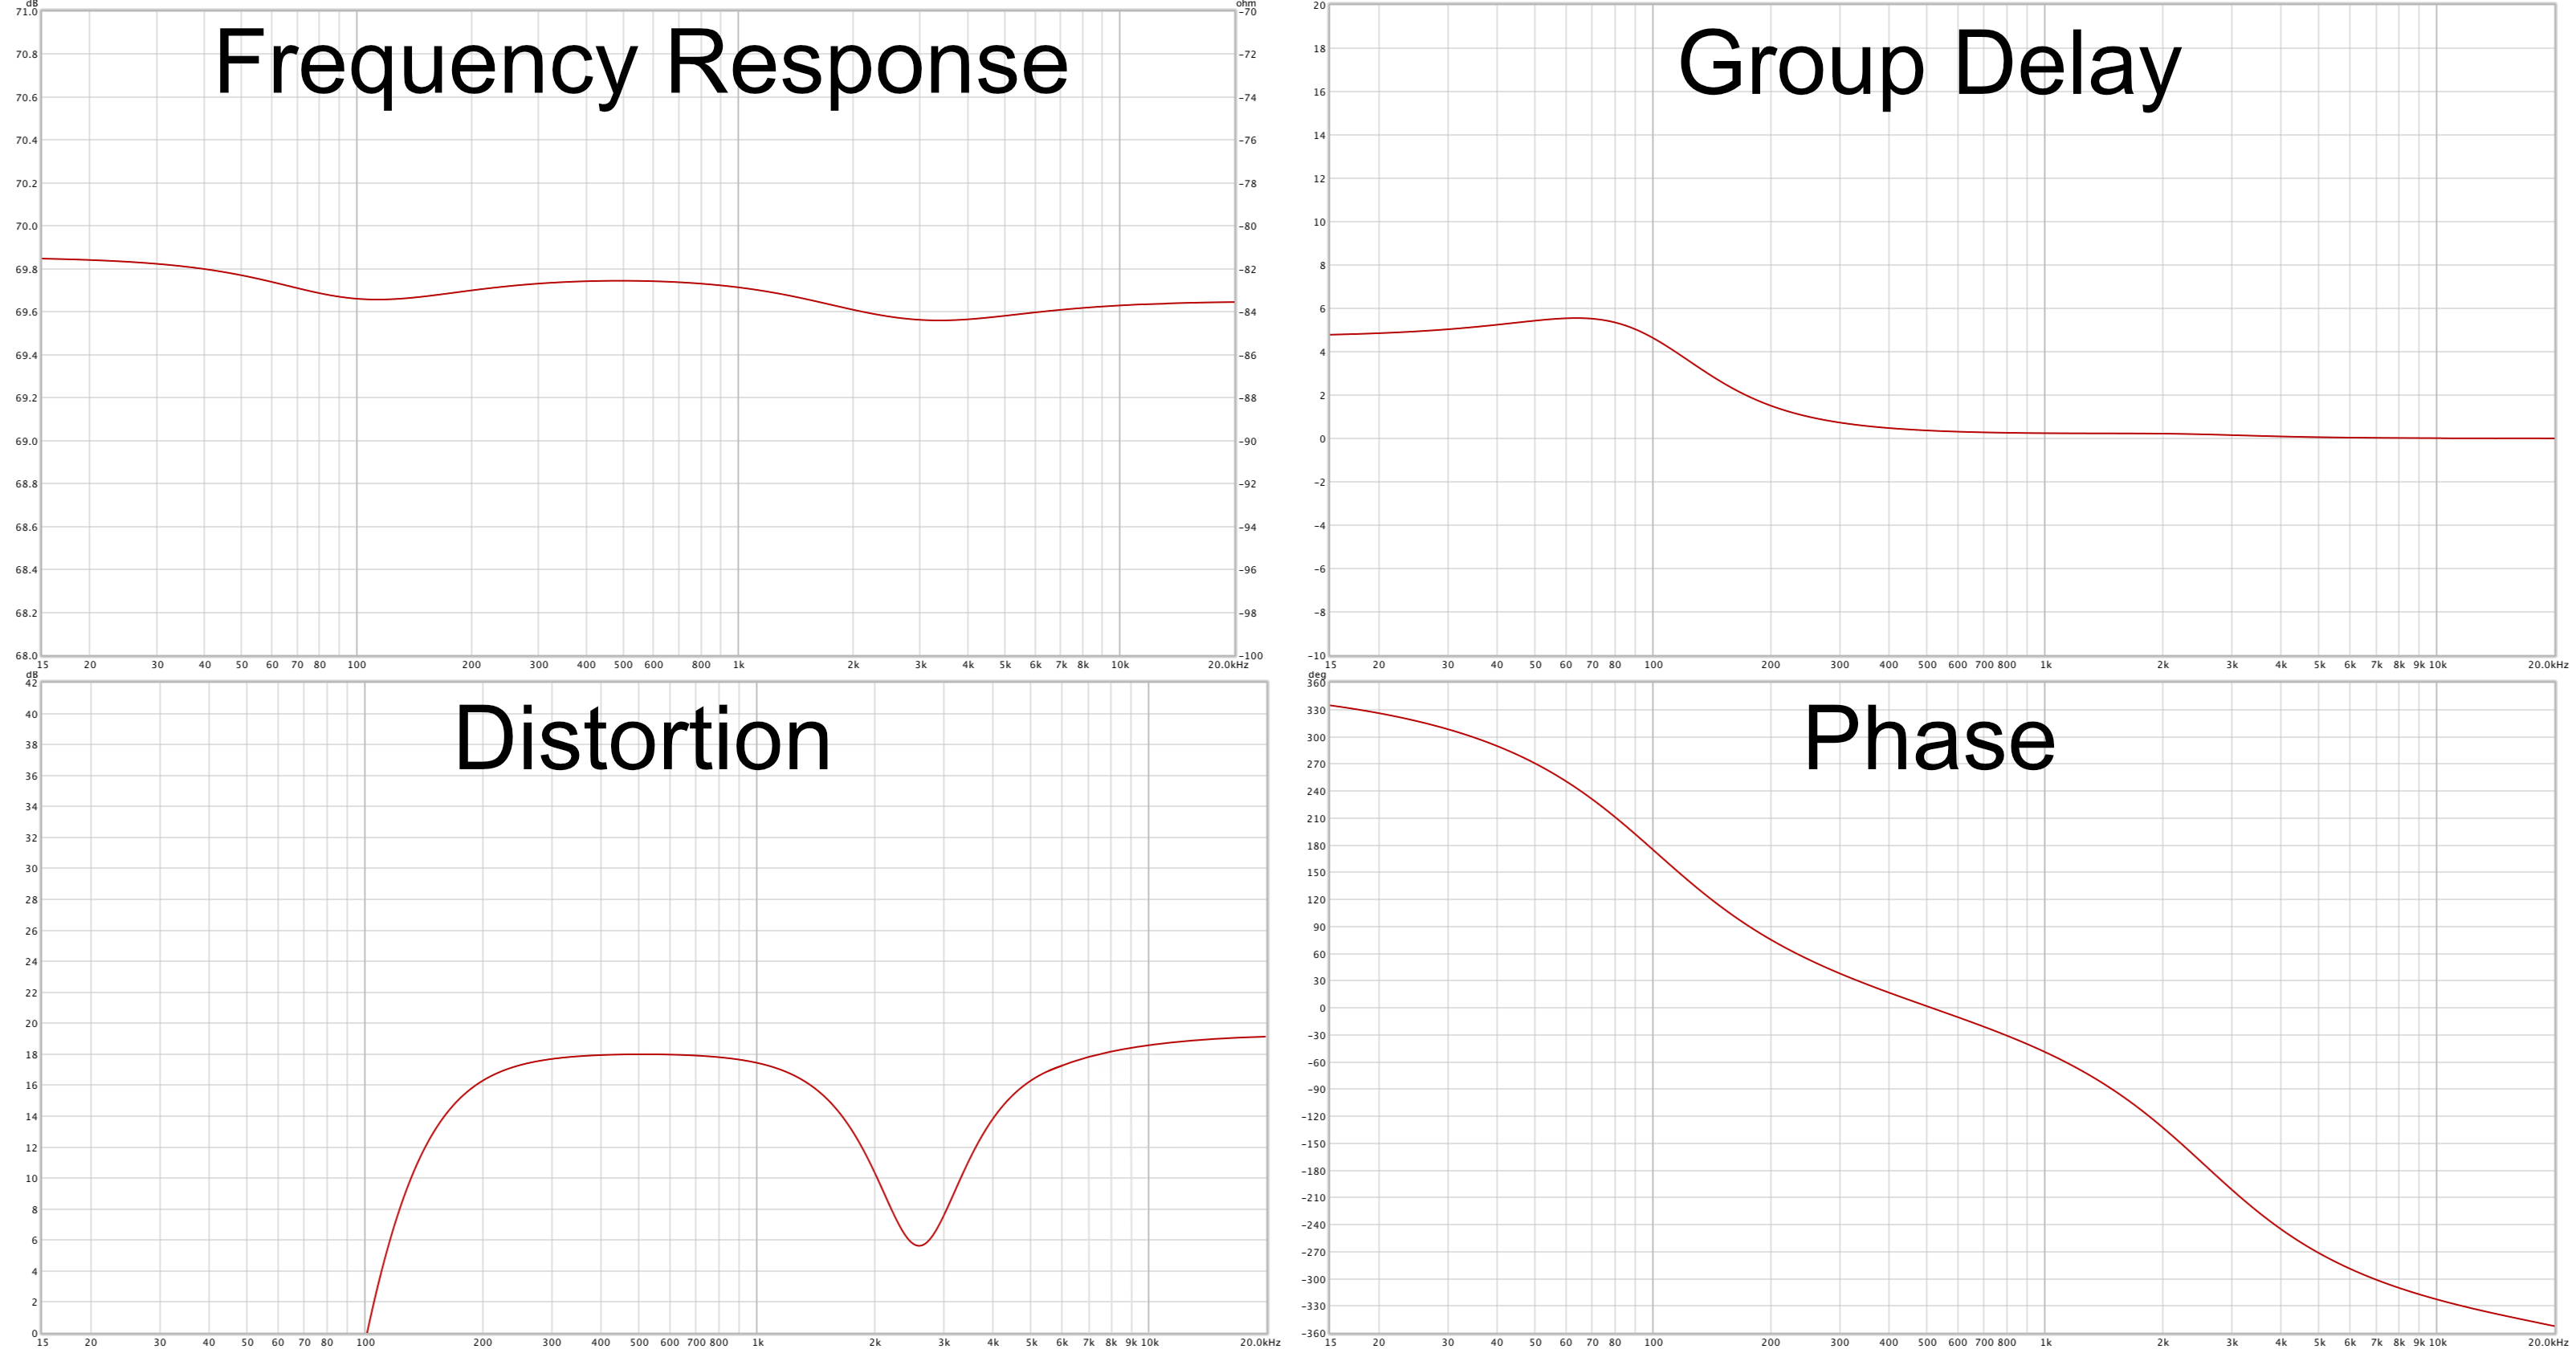
I have included a preset that you can download right here which on its own is a fantastic plug-in to just put on your track and enjoy how it improves the sound.
The image above shows the frequency and phase response of this preset, along with the saturation that you can expect. It is most certainly not a clean sound, but it is a fantastic sound.
That’s not all I expect you to do with it though, you need to take advantage of being able to move the speaker in the room. I suggest turning up the early reflections and D.LOSS (to about 6dB)then moving the speaker around the room as if you were moving the performer around the room. It’s a fantastic effect works well for placing a sound anywhere in the space of the mix that you want.
Note as well that there is saturation, and that low-frequency group delay gives you that polished sound that is so common in modern recordings.
Mixing Examples
The mixing examples feature guitar, vocals, drums and a synthesizer.
I’ve included the dry version of all of them, along with the base mixing preset version. from there I place the sounds in the virtual room at the midpoint and far point, and to the left into the right.
MANUAL for the Comparator is here
REMEMBER! all of these examples are volume matched to the same LUFS value so you won’t be fooled by the ‘louder is better’ phenomenon.
Chorus
The Rotary speaker simulation takes up a lot of CPU, so just turn off and use the chorus.
I already explained how the course works in the Chorus section, but to recap you get two stereo courses in parallel that can be cross mixed in each of the four channels has their own telephone which is set in a ratio between the two stereo channels.
The end result is a brilliant wonderful chorus that is easy to use without many parameters.
Chorus Examples
I’ve processed a guitar, a synthesizer and some vocals with the only the chorus section.
The heavier chorus applications also have a version with a 50% mix.
MANUAL for the Comparator is here
REMEMBER! all of these examples are volume matched to the same LUFS value so you won’t be fooled by the ‘louder is better’ phenomenon.
Stereo Widening
Of course the chorus can be used for stereo widening but there is another trick: utilize the horn and drum to create a stereo effect. (I suggest starting with the mixing preset to do this, because it will give you a generally cleaner sound, however you should feel free to do it with the default settings as well)
Firstly, put the brakes on the horn and the drum and set them to free park angle. Now aim the horn slightly to the left and the drums slightly to the right. It it’s a subtle effect, and remember that your low-low end is not affected because that is split off.
Set up a fairly subtle use of these and apply a little bit of chorus… the results are just… nothing can come close.
Stereo Widening Examples
Here I have some stereo widening examples from vocals, a guitar and drums.
There is an example of light and heavy widening along with mixing in the dry signal for each example.
MANUAL for the Comparator is here
REMEMBER! all of these examples are volume matched to the same LUFS value so you won’t be fooled by the ‘louder is better’ phenomenon.
Special Effects
By utilizing the speaker movement and rotary speaker capabilities you can create some really cool special effects that you wouldn’t expect would come out of a rotary speaker simulator.
Special Effects Examples
Here I have some examples of some crazy sound effects with drones synthesizers and vocals being thrown around a virtual room, along with some Rotary speaker thrown in (and sometimes some chorus).
MANUAL for the Comparator is here
REMEMBER! all of these examples are volume matched to the same LUFS value so you won’t be fooled by the ‘louder is better’ phenomenon.
Multiband Processor
Using the horn and drums variety of parameters you can treat it like a multiband processor. I won’t be giving any examples for this one, however I think you can use your imagination here.
Conclusion
EARevolve is more than just a rotary speaker simulator. It is a brilliant chorus plugin, a versatile stereo widener, a fantastic element positioning tool for your mix and of course it is a rotary speaker simulator.
EARevolve is not light on the CPU, so you may not want to use too many of them in a mix, but what you can achieve with EARevolve you cannot achieve with anything else. I strongly feel that this is a must-have plug-in of 2018 so far.
It may not be the plug-in that you use on every single track, but if you want a big wide mix with a great sense of space then there is nothing better than EARevolve.
Really.
I haven’t had this much fun with a plug-in in nearly a decade, and it’s found its way into every mix I’ve done for months (I was part of the beta process).
Support Me!
This post took 20 hours to research, screenshot, animate, screencast, write and edit. If you appreciate the information presented then please consider joining patreon or paying me for my time spent bringing you quality content!