6 days since my last post. It's because I've spent some time recently making something cool for the blog. This is an audio comparator.
Sorry... that's just an image. I don't want people loading a bunch of files on my front page. Click "Read More→" for the actual thing.
Hopefully you can figure out what it does by the UI, but consider this post the manual. Let's check out a few more examples and I'll explain how it works.
The Real Thing™
What it is
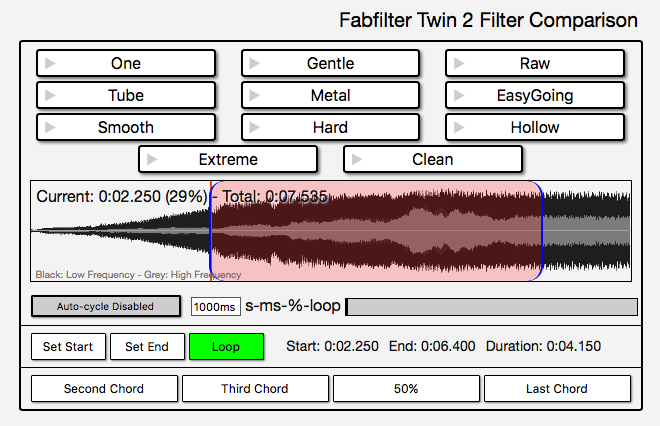
This is what I call a 'Comparator'. It allows you to listen to multiple audio files while seamlessly switching between them. All files maintain sync when switching so you are always at the same point during the switch.
I will likely be using this on future posts concerning various audio subjects. My main idea is to use this for plug-in reviews, but I'm certain I'll use it for other audio-related topics as well. There's plenty of ideas I have though! It supports as many formats as your browser does, and I have written a number of local tools to let me do fancy things as well.
This is written entirely in Vanilla JS by hand in vim with no external dependencies. I tested it in Safari, Chrome, Vivaldi and Firefox. I think it works ok in IE as well.
So let's discuss some features and how to use them.
Basics
To start playback: click any button with the triangle next to it.
To stop playback: click any active button with a square, or click the red square in the lower left of the waveform display. The waveform display button will stop ALL players on the page, and is visible on all players when one is playing.
Files can not be played when they are loading. The display will indicate when the file is loaded by changing the button name to the file name.
Synced playback
Synced playback is automatic. Anytime you switch playback of a file, by simply pressing the appropriate button, the new file is playing back at exactly the same position as the previous file. This sync is maintained across all functions.
If for some reason the files become de-synced, as can happen with some MP3s, simply click the waveform graphic to re-sync them.
Synced playback helps you overcome the limited auditory memory available to most people. Synced playback allows you to hear much more nuanced differences by seamlessly switching between files.
Level matched
All files are level-matched to -20lufs, -0.5dbFS max peak, -11dbFS loudness range.
Level matching allows you to make qualitative judgements without being biased towards 'louder' sounds as is natural. Without level matching, even a slight increase in loudness will usually bias a listener to prefer a file they may otherwise dislike when level-matched.
The level matching can make some subtle differences difficult to hear. This is intended! You can always adjust your volume knob or fader, but the effect itself is what it is.
Looping
The files automatically loop at full length.
User loops can be made by pressing the "Set Start" and "Set End" buttons when the playback cursor is at the appropriate position. These can be used when playback is stopped, or during live playback.
The loop start can not be set after the loop end, and vice versa. I decided to not enable any intelligent re-arranging of the loop, since it became rather confusing at times.
Looping is enabled by pressing the Loop button. The GUI's display indicates when the loop is active by showing a transparent overlay between the loop markers. If playback is active, starting a loop will reset the playback position to the current loop start.
Loop start, end and duration values are shown to the right of the loop controls.
Auto-cycle
The auto-cycle function is available during playback. This will cycle to the next audio file in the list automatically at a rate determined by the value set in the text box.
Multiple values are possible
- Seconds: "4s"
- Milliseconds: "3500ms"
- Percents: "45%" (Greater than 100% is allowed!)
- Loop: "loop"
The bar to the right of the cycle input box shows the progress of the current cycle when active.
When loop mode is active, Auto-Cycle works slightly differently. It has 2 states:
- Loop on: When loop is on and auto-cycle is set to "loop", the next file will be played on each loop cycle.
- Loop off: Auto-cycle works similarly to the other 3 modes, but the time is set to the duration of the loop. This is not necessarily synced to the loop.
One trick that may be useful is to set Auto-Cycle to 'loop', set the loop markers to the ends of the files, enable loop mode and start auto-cycle. This will change files on each play-back of a full file.
Cycle values can only be set when playback is stopped.
Jump Markers
Some comparators will optionally have a series of buttons on the bottom under the loop section. These are "Jump Markers". They allow you to quickly seek to locations in the file that I have deemed noteworthy.
Give it a try by doing this:
- Click "Third Chord"
- Click "Set End"
- Click "Second Chord"
- Click "Set Start"
- Turn on "Loop"
- Click any file to start playback.
Now you're looping the second chord repeatedly. I will hopefully use this feature often to make such loops easy, as well as point out various interesting things in the comparison.
As a bonus for me I can input this data in multiple formats:
- Number of seconds: 4
- Percentage: 51%
- Minutes:Seconds: 05:04
- Minutes:Seconds.Milliseconds: 00.45.3451
Waveform
The waveform displayed is not your ordinary peak waveform!
There are 2 layers to the waveform display, the dark and the light sections. They correspond to different frequency data. These are not absolute values, but instead a relative display to give a rough overview of the spectral balance of the audio file.
- Dark Background: displays low-frequencies <1.05kz.
- Light Background: displays high-frequencies >1.05khz
The 1,050hz cutoff was carefully selected after testing 100s of files. I feel that this offers the best overview.
In the above example look at the two files "Tube" and "Raw". The "Tube" file shows much more high-frequency data with a larger light-foreground. The "Raw" shows a bias towards lower frequencies. Knowing the context of the test being synthesizer filters, we can quickly guess that the "Tube" filter likely is producing a lot more higher-amplitude harmonics than the "Raw" filter.
The waveform displays are normalized and level-matched as well. This has the opposite effect of level matching audio! The level matched display more greatly shows differences between files.
When switching files, the waveform transitions are animated in a way that is biased towards the new file. I spent a good deal of time tuning this so it gives you the best feel for the change in envelope and general frequency content delta.
Support me!
If you appreciate the information presented then please consider joining patreon or donating!
If you appreciate the information presented then please consider joining Patreon or donating money/time.
