
A DAW that's aimed at electronic musicians needs to supply at least a basic set of instruments so the user can get making some music right away. Bitwig has a decent set of included instruments, and it has note effects (midi effects).
Let's see how they are...
Spoiler - Overall rating:
Other posts in this series:
Contents
- Introduction
- Instruments
- Hardware Integration
- Container - Instrument Layer
- Container - Note FX Layer
- Note Effects
- Conclusion
- Support Me!
Introduction
Bitwig comes with a sampler 3 synthesizers, a selection of drum synths and 2 hardware integration devices. All 4 of the main instruments in Bitwig have an FX container, Note FX container and allow per-voice modulation.
Despite the relatively small number of instruments, they are all quite capable due to these extra features.
It's worth noting that output of the instruments is quite clean.
Modulatable
First read the modulation post. It's integral to understanding the value of Bitwig's included synths. Nearly every parameter of Bitwig's synths can be modulated by the included modulation devices. Even the buttons and switches! (I try to make note of important things that can't be)
In the example above, I made a simple 'talking synth' patch. There's an audio-sidechain connected to an audio track that I'm feeding a vocal track. This patch is very expressive, sounds amazing and took me about 45 seconds to setup. Doing this in nearly any other DAW with stock effects is impossible or takes a lot more time.
Most high-quality synths have built-in modulation systems, but almost nothing comes close to what Bitwig offers on a whole. (Mux comes damn close though!)
You might be nonplussed by my evaluations of these synths simply based on my description of them, but I am reviewing them as I experience them: with an amazing modulation system.
Per-Voice modulations
The bulk of synthesizers, analog and digital, present an interface that controls the timbre of each voice. A voice is what's triggered in response to a single midi note-one message.
If you were to automate your favorite VST's filter, then every voice will be locked to that automation. What if your notes are staggered, and you want each note to have some movement that starts when the note starts? In any other DAW you would have to create a separate track for every note! Many high-quality VSTs (like my beloved Bazille) have their own modulation system where each voice has its own modulation signal, but this doesn't allow you to respond to events from outside the VST. What if you want a looping envelope on each synth voice to respond to a drum part elsewhere in the project? You can't do that with a VST.
With Bitwig you can.
Many of Bitwig's modulation devices allow per-voice modulation. To see which go to the modulation post and search for "per voice".
Bitwig's per-voice modulators allow the modulator to act independently on each synth voice. So if you have an ADSR on your filter to make a cool note-triggered sweep, then every note will trigger its own independent sweep. Very, very, super, ultra fantastic.
The per-voice integration is a smart feature that truly makes the modulation system 'unified'. Every modulator is really part of each synth, not just a tacked on 'automatic parameter automation' like so many other DAWs.
Voice Stacking and Device Panel
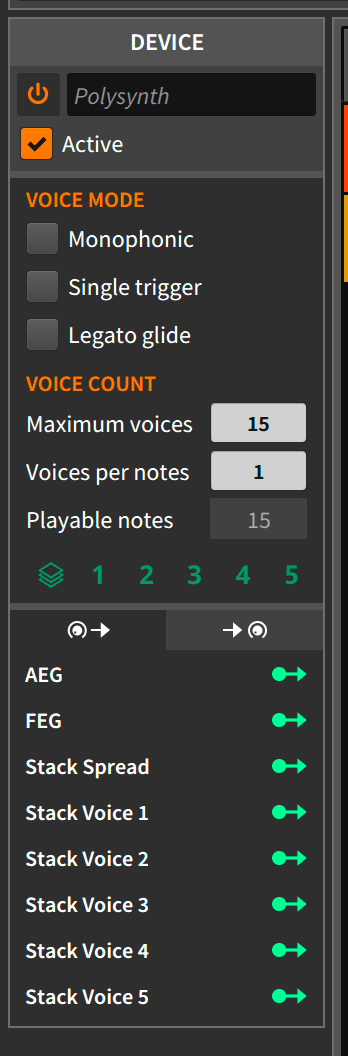
Firstly, every synth has a device panel now. Bitwig synths have the information shown, and for VSTs you just get to turn on/off MPE.
EVERY Bitwig synth supports Voice Stacking. You can have up to 5 stacked voices per input MIDI. Each voice has a modulator so that each specific voice can change any modulatable parameter for that specific voice. That's right... you can customize each stacked voice exactly how you want it. It makes every single synth in Bitwig even more powerful.
Containers
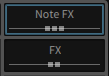
Each of the non-drum synths has its own Note FX and FX container. There will be times when you have complex patches and you only want to apply FX or Note FX to a single instrument. This is possible by using a Chain, FX Layer or Instrument Layer, but having it built-in to the device is convenient.
The immediacy of the Note FX and FX containers is an inspirational bonus. I've found that there's many times I've used them, when in their absence I would never have taken the time to setup the same patch.
Instruments

Bitwig's instrument selection looks limited, and it is... except it's not.
While there is a limited selection of devices, the capability and quality of the devices is outstanding. Nearly every device outshines anything of it's synthesis-type peers in any other DAW.
Drum Machine
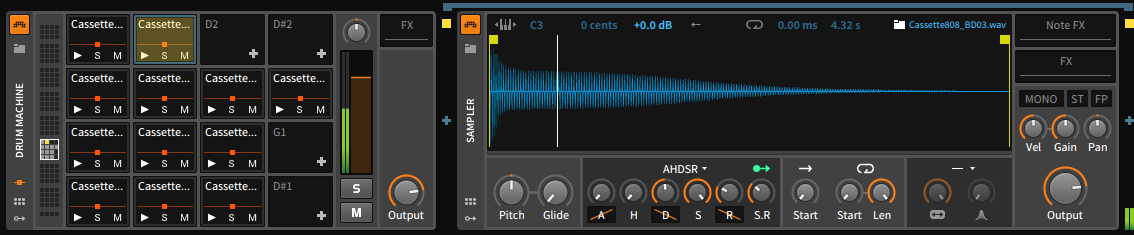
Drum Machine is a container. If you are familiar with Ableton Live's drum racks then you are familiar with Drum Machine. Drum machine is on the left in the image above, and under the blue bar is a sampler associated with one of the 'note containers'.
Drum machine maps all 128 notes to their own containers. When a note is sent to Drum Machine, then that note is sent only to the instruments loaded in that note's container. The note containers can have anything you want: samplers, drum synthesizers, VSTs, FX, etc...
It's worth mentioning that Drum Machine doesn't support per-voice modulators, which seems obvious since each note is already segregated. Per-voice modulation is done by modulating the device inside the container, not the Drum Machine itself.
Drum Machine automatically maps the names of samples to notes when viewing Bitwig's drum editing mode in the note editor. Unfortunately, as you can see, it still may not be possible to see what you're samples are. The name area can not be resized.
Drum Synthesizers
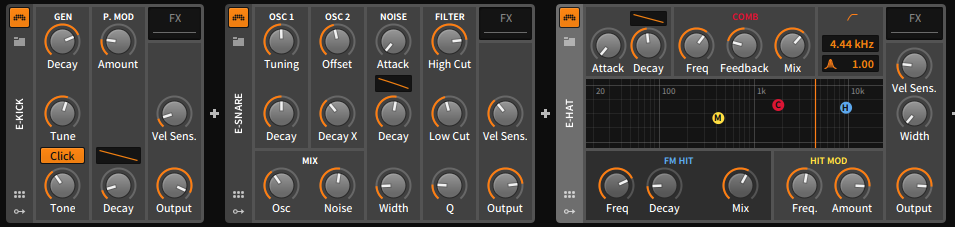
Bitwig comes with a number of specialized synthesizers for drums. While it's possible to synthesize drum sounds with almost any type of synthesis, if often requires a good bit of knowledge and experimentation. Bitwig's individual drum synths are a welcome addition, especially when you just need to bang something out.
The drum synths clearly take inspiration from certain classic hardware drum synths. I am only interested in their general usefulness, and now how well they emulate a specific piece of hardware or genre sound.
E-Clap
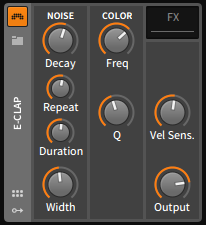
E-clap is very simple. It's filtered white noise, with repeating sub-voices. White noise is generated, filtered and this process is repeated n-times separated by a time of the repeat-duration. The width of the noise (correlation between l/r channels) is controllable for some wide clap sounds.
It is nice that this conceptually simple device exists for when you don't want to hunt around for the right clap sample. It never was useful in a final context though. It sounds much more like a classic drum machine snare than a clap no matter how much you tune the repeat parameters.
As an e-clap it sucks. As a percussion synthesizer it's still useful and appreciated.
E-Cowbell
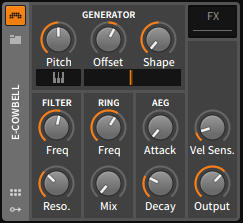
E-Cowbell gives you 2 oscs (one is an offset of the first), ring modulates and filters them. A classic cowbell design if I've ever seen one.
E-Cowbell can track incoming pitch or produce a selectable pitch. The Osc shapes are variable (they appear to be a series of impulses at the specified frequency that are rectified as you change the shape?). You get a single attack parameter to smooth the attack. Velocity sensitivity is adjustable and works well.
The optional ring-modulator that can be mixed lets you add some complexity to the sound and a dirtier feel.
Overall the E-Cowbell delivers what's on the label.
E-Hat
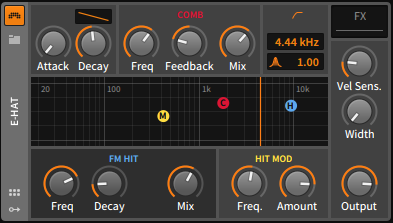
E-Hat gives you two classic composable hi-hat synthesis types: comb filtered noise and FM.
The envelope has attack and a release stage with adjustable shape and covers all generated sound from the E-Hat. The noise is then optionally (via the comb mix knob) fed in to a simple comb filter followed by a high-pass filter.
The optional (via the FM mix knob) FM section has its own envelope with an adjustable exponential decay. The carrier and modulator, plus modulation amount, are individually adjustable.
E-hat offers an admirable range of classic electronic hi-hat sounds. I would find this to be a great addition to any DAW.
E-Kick
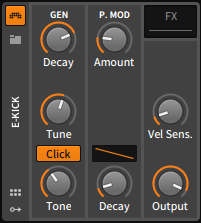
E-kick is a simple rectified sine-wave based kick generator. An attack section generates a variable 'click', and there's a pitch mod with adjustable decay and decay curve.
E-kick is a quick way to lay down great sounding kicks. Electronic kick drums are normally simple, but if you need more from E-kick then just abuse the FX-container and modulators.
Deceptively simple, but I end up using E-kick for most all of my kick needs when I'm in Bitwig.
E-Snare
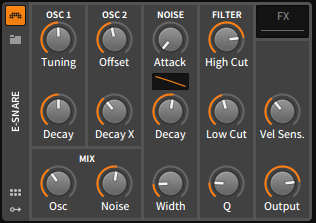
E-snare offers you 2 oscillators, one of which is offset in frequency and decay to the first, for the tone of the snare. There is a noise section in parallel with its own envelope settings. The OSC and Noise sections are mixed as you desire then sent to a set of variable high and low pass filters.
Strangely E-Snare does not have a pitch-following mode like E-Cowbell. Pitch changing snares are common-practice in a number of genres, and E-Snare forces you to setup modulation or automation to pitch your snares per-note.
E-Snare limits you to a small selection of classic x0x type snare sounds. While modulation and the FX container are a pathway to more variance, E-Snare is perhaps too simple for what I would want. There's a few extras that would be nice to access without fiddling with modulation: note tracking, pitch mod, noise type, osc shape, FM facilities, multi-path FX containers (noise/osc separate) etc...
The argument could be made that Bitwig is aiming to offer simple devices that you extend as you desire, but these features are present in other devices where it arguably matters less. Electronic snares vary greatly across genres and eras, and E-snare neither offers you useful simplicity or the necessary complexity to be frequently useful.
For the amount of effort necessary to make more complex sounds with E-snare, you could nearly build the whole device from scratch with more features.
E-Tom
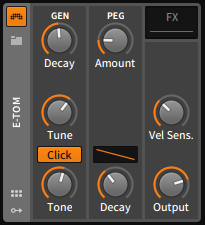
E-Tom is E-Kick with the knobs scaled to make higher pitched sounds. There might be a slight difference in the envelopes, but it's barely noticeable when all parameters are set the same.
E-Tom would be useful if it would respond to note-value, since toms are often varying pitches, but you have to setup a modulator for that to happen. With some help from the modulators, E-tom can be quite useful, but it once again seems strange how limited this is.
If Bitwig wanted to offer a set of very simple devices that allow you to make what you want, then E-Tom is too complex (yet somehow limiting). If they want to provide you a good tom instrument, then it's far too simple. E-tom is just a lazy middle-ground that does no justice to either philosophy. It's a shortcut that makes you do extra work.
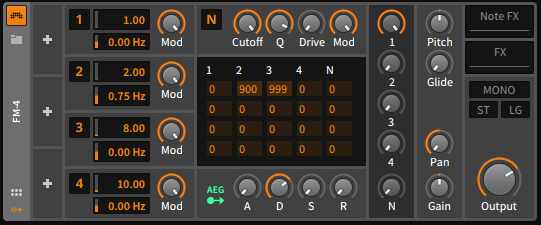
FM-4
The FM synthesizer is possibly one of the most confusing common synthesis types. It's also not something included frequently in others DAWs as part of their de facto package.
FM-4 offers you:
- 4 sine-based operators - with adjustable frequency multiplication (coarse tuning) and fine tuning offset.
- A noise operator - with a tunable low-pass filter, filter drive, on/off toggle and used to modulate the other operators.
- Modulation grid.
- Envelope generator - basically an ADSR modulation device built-in.
- Note goodies - FM-4 has pitch glide (portamento), pitch offset, pan and gain. Legato (no re-triggering of envelopes when notes overlap), pitch legato (glide notes when legato is triggered), and monophonic modes are also available
Each of the operators is played according to it's value in the mixer (the dark grey strip), and optionally sent to the modulation matrix in the center based on the 'mod' value associated with that operator. The center modulation matrix shows the operators as modulation sources, and the rows are the destinations. Operators can modulate themselves, which is useful.
Fm-4 is the bare-minimum that you'd ever want from an FM-synthesizer. It lacks modulation routing options (such as parallel->serial modulation options), modulation amount is not modulatable (which is very difficult to implement anyway!), there's no post-op feedback, no amp mod, filter feedback (there's no filter at all), gibb's filter, post-mod unison or post-mod panning.
That said, Fm-4 is a nice addition. Compared to Ableton's Operator it's a much better offering. Along with the rest of Bitwig's capabilities Fm-4 is a decent building block, however it could be opened up more to allow for more flexibility.
Organ

Organ is more than just an organ. It's an additive synthesizer! Organ gives you a selection of sine waves, relative to the fundamental frequency, that are combined to create your sound.
The drawbars each produce a waveform based on the harmonic complexity setting: Pure, Rich and Full. Pure is a clean sine wave, Rich gives you a decaying set of odd harmonics and Rich produces a complete set of odd and even harmonics in decaying amplitude. The result of the drawbars passes through a simple attack/release envelope with no adjustable curve.
Organ has pitch offset, pitch glide (portamento), pan, gain, phase re-trigger on note-on, legato (no re-triggering of envelopes when notes overlap), pitch legato (glide notes when legato is triggered), and monophonic mode.
I understand that organs traditionally are not velocity sensitive, but that would be a nice addition instead of having to rely on a modulator. Modulating the drawbars by negative values displays oddly and is difficult to see.
Organ is cool. It's also surprisingly versatile and a monster pad-machine... but it's still very simple and bothersome to use.
Phase-4
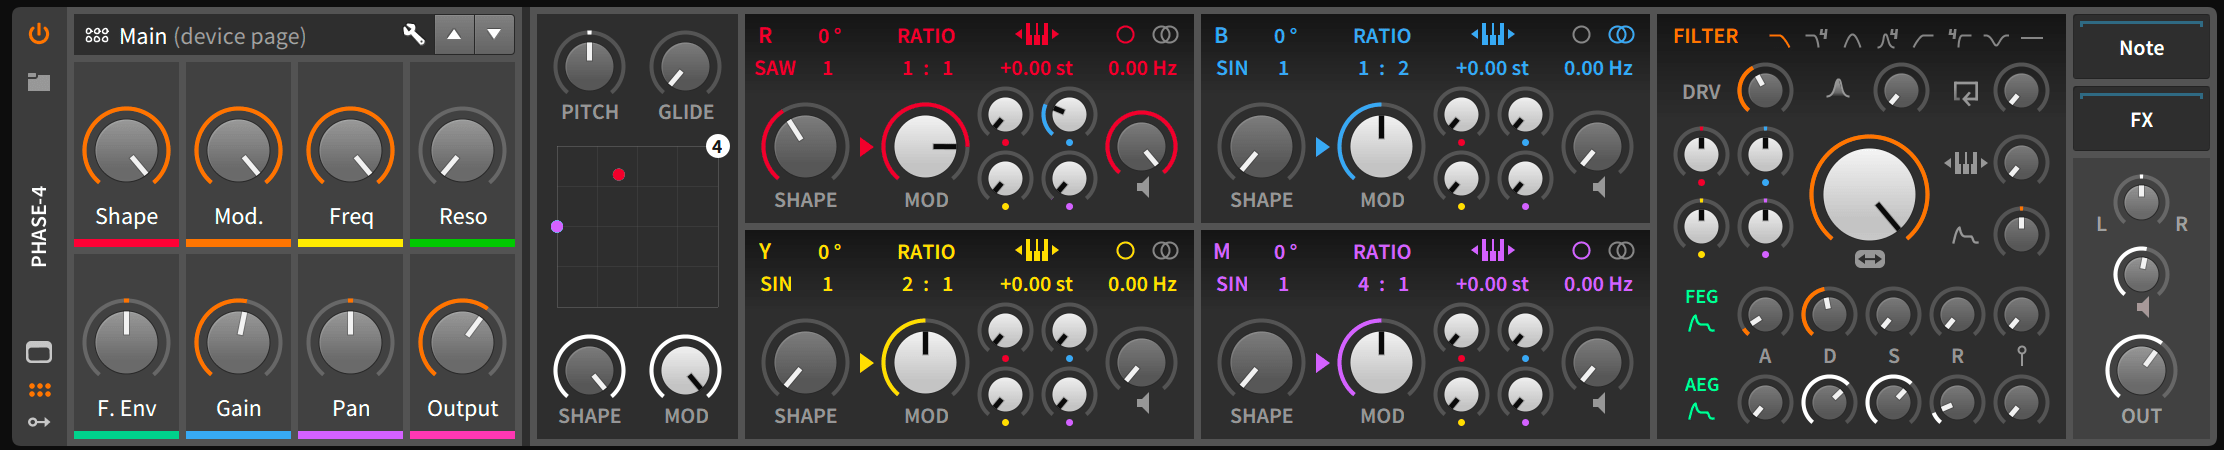
This bad boy right here... Yeah. Bitwig is upping their game.
This is a Phase Distortion and Phase Modulation synthesizer. You can jump ahead to the next section to learn about phase distortion synthesis or the section after that to learn about phase modulation synthesis.
Phase-4 offers you 4 oscillators. You can control the amount of phase distortion applied with the shape knob, the order of PM or PD with the arrow and the 'Mod' controls the amount of phase modulation. There's a detune above the mix knob and those 4 knobs in the middle control the amount of phase modulation applied to the oscillators including itself for some really neat feedback PM sounds.
The algorithm used for the phase distortion is selectable above the shape, and above that still is the phase offset.
There's a filter section with your normal filters and each oscillator can modulation the filter frequency. That's right... 4 way audio rate modulation of the filter cutoff. Cool stuff. Really cool and really fun stuff. There's filter feedback too! Filter feedback is awesome for those deep growling basses or expressive leads.
Each oscillator has optional key tracking. This allows you to adjust whether that oscillator responds to the MIDI note input, or outputs a fixed frequency. The oscillator's pitch can be set to a ratio of the input MIDI pitch like your standard 'octave' control.
Your typical filter and amp envelopes are present and they allow you to control how much the input velocity affects their function.
There's global pitch, glide, global shape and global modulation parameters. The global shape/mod parameters let you 'pull it back' when you've created a sound that's maybe a bit too aggressive or crazy. Likewise you can go nutballs with your patch by increasing these if you want (assuming there's room for that to happen).
The sounds produced are on the extremes between ultra-clean and frighteningly aggressive. Some of the bass sounds I've coaxed out of this thing are among my favorite I've heard in any synthesizer.
Phase Distortion
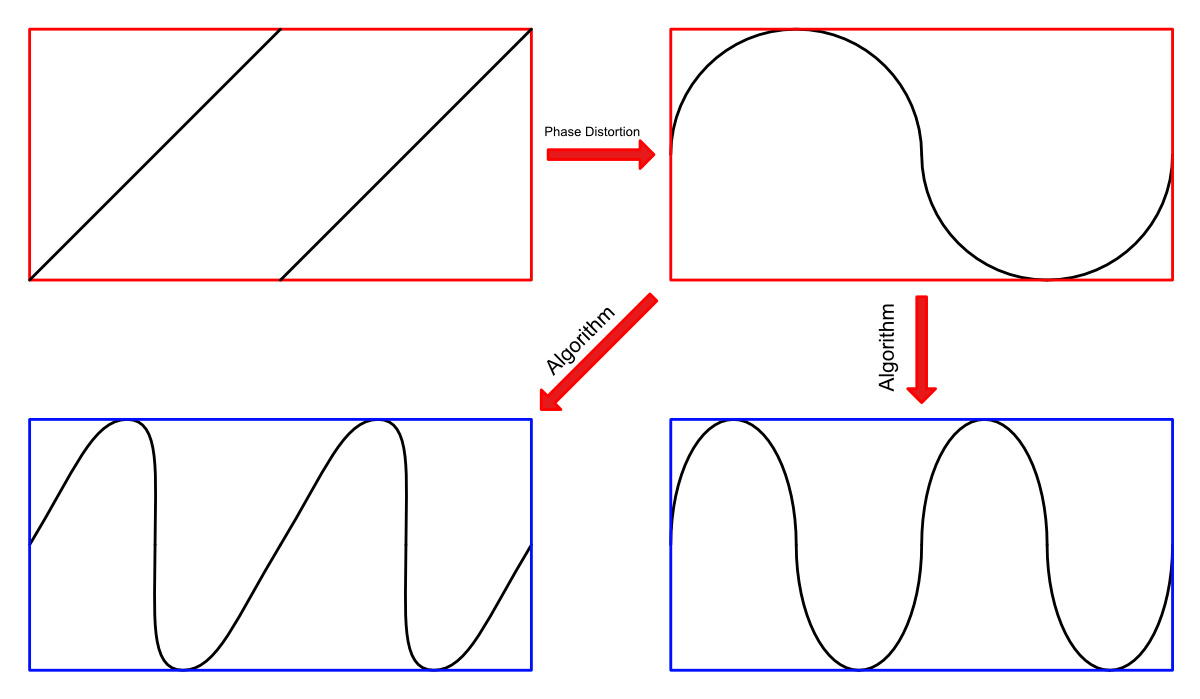
Phase Distortion Synthesis is not complex. You take a signal (carrier) and another signal (modulator) then use the modulator to change the phase of the carrier.
"Phase" is the current position of the waveform. Imagine drawing a sinewave with your finger. Your position in that sine wave is the 'phase'. It's the location in the current point in time in a signal expressed as a portion of a circle. So if you're at the center line then it's 0° phase since you are at the 'start' of the circle. At the top you're at 90° phase. Halfway down to the center again you're at 135° and so on. Phase is normally expressed in radians, but I'm using degrees for non-mathy folks.
The carrier and modulator are the same frequency, so that they occupy the same amount of time (or you can think of it as: they fit in the same box). The modulator takes the current phase and applies some algorithm to it that adjusts the current phase of the carrier. The modulator doesn't need to be a continuous signal, nor does the algorithm need to be linear.
The result is that you can have a variety of ways to 'phase distort' your carrier. You can also mess with the modulator in various ways such as modulating its position in time, changing the modulator each cycle, modulating the amplitude, etc...
Understanding how to use PD to create a specific sound though... best of luck. It takes a lot of experimentation and familiarity with the specific algorithms used for phase distortion in the synthesizer. There's some other tricks that different PD synths use and you will have to become accustomed to those as well.
Phase Modulation
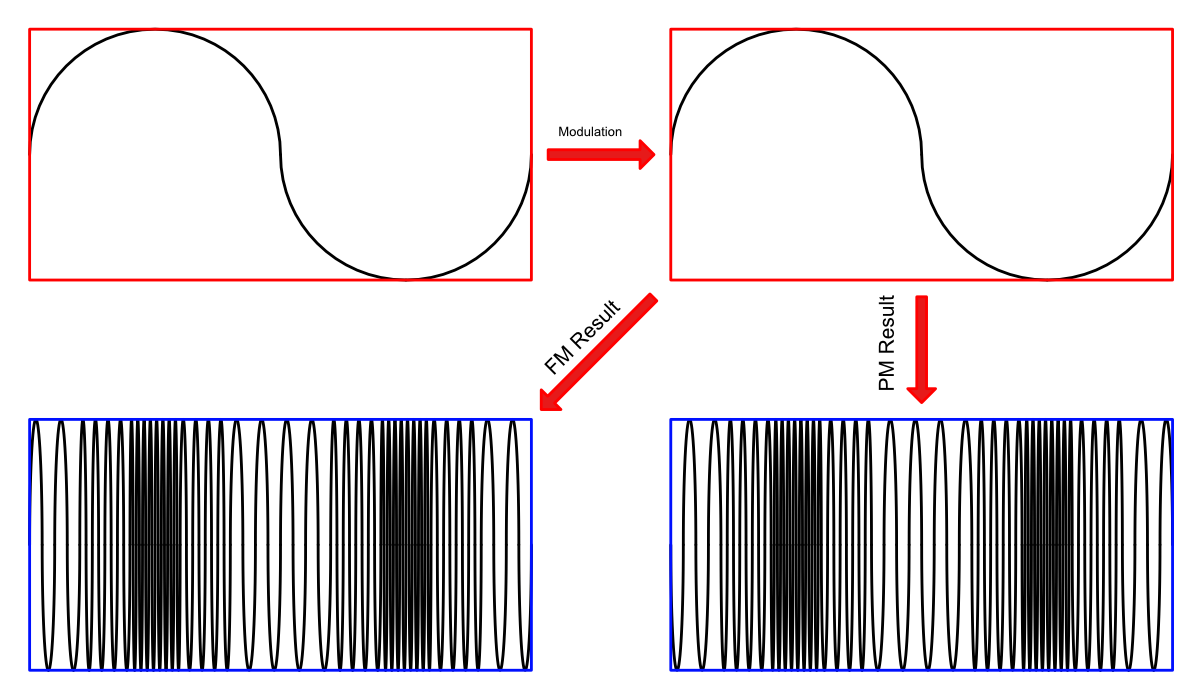
With Phase Modulation Synthesis the synthesizer is taking the current phase and modulating the carrier. It's nearly identical to FM Synthesis where the frequency of the carrier is modulated. The difference is that the result is inverted in polarity.
BUT JUST FOR SINE WAVES
There's a myth out there that phase modulation and frequency modulation are identical. They are (besides the polarity inversion, or 180° phase rotation), but only for sine waves.
What if our modulator is a square wave instead?
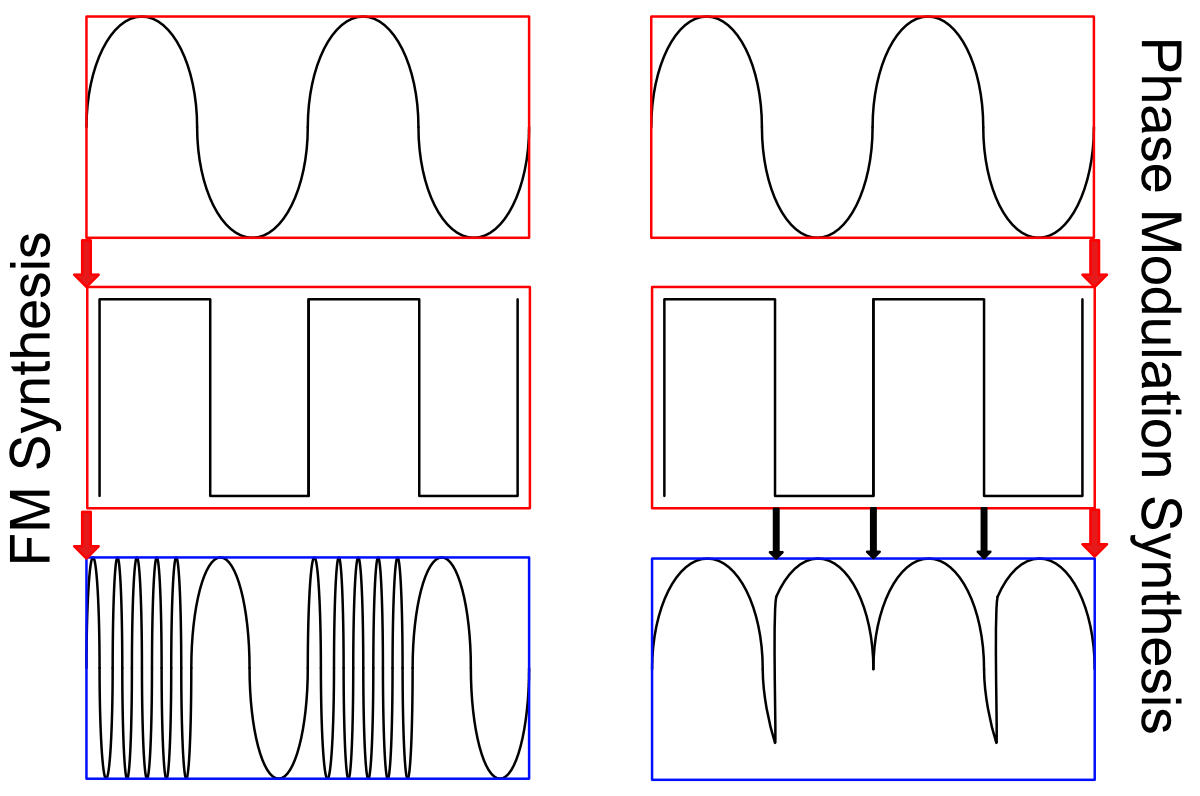
The Frequency modulation should be somewhat obvious. When the modulator is 'high' in its position, the frequency of the carrier is increased. When the modulator is 'low', the frequency of the carrier is decreased.
Phase Modulation Synthesis is where we see a difference. When the square wave modulator is 'high' the carrier does its normal thing. When the square modulator goes 'low' then it just flips the phase. We end up with a very strange looking waveform that in this case is asymmetrical and full of even harmonics.
The black arrows in the PM side show where these switches are occurring.
Perhaps you can imagine how things would differ with various waveforms. Anything besides a sine wave causes some major differences between PM and FM Synthesis.
Polysynth
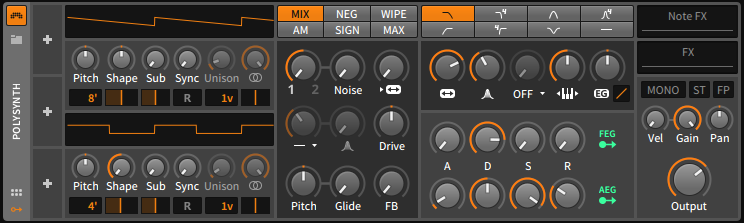
Every DAW needs at least one subtractive synthesizer. Bitwig's is Polysynth.
Polysynth offers:
- 2 well-stocked oscillators with sub-oscs, sync, shape, pulse width, sub-osc pwm, coarse and fine tuning.
- A mixer - Polysynth's mixer has multiple mix modes, amplitude modulation and noise mix
- A post-mix high-pass filter with resonance and drive.
- Filter - multiple filter types with variable drive types, built-in key-tracking, filter feedback and attached filter-envelope depth and shape.
- 2 built in envelopes - The filter envelope and amp envelope are available as freely assignable modulators for almost any parameter in polysynth.
- Note goodies - pitch offset, pitch glide (portamento), pan, gain, velocity-sensitivity, legato (no re-triggering of envelopes when notes overlap), pitch legato (glide notes when legato is triggered), and monophonic mode
Polysynth sounds awesome. Polysynth is capable. Polysynth is fun. Polysynth is expanded by the modulation system in amazing ways. Polysynth shows what the Bitwig developers can do when they set their mind do it.
I'd buy Polysynth straight-up if it came with all of Bitwig's modulation capabilities build-in. It'd be a monster synth, your everyday workhorse and a top-seller for sure.
I do have a problem though with Polysynth: the fact that it's great. Once again the argument could be made that Bitwig tries to offer you a selection of simple devices that you can use to create your own complex patches, but then Polysynth exists with a plethora of built in options.
Polysynth makes every other synth in Bitwig look like a half-assed attempt at making something immediately useful. Maybe that's not the case, but it's hard to see a cohesive thought-process amongst the complexity of these synths.
Sampler
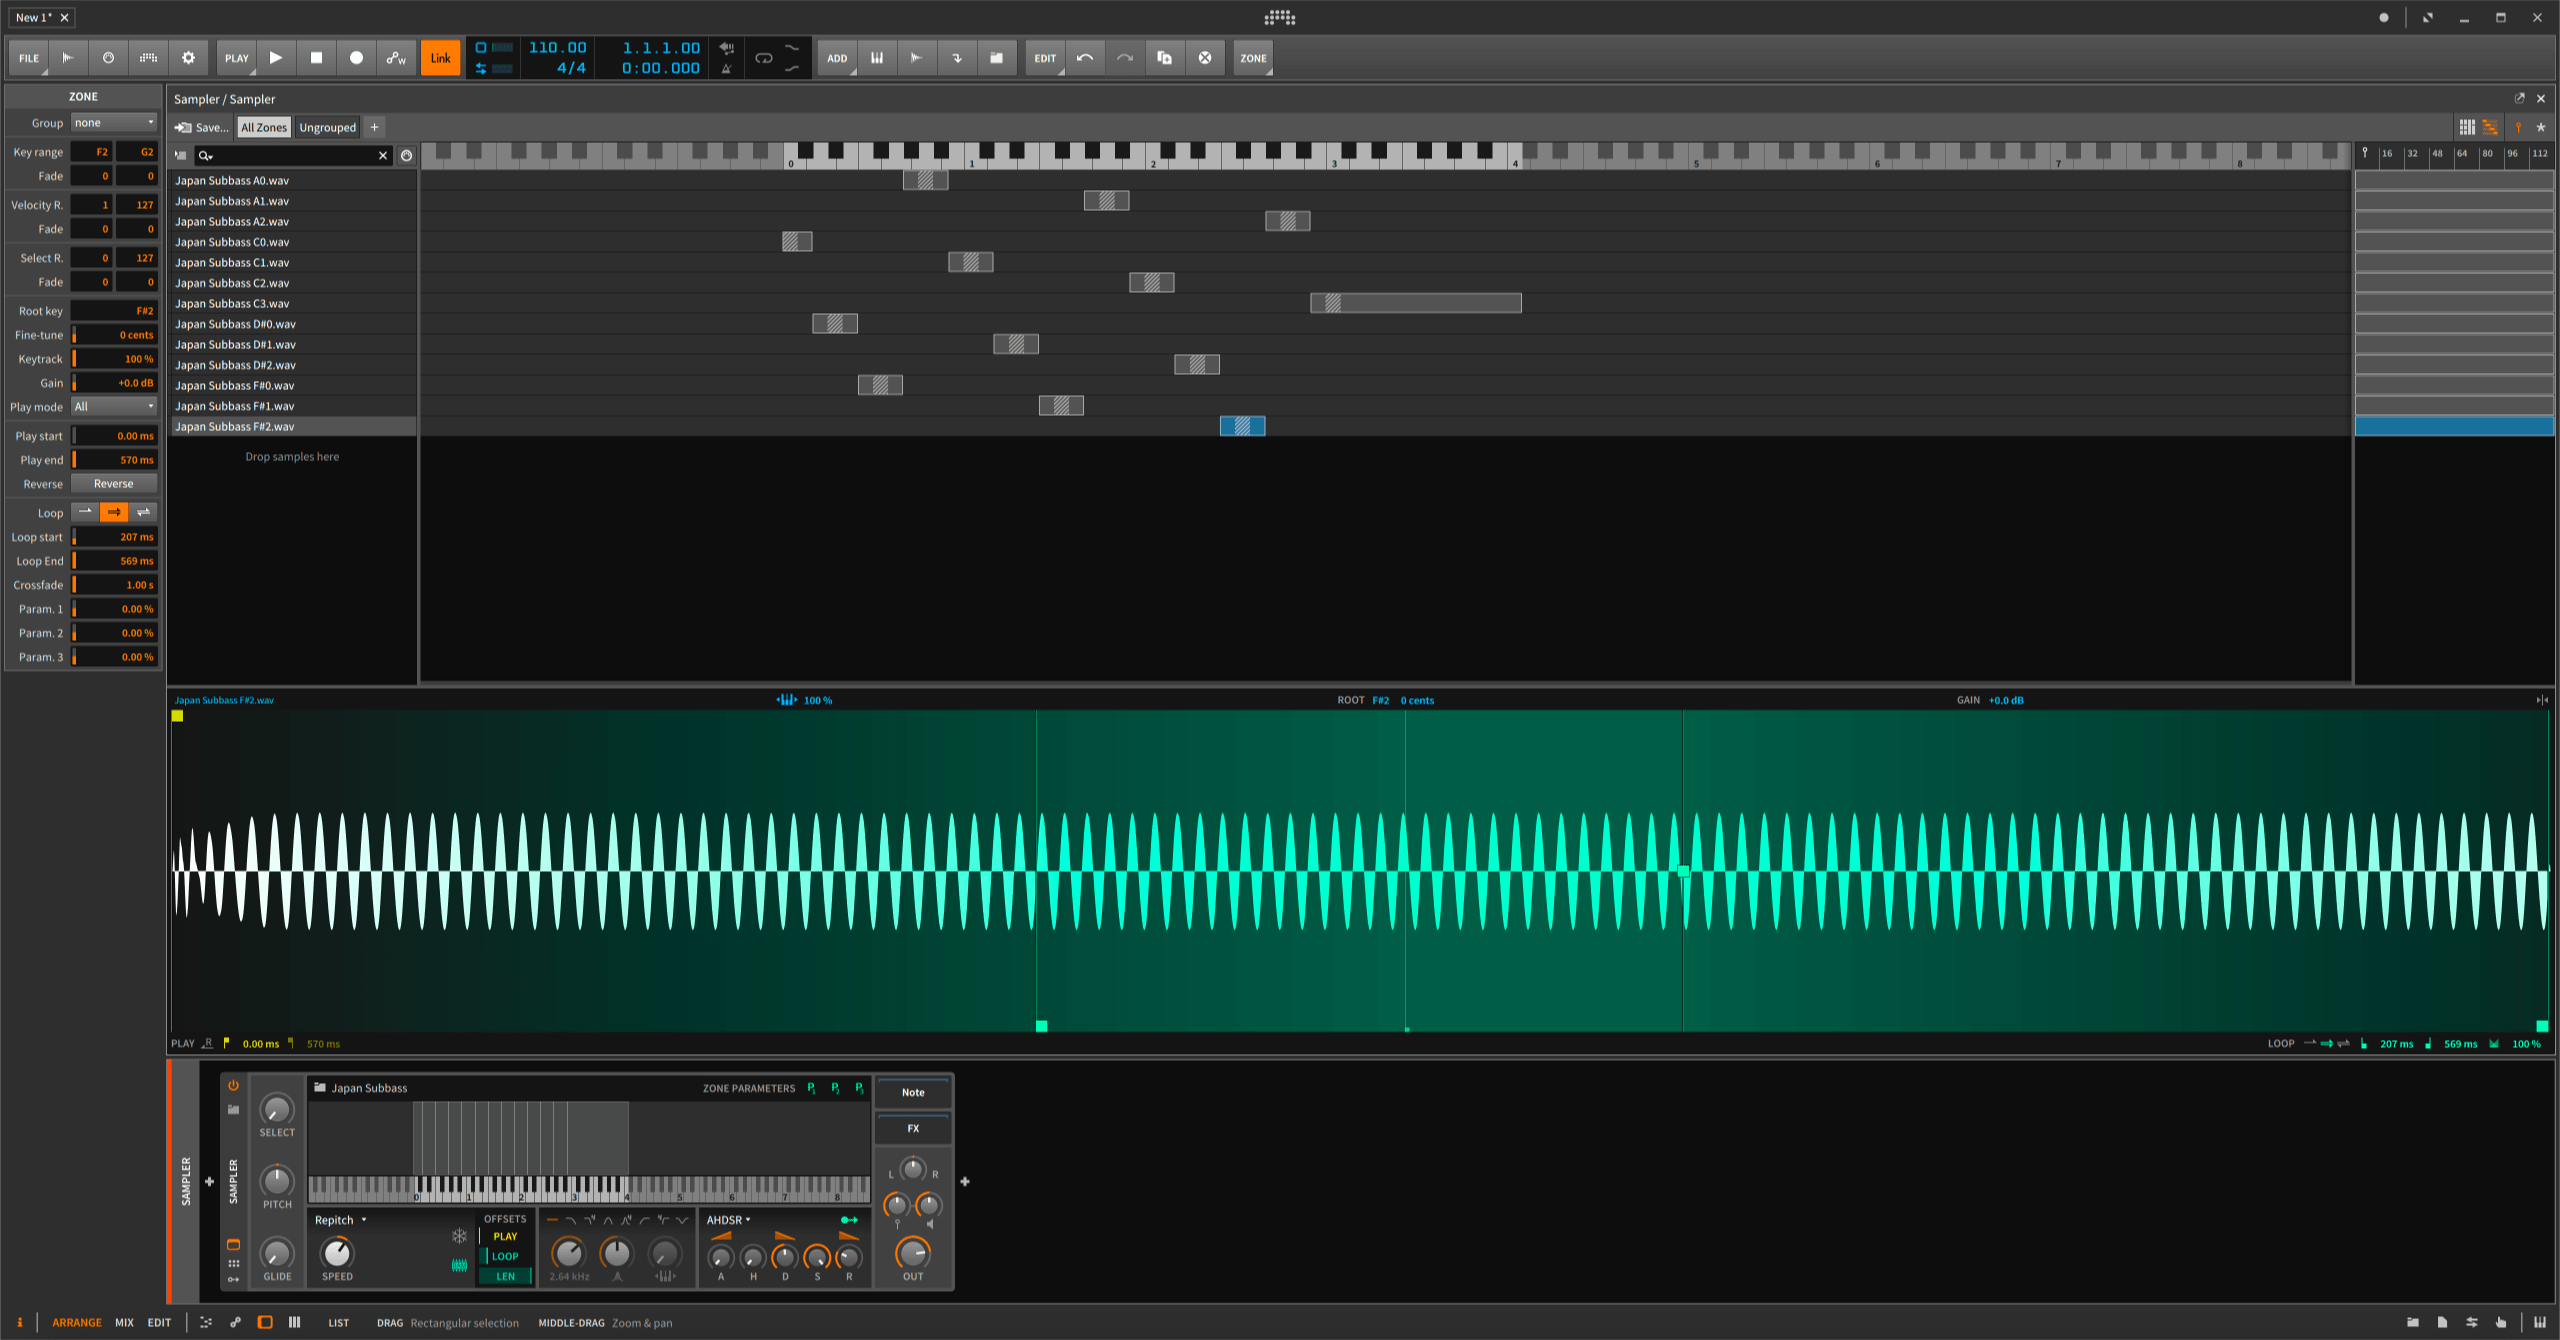
Sampler is a pretty decent sampler. Surprisingly some DAWs these days don't come with a decent sampler, but Bitwig is not one of those.
Sampler has most of the basics covered:
- Sample manipulation - looping (with independent start/length), start/length, reverse playback, pitch shift, note-pitch follow or static playback.
- Full featured optional ADHSR - variable shape ADSR with hold and 'steal time'. The ADHSR is also a built-in modulation device.
- Steal Release - Steal affects mono mode and pressing the same key twice. Rather than deleting the previous voice, steal release allows the previously played sample to fade out naturally.
- A selection of filters.
- Multi-sample mode - (see below)
- Note goodies - pitch offset, pitch glide (portamento), pan, gain, velocity-sensitivity, legato (no re-triggering of envelopes when notes overlap), pitch legato (glide notes when legato is triggered), and monophonic mode Added in 2.4
- An amazing expanded editor
- Excellent multi-zone editing
- Granular and Wavetable-like pitch shifting modes
- Ram loading or disk-streaming optionally.
- Key detection
- Playhead freeze
As a sampler, Sampler performs admirably. It does basically all the things that you'd want from a simple sampler with minimal fuss.
Please look at the improvements made in Bitwig 2.4 to the sampler. It's much improved.
Multisample mode
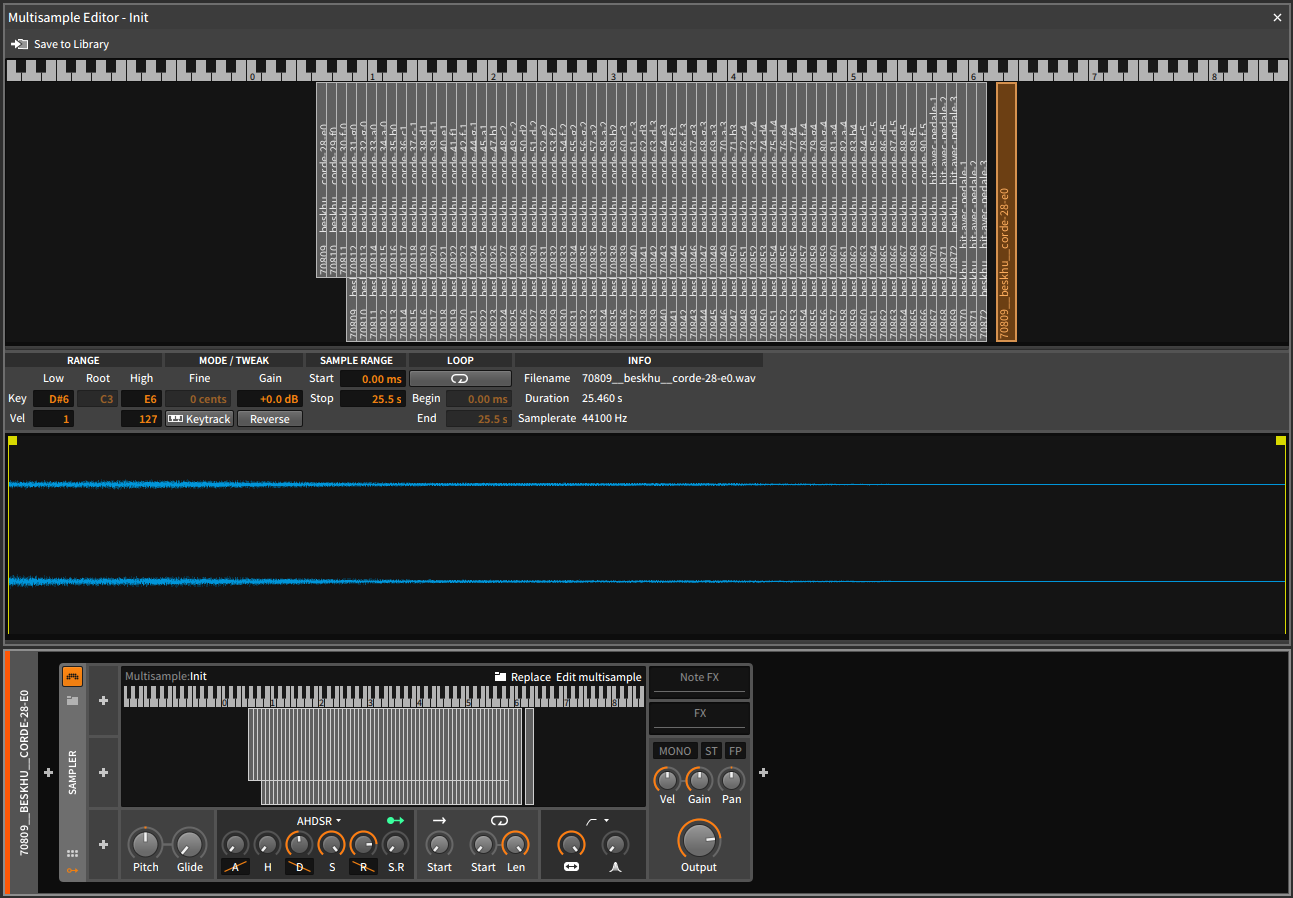
Sampler allows you to create multi-sampled patches. This means that each note, and each velocity of that note can individually play a different sample with different settings. A single sample can also just cover a handful of notes or velocities if desired.
Multi-sampling is the first step to more authentic sounding instrument emulation. Most acoustic instruments, and many electronic instruments, vary greatly across their expressive and pitch range. A single pitched sample does not capture that, but if you have a sample for each note and across the velocity range then you can begin to capture that expressiveness.
The multisample mode is integrated directly in to Bitwig as shown in the image. A large editor opens up and allows you to map your samples to different pitch and velocity zones.
Multisample mode is nice, but it lacks some 'basic' multisampling features: sample cycling (round-robin for instance), note-off trigger, per-sample adhsr, per-sample filter settings, basic scripting, per sample effects containers, simple note movement, and parameter mapping over range.
I've also experienced a lot of strange bugs with the multisample mode. Particularly having samples seemingly randomly move to new places or ranges. Dragging a new sample on to Sampler basically deletes your multisample as well, which is very frustrating!
Multisample mode isn't perfect, but it's there and it's useful.
Hardware Integration
Bitwig has a huge lead on other DAWs in hardware integration. If you have hardware and you want to use it along with your DAW, then Bitwig is worth a serious look for you.
Bitwig offers 2 methods of integrating your external hardware in to your project.
HW CV Instrument
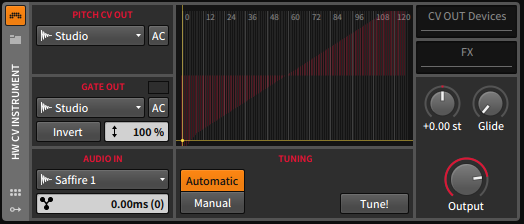
HW CV Instrument allows you to integrate your CV gear in to your Bitwig project.
HWCV sends gate/vc out of the selected inputs (optionally AC), and takes the input back via a hardware input. The gate can be inverted and scaled as necessary, and that can be quite helpful.
There is a manual latency compensation for the incoming signal from your synth, but sadly no automatic compensation like HW FX. HWCV also provides a facility to manually map note-pitch to CV value, and an automatic tuning procedure which seems to work surprisingly well!
There's an FX container to apply effects to your CV signal, which can be disasterous or catastrophic... but always cool. An FX container is also attached to apply FX directly to the incoming signal from your hardware input.
HW CV Instrument is fantastic. People pay good money for things like this when they own another DAW, and I know a number of people that use Bitwig purely because of this type of integration. If they add automatic latency compensation, it's easily 100%.
HW Instrument
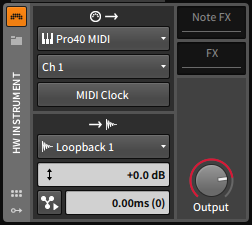
HW Instrument is the midi-capable synth version of HW CV Instrument. It sends midi out of your interface, then takes audio back in from the hardware device.
HW Instrument has selectable channel control and can send midi clock. There's a Note FX container to use on the midi signal before it leaves, and an FX container for the incoming signal.
Notably HW Instrument has manual latency compensation and automatic compensation. I'm somewhat baffled as to while there's automatic compensation here and not in HW CV Instrument.
I've got a lot of mileage out of HW Instrument.
Container - Instrument Layer
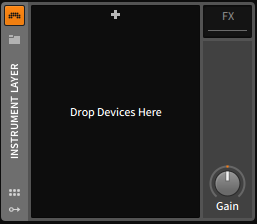
Bitwig has one non-legacy container for instruments: Instrument Layer. It's identical in function to FX Layer except it takes midi input and produces audio output from the devices enclosed.
Layering instruments is a huge part of modern electronic music product, and without a way to easily setup instrument layers, Bitwig would have been in a bad place. Luckily it's there and it's easy to use.
Container - Note FX Layer
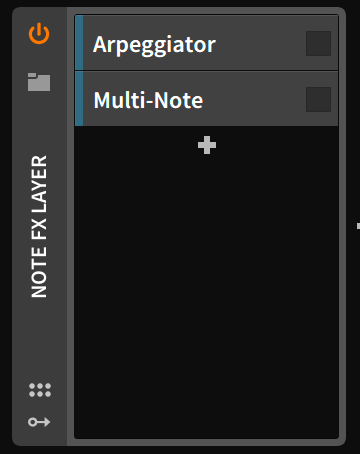
I am IN LOVE.
This lets you use Note FX in parallel. So in the image above, if I play a chord it is arpeggiated to create a melody, and the chord is doubled (octave up and down). It sounds massive
Note Effects
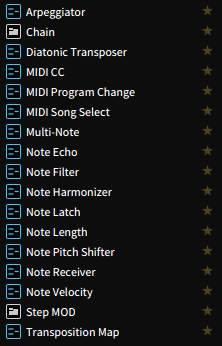
Bitwig has a selection of Note FX, which are often called 'Midi effects' in other DAWs. These can be placed in the signal chain to change the midi stream at that point, or in the Note FX container of the various integrated instrument devices.
I've rated these as a whole. The selection of Note FX is useful, but some are lacking options/complexity that's often necessary. It is cool that you can use them to affect any midi stream such as those going to an audio effect or modulator. Note FX also are modulatable!
Note FX often make a massive difference when used judiciously in a synth patch and should not be overlooked when using Bitwig.
Arpeggiator
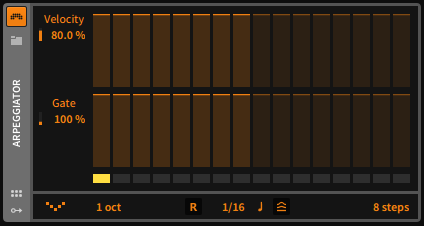
Arpeggiator takes an input chord and plays the constituent notes based on the settings.
The sequence has multiple playback modes, up to 16 steps, 1-4 octaves, can be reversed, optionally retriggered, set to transport. Each step has adjustable velocity and gate.
You can not 'draw' on the velocity or gate sequence. Not being able to mouse-drag to set values slows down workflow for certain sequences.
The Arpeggiator also lacks the capability to offset specific steps in time or sequence pitches manually. A proper 'voice sequencer' would be much more useful, but the Arpeggiator works fine as it exists.
Channel Filter
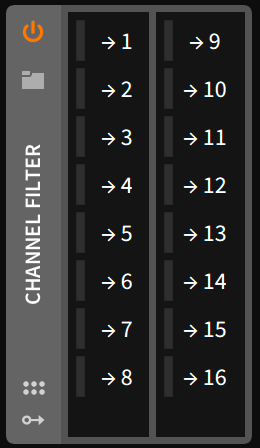
As of Bitwig 2.4, MIDI Channels are supported. Channel Filter lets you control which MIDI channels are allowed through the plugin.
Channel Map
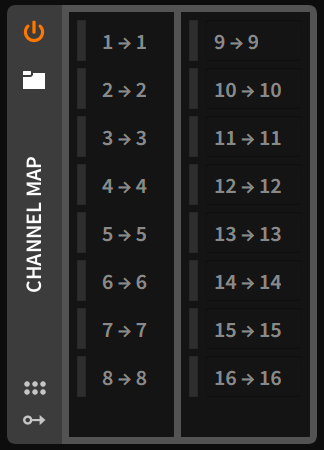
As of Bitwig 2.4, MIDI Channels are supported. Channel Map lets you route a MIDI channel to any other MIDI channel.
Diatonic Transposer
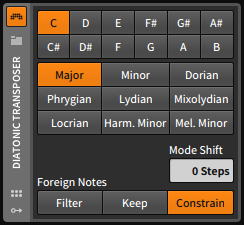
Diatonic Transposer takes the notes in your midi stream and constrains them to a set scale. Foreign notes can be muted or moved to the nearest scale note.
I find Diatonic Transposer to be near worthless for a few reasons:
-
Keep mode - Uh. Can someone explain this to me? It seems to do nothing except turn it in to a shifter. Maybe this is useful as a modulation target since Filter/Keep/Constrain are a 3-way modulation destination.
-
Unidirectional search - Constrain always corrects upward first. If there's a near note above and below the to-be-corrected pitch, then it is shifted higher in pitch.
-
No scale editing - You can't easily add your own scales or modes.
-
Everything is labeled in sharps - Really. I hate this. I always hate this. If I'm working in Db major, I don't want to bear the mental load of transposing things around in my head while I'm transposing things in the DAW. There are no diatonic sharps in Db. If you don't understand that then please take a Music 101 course. (and yes, this annoys me about a lot of electronic music products!)
-
No pitch shift consideration - Diatonic pitch shifting is made much more useful if pitch messages can be interpreted or constrained given some rule.
Midi CC
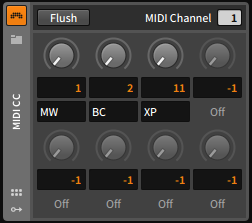
Midi CC lets you manually adjust, generate or modulate a midi CC stream.
It has flush (panic), thank goodness. Midi channel selection is available for the stream. It also lets you add your own arbitrary labels to the CC numbers, and that is useful.
Midi Program Change
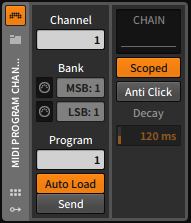
Midi program change messages let you instantly change a preset, project, scene or whatever your DAW/Device/VST has mapped to program change messages.
Midi Program Change lets you send simple program messages and lets you create your own 16-bit messages (!!)
A major feature is that you can place a device (including HW Instrument or a VST) inside the "CHAIN" chain. The PC message can be optionally only sent to devices in that chain, and there is a 'decay' parameter that fades the output of that chain in response to the PC.
A lot of devices have strange pops/clicks when changing programs, and Midi Program Change offers an acceptable solution to that problem. Exceptionally useful and somewhat unique.
Midi Song Select

Midi Song Select sends a Song Select message to the midi stream. This can happen on-load or sent by pressing, modulating or automating the 'send' button.
Multi-Note
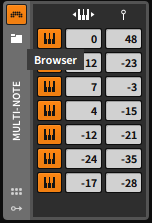
Multi-Note takes each of your input notes and adds notes relative to them. You can set the pitch and velocity offset for up to 7 additional notes.
Note Echo
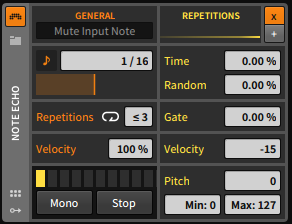
Note echo is like a delay effect, but for Midi note-on messages.
Notes are repeated by the assigned time value and optionally offset in time for the designated number of repetitions. There's a number of parameters for affecting the time offset, gate time, pitch and velocity of the repeated notes.
The echo can be set to repeat forever, but there's thankfully a 'stop' button. There's also a mono button that makes the note echo only act on the highest note input, but I wish this was configurable.
Note Echo does have an option to mute the input notes, but it does not have the ability to mix in the input stream. A mix is more useful.
Note echo is obviously a lot of fun. I love it.
Note: The X and + next to "Repetitions" changes if the echo-time is a multiplication or an offset for each next note in the echo sequence. That took me a while to figure out. X makes the time spread out much more with each echo.
Note Filter
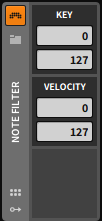
It automatically deletes up to the assigned note.
Yep.
Note Harmonizer
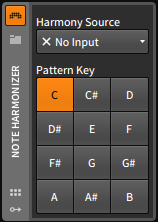
Note Harmonizer is like a real-time Diatonic Transposer. It requires a sidechained stream of notes, preferably some chords, and conforms your midi stream to what's present in that sidechain stream.
I've found basically no use for Note Harmonizer. I'm sure there is a use somewhere maybe, but not for me.
Note Latch
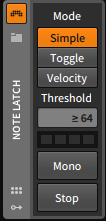
Note latch holds notes for you. It has 3 modes:
- Simple - Note-on keeps the note on until you hit stop
- Toggle - Note-on turns the note-on if it's off, and off if it's on
- Velocity - Note only turns on when the velocity exceeds the velocity threshold.
There's a monophonic mode as well.
It's pretty useful when combined with the Arpeggiator device or with the Note Harmonizer.
Note Length
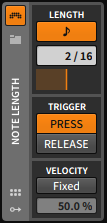
Note Length changes the length of incoming notes. It can set the length from the onset of the note, or from the release of the note. When set to release, the note begins on the note-off message and sounds for the length duration. It does not extend the length of the note.
Length values can be set to beat values or milliseconds and offset as a %.
Note Length is often useful for taking a complex stream of notes and thinning it out.
Note Pitch Shifter
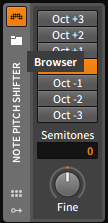
It shifts the pitch of incoming notes.
Simple, but there is the added bonus of a knob that applies pitch-wheel.
Note Receiver
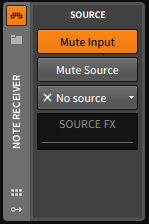
Note Receiver lets you take a midi notes from another track. It has a Note FX container to apply Note FX before it's passed on to the next device.
You can mute either the current input, or the source input. It would be useful if they were mixable (via velocity).
Note Velocity
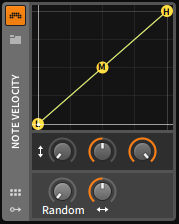
Note Velocity allows you to scale the incoming velocity of notes. You have 3 points which allow you to draw a curve to re-map the velocity of the incoming stream. The velocity can be randomized on top of that as well.
Note Velocity can be particularly useful to humanize parts, add intensity or soften, or create interest through modulation of the parameters.
Transposition Map

Transposition Map lets you map pitches relative to the selected Root. It's a bit annoying that you can not mouse-drag and draw a pitch-map.
Transposition Map is arguably more useful than Diatonic Transposer most of the time since you are given more control over what pitches move to what locations.
Conclusion
Overall rating:
Bitwig's selection of instruments is limited. Once again the main competitors of Bitwig mostly offer a more comprehensive set of instruments.
What Bitwig does offer though, is an incredible about of versatility with what is provided. It would take many, many months (year, lifetimes) to exhaust what Bitwig offers. Bitwig also offers something that other DAWs miss out on: it's fun to use Bitwig's instruments. The modulation system, built-in FX containers and Note FX.
The downside is that music-making isn't always about fun. It's especially not fun when you need to spend a bunch of time setting up modulators, effects, layers etc... when you know you could easily achieve a given sound with another product. This setup process is very common due to the general design of Bitwig's instruments. It would be appreciated if there were some more monolithic options.
On the other hand one could also argue that the modularity of Bitwig's approach is to be lauded. There's an intrinsic inflexibility when you are presented with a monolithic device, and modularity allows you a lot more possibilities. To that effect I feel that Bitwig needs work as well. Bitwig lacks the simple building blocks that would make a modular approach more enjoyable. It would be much cooler if polysynth's osc's were their own device, and the drawbar module was available on its own, if there was a multi-input FM device, etc... That would also require better facilities for visualizing the complex connections and routing necessary, and clearly Bitwig lacks that.
So while Bitwig does offer some great instruments, and the accompanied flexibility, it still falls short in offering immediate satisfaction or complete modular flexibility.
Still... It's damn fun. I was going to give an overall rating of ~55, but the article was delayed by a day because I was having so much fun screwing around with massive polysynth patches.
(Btw, the manual is still awful. Ugh.)
Support Me!
This post took 34 hours to research, photograph, write and edit. If you appreciate the information presented then please consider joining patreon or donating!
Other parts in this series
If you appreciate the information presented then please consider joining Patreon or donating money/time.
