It's finally time for the Tracktion Waveform 9 review!
I'm going with a different format this time. Each post will cover at least one of the following categories: good, bad and weird. Each category may have more than one entry. If all goes well then the 'good' section will have multiple entries each time, and maybe there'll be a post with no Bad section?
I love Korean cinema (and kdramas). One of my favorite films is 좋은 놈, 나쁜 놈, 이상한 놈, aka "The Good, the Bad, the Weird". I highly suggest watching it. Even if you don't like subtitles, I think it may be capable of swaying you. That's where the idea for this review format came from.
So let's get on with it!
- The Good
- The Browser
- Mixing
- Racks
- The Bad
- Non-Native
- The Mixer
- Mixing?
- The Weird
- VCAs
Other posts in this series:
VERSION - This review is (hopefully) accurate as of Waveform 9.1.1 Further versions may obsolete these views.
Contents
The Good
The Browser
Waveform's browser section is pretty alright. It has the features you'd expect of a loop browser like syncing to project tempo, looping preview, alternate output, project sync (retrigger on play) and auto-play.
Beyond just loop browsing there's more features though:
- Search - Any file can be tagged and searched. Files, plugins, presets. All taggable and searchable.
- Files - Every file in your project is easily accessible.
- Tracks - Tracks can be tagged in their property pages, then selected via tags. Unfortunately tags can not be set in this window.
- Tracks can be hidden and disabled easily.
- Tracks can not be selected via this window unfortunately.
- Markers - Markers are listed to be easily jumped to.
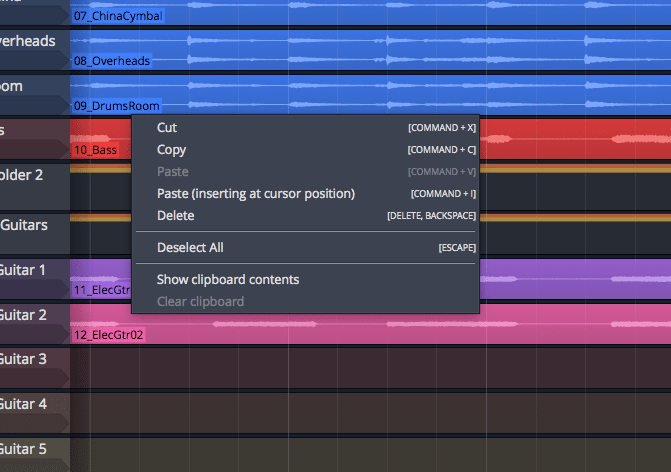
- Clipboard - All of your recent cuts and copies are shown so that you can quickly access previous clipboard uses.
Multiple browsers can be opened at the same time and operated independently
Mixing
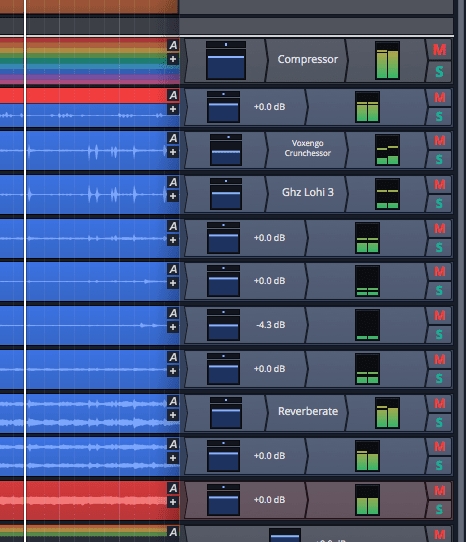
I like mixing in Waveform as a matter of how the GUI operates. On the right hand you have a list of all of your plugins.
Everything is always present. If your track starts to have a lot of plugins, then you can resize the panel to allow more room as necessary.
Having everything visible at all times makes it very simple to make adjustments while visually referencing what's happening in the project. You don't need to click a track to bring up an inspector. You don't need to open a side panel. You don't need to do anything except look, because everything is right there.
The upside of this as well is that you can place faders and meters at any point in the signal path. If you want pre-fader metering then just put the meter before the fader. If you want meters between every plugin then do that! If you read my gainstaging article then you might very well be excited by this possibility.
I'm very fond of the process of mixing in Tracktion when it comes to simple adjustments and organization of processors.
Racks
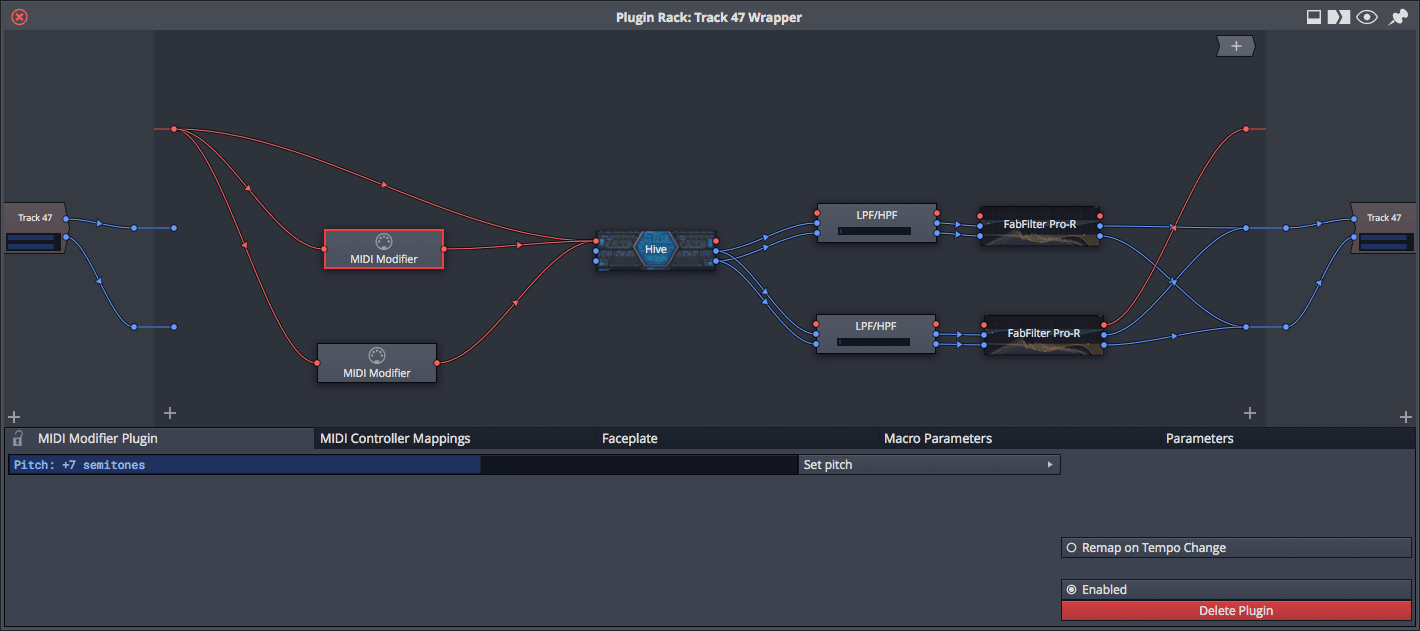
There's few Waveform features that are as iconic as Racks.
A 'Rack' is a container for plugins that allows modular routing. In the image above I have 2 midi shifters that add an octave and a perfect fifth going in to Hive (this gives me root, fifth, octave). After Hive there's a multiband split at 600hz. Then there's a Fabfilter Pro-R on the high end, and one on the low-end. That rack is very simple.
Racks offer a lot more than just simple routing. Any track can feed an input. Racks are 'track agnostic', so a rack can be fed from multiple tracks or have multiple track inputs, and these inputs can feed plugin I/O or sidechains. A single rack instance can be put on multiple channels for easy access too. It gets really crazy if you want it to. You can think of Racks as global FX containers Their place on a track only determines the track input point i.e. where in the signal path that the rack takes input from.
Racks have multiple outputs as well. A single rack can feed multiple tracks. This allows you to have a single setup that splits out to various tracks, for instance my multiband reverb patch above could have fed to a 'Reverb High' and 'Reverb Low' track if I wanted. This works with multi-output instruments too.
The multiple I/O paths allow for some very creative sidechaining opportunities. You can have sidechains that are filtered, then routed out to another track for post-processing, or sidechains that easily feed multiple inputs.
There is a 'stack editor' mode. I find this to be mostly useless. It makes it easy to create serial connections where plugin->plugin 2->plugin 3 are inserted in to the rack and automatically connected. I suppose this is useful if you want to use a rack as a 'plugin container' of sorts, but with no parallel paths. If you want to use any of the cool features then you must be in the 'Rack Editor' mode. (Edit: Check out this post here for some more information. I'll cover this later when I get to another feature...)
Racks also have the Macro facility built in so you can create control macro for complex parameters, but this hasn't been covered yet. We'll get to this in another post.
A neat feature is that VST racks can have a control selected as the 'quick control' that shows on the plugin's block. This allows you to access a single parameter quickly without bringing up the GUI.
Racks can be saved as presets, which is obviously helpful when you create some massive monster.
I found no way to automatically connect I/O between plugins. I found that bothersome especially on stereo plugins. I/O on multiple tracks is always set to fully parallel, so you are forced to nearly always undo this manually and re-route it. More automatic routing shortcuts/options would be great. The clicking and dragging becomes tiresome quickly.
Racks can be put on audio clips, but they don't add any I/O. I can't figure out how to utilize clip based racks since there's no 'clip Input' or 'clip Output' to use. Racks can not be put on midi clips.
Racks do not have 'control signals'. You can not route automation data or modulation Data. You can add Modifiers to racks, but not inside of racks, which is unfortunate and confusing when you have a single rack across your project. Modifiers live on tracks, so if you delete the track with the modifier then all of your racks are affected. I will discuss modfiers in a later post, but they are a way to modulate parameters outside of automation. The implication of having no control signals is that affecting changes beyond what's written is impossible. Slight adjustments must be made at the source, and there's no 'modulation of modulation'.
Racks bonus
Later I'll discuss why I dislike Waveform's VCAs, but there is a workaround involving racks.
You can have multiple tracks input to a Rack, setup various level meters, then link the meters together with Macro Parameters. This means that multiple tracks can have plugins that are linked together without too much fuss. Any parameters can be linked this way: volume, pan, midi and any plugin parameters.
Essentially you can have a global object that contains specified I/O points for certain tracks. You can then link parameters of child objects.
It's really fun.
The Bad
Non-Native
If you do not rely on native capabilities of your OS or Window Manager to interact with programs, such as text editing shortcuts, window management shortcuts, native shortcut assignment or application scripting... then this section is totally irrelevant to you. You can just skip ahead and realize that Waveform exists entirely in its own window and doesn't care what your OS is. For many people that's actually a great feature. This is a negative to me.
Everything in Waveform is in its own window, using its own graphics. There aren't any menus via your OS, there isn't a menu bar, there isn't any native OS integration... It's all the way Waveform wants it.
That presents a number of problems.
- OS shortcuts don't always work - This means that you can't use any tricks for navigating menus, editing text, finding things, scripting, etc... You are at the mercy of what Waveform offers.
- No native menus - Waveform of course has menus, but they are menus created by the application and not exposed to the OS or WM. I particularly enjoy in macOS that I can press
command-option-/and pull up a search. This search lets me search through all menu items and find what I need. It's exceptionally useful for learning software. Windows and most Linux-based WMs have similar features. - No scripting - Waveform does some scripting in the form of programmable actions, which I'll discuss later, but any native OS scripting like hammerspoon, autohotkey, autoit, AppleScript are handicapped when used with Waveform. Waveform doesn't expose the normal internal bits that make scripting enjoyable.
I realize that these things don't matter for many people. If you 'live' inside Waveform then it's certainly not going to be an issue. I am an emacs user after all, so I can understand the idea of living in a weird non-native ecosystem.
The problem is when you begin to realize that you need to basically relearn how to use a computer to interact with Waveform. Many of the things that you expect to work may not work if you know how to use your OS or Window manager well.
However if you aren't an 'expert' in your native environment then this may actually be a bonus for you. Such is the duality of life.
The Mixer
You may have already read that I like mixing in Waveform so it may be a surprise that I think the mixer is pretty awful.
Waveform 9 introduced a mixer, which is strange if you know the history of Tracktion. I recall very clearly that the original author of Tracktion said that tracktion would never have a traditional mixer. Here we are in 2018, and it does.
The mixer is not particularly useful though. There's many issues with it that I've found make it a less exciting prospect than using the right hand panel:
- Only the last meter and level filter are used - This means that any awesome pre-fader metering you had is now irrelevant if you have post-fader metering as well. If you have multiple volume&pan plugins then only the last one is controlled by the fader.
- Folders expand to the left sometimes - When you unfold a folder then everything moves to the left occasionally. Your folder track often goes off screen and you have to then scroll to find it and fold it back. Very annoying, especially when this is not consistent.
- Selecting a track does not show the Volume&Pan or Meter properties - The volume&pan and Meter plugins have their own property panel which is great to use. There's features for polarity inversion, resetting controls, ignore VCA, pan law and meter mode. The property pages is also where you can input numeric values for controls. You can't access these from the mixer! Selecting a track in the mixer shows you the track properties. The track properties are basically useless when mixing.
- The mixer can't be closed when it's full - The hotkey to bring up the mixer is
m. Pressingmbrings up the mixer. There's a button that allows you to create a full-screen mixer tab, but there is no hot-key to jump back to the project. There's also no hotkey to trigger the full-screen mixer tab. This makes using the full-screen mixer an exercise in constant mouse usage. - No smart shortening of names - If you use the thin mixer mode then your 'Rack Tom' track looks like 'Ra...'. Other programs allow you to specify a short name, or intelligently shorten that to 'RTom'. This is very important when working with 100s of tracks, and since you can't easily switch between the full mixer and project, this omission is even more problematic.
- Show outputs isn't interactive - It's possible to have the mixer show inputs, but you can't actually change the output from that button. You must click the track then change the output in the property page. It's an unnecessary click.
- Fader section is resizable - I harp on this constantly! I usually require that the fader section be resizable, but Waveform does it poorly. There's 2 modes for the fader position: under the pan/mute/solo and to the right of the pan/mute/solo. You can not select which mode is being used! When you resize the fader panel it automatically switches depending on the size. The problem is that the switch occurs at a weird point. As you increase the size of the faders it will suddenly switch layouts and you end up losing fader height! The layout should be manually selectable or smart enough to switch so that you don't lose fader height when trying to enlarge the panel.
- There's no mixer submix/aux re-ordering - It's often nice when mixing to have your groups and aux sends organized together in one part of the mixer. This is not possible in Waveform.
- Arrangement follows mixer, ALWAYS - Selecting a track in the mixer also selects it in the arrangement view. I can find no way to turn this off. Selecting a track that is off-screen does not scroll to the track either.
- Track selection doesn't affect mixer controls - Selecting multiple tracks does not allow you to control multiple tracks. You can't easily mute multiple tracks at once, solo multiple tracks at once, adjust pan or volume either. Ouch, that's really bad.
Mixing - the bad
Mixing in Waveform has some omissions that can make it infuriating to work with.
- No way to control multiple volume at once outside VCAs, which don't work super great.
- No way to control multiple pans, mutes or solos either.
- Plugins in the right panel look disordered. Your meters and volume&pan end up all over the place due to the dynamic resizing. It becomes ugly and disorienting.
- The mixer sucks
- Creating Aux sends is a multi-stage process - To create an aux send, you have to: create the send, create a track, create the return, select the send bus, select the return bus. Not pleasant.
Aux sends can't follow mutes - Various DAWs have different words for this, but often when you solo a track you want to also hear all aux sends that it's feeding. As far as I can find, Waveform does not have this capability. Thusfar this is maybe the most annoying thing in Waveform to me about the mixing process.- EDIT: This is incorrect. You need to enable
Solo Isolateon the track with the return. I missed this originally.
- EDIT: This is incorrect. You need to enable
- Metering - There's only peak metering, RMS with an unknown window and mid/side (called sum and difference). There's no options for falloff, hold, rms window or anything that may allow you to allow the meters to benefit your process.
- The pan control is tiny - When working with 'normal' sized tracks if your project is more than 16 tracks, the widget to use for pan is tiny. It's between 1mm and 2.5mm on my screen. Frustrating to operate. That's the largest it gets for me: 2.5mm. I'm pretty sure my big toenail is thicker than that.
- VCAs are weird.
The Weird
VCAs
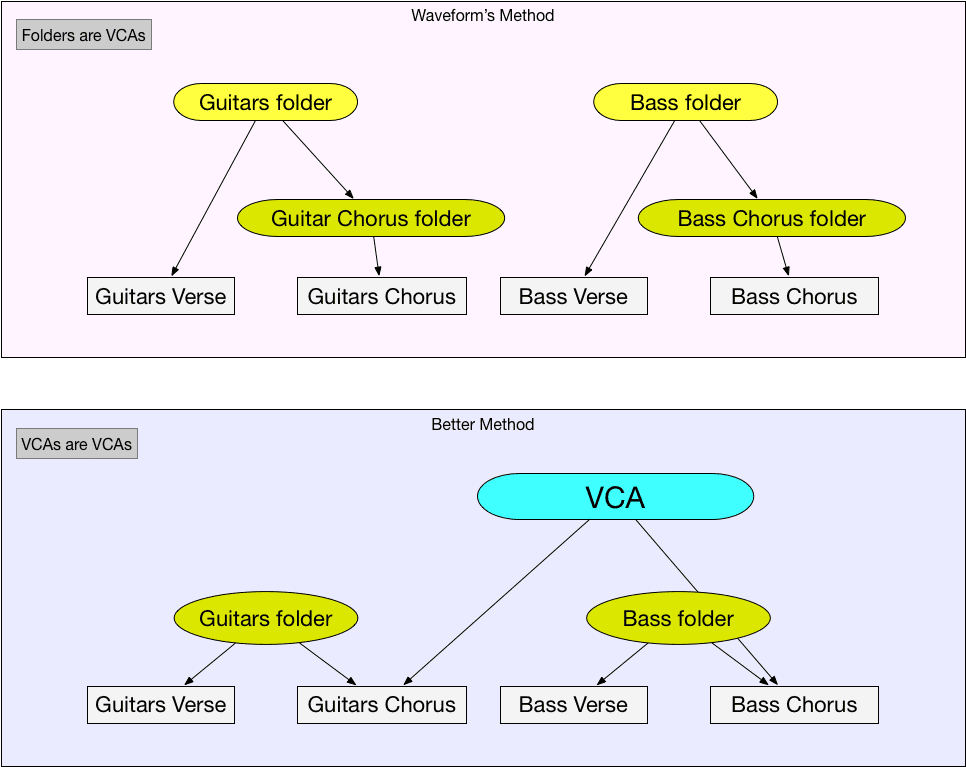
VCAs are one of my favorite things to use for mixing. I've explained VCAs once or twice before. So go read those first if you don't 'get it'.
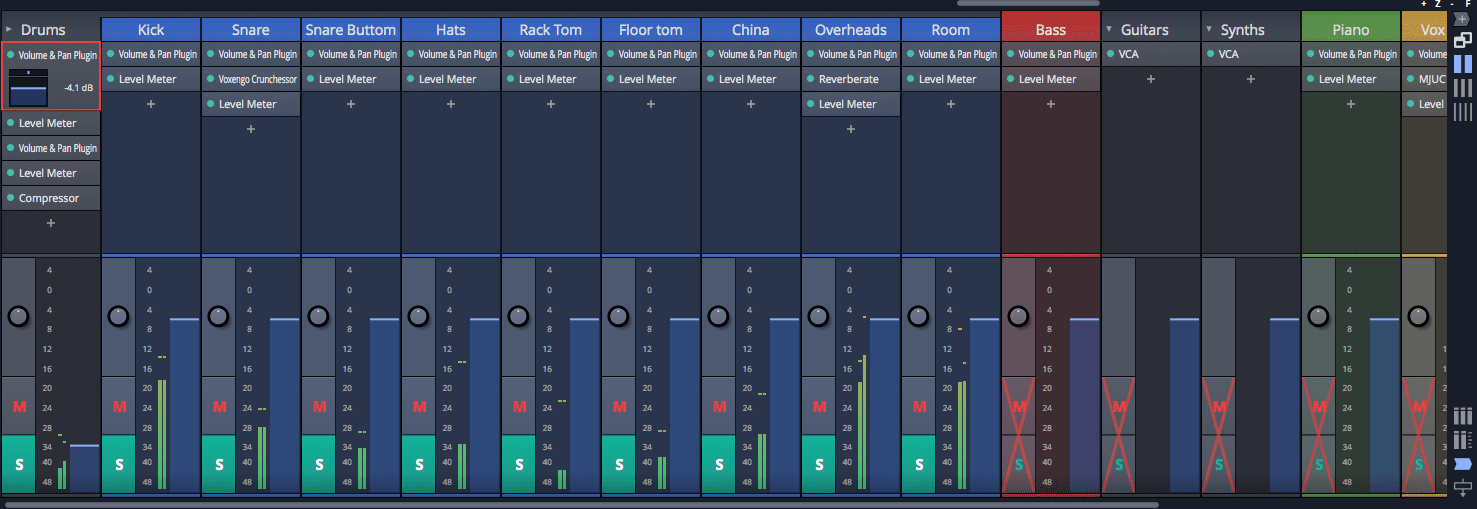
One issue with Waveform is that VCAs are implemented as track folders. That means that you can only control direct children of folders. If you want to control multiple tracks that aren't part of the same hierarchy then you are out of luck. In the image above I want to have a VCA that controls the parts of the track in the chorus, but in Waveform that requires that you have sub-folders for every folder and you must manually adjust each VCA alone.
A better approach is that VCAs are assignable directly to tracks. This would allow a VCA to control anything at any place in the signal path.
The next issue with VCAs is: What do they control?! If you have multiple volume&pan plugins on your track then it controls all of them! That's not always what you want, especially since one of the benefits is that VCAs affect volume before post-fader sends. What if you want to have some gainstaging control after your post-fader plugin? Too bad. This becomes even more of an issue in the mixer where the fader only affects the last volume&pan on a track but if you adjust a VCA fader on a folder track then it affects all of the volume&pan instances. This is very confusing.
The better behaviour would be that there's a VCA filter or track that can be assigned to specific volume&pan instances.
As it stands I'm not sure that I can figure out a workflow that benefits from Waveform's current VCA implementation. This is especially apparent when you use the mixer and the behaviour between normal tracks and folder tracks differs.
These issues can be worked around by using plugin racks, but that's a lot of work sometimes.
Support Me!
This post took 7 hours to research, photograph, write and edit. If you appreciate the information presented then please consider joining patreon or donating!
Other parts in this series
- Version 9, Part 0: Intro
- Version 9.1.1, Part 2: Modulation, Plugin browsing, Annoyances, GUI
- Version 9.1.1, Part 3: Macros, UI design, Ghost tracks, Buying
- Version 9.1.1, Part 4: Pattern Generator, Edit Clips, Folder editing, Chord Track
- Version 9.1.1, Part 5: Step Clips, Loops, Clip Linking, Loop Recording, Track Presets
- Version 9.1.1, Part 6: MIDI Editing
- Version 9.1.1, Part 7: Recording
- Version 9.1.1, Part 8: Clip Layer FX, Multisampler, Scripting, Project Management and more
- Version 9.1.1, Part 9: Instruments and Effect Review
- Version 9.1.1, Part 10: Conclusion
- Version 10.1.0
If you appreciate the information presented then please consider joining Patreon or donating money/time.
