Ok. We're going to start hard here. Audio Recording in FLStudio.
It doesn't exactly have the best reputation for this, but is it deserved? Are there redeeming aspects? Is it really awesome?
Enough talk. Click through for more talk!
Other posts in this series:
Contents
How is Audio handled in FLStudio
As discussed before all "plain audio" in FLStudio is stored in a sampler.
Other DAWs do this implicitly. Audio in most other DAWs is stored in regions, which are ad-hoc samplers that are triggered on the beginning of the region and turned off at the end of the region.
FLStudio makes this an explicit mechanism. There's some major benefits to this, and of course there's some detriments... but first: benefits
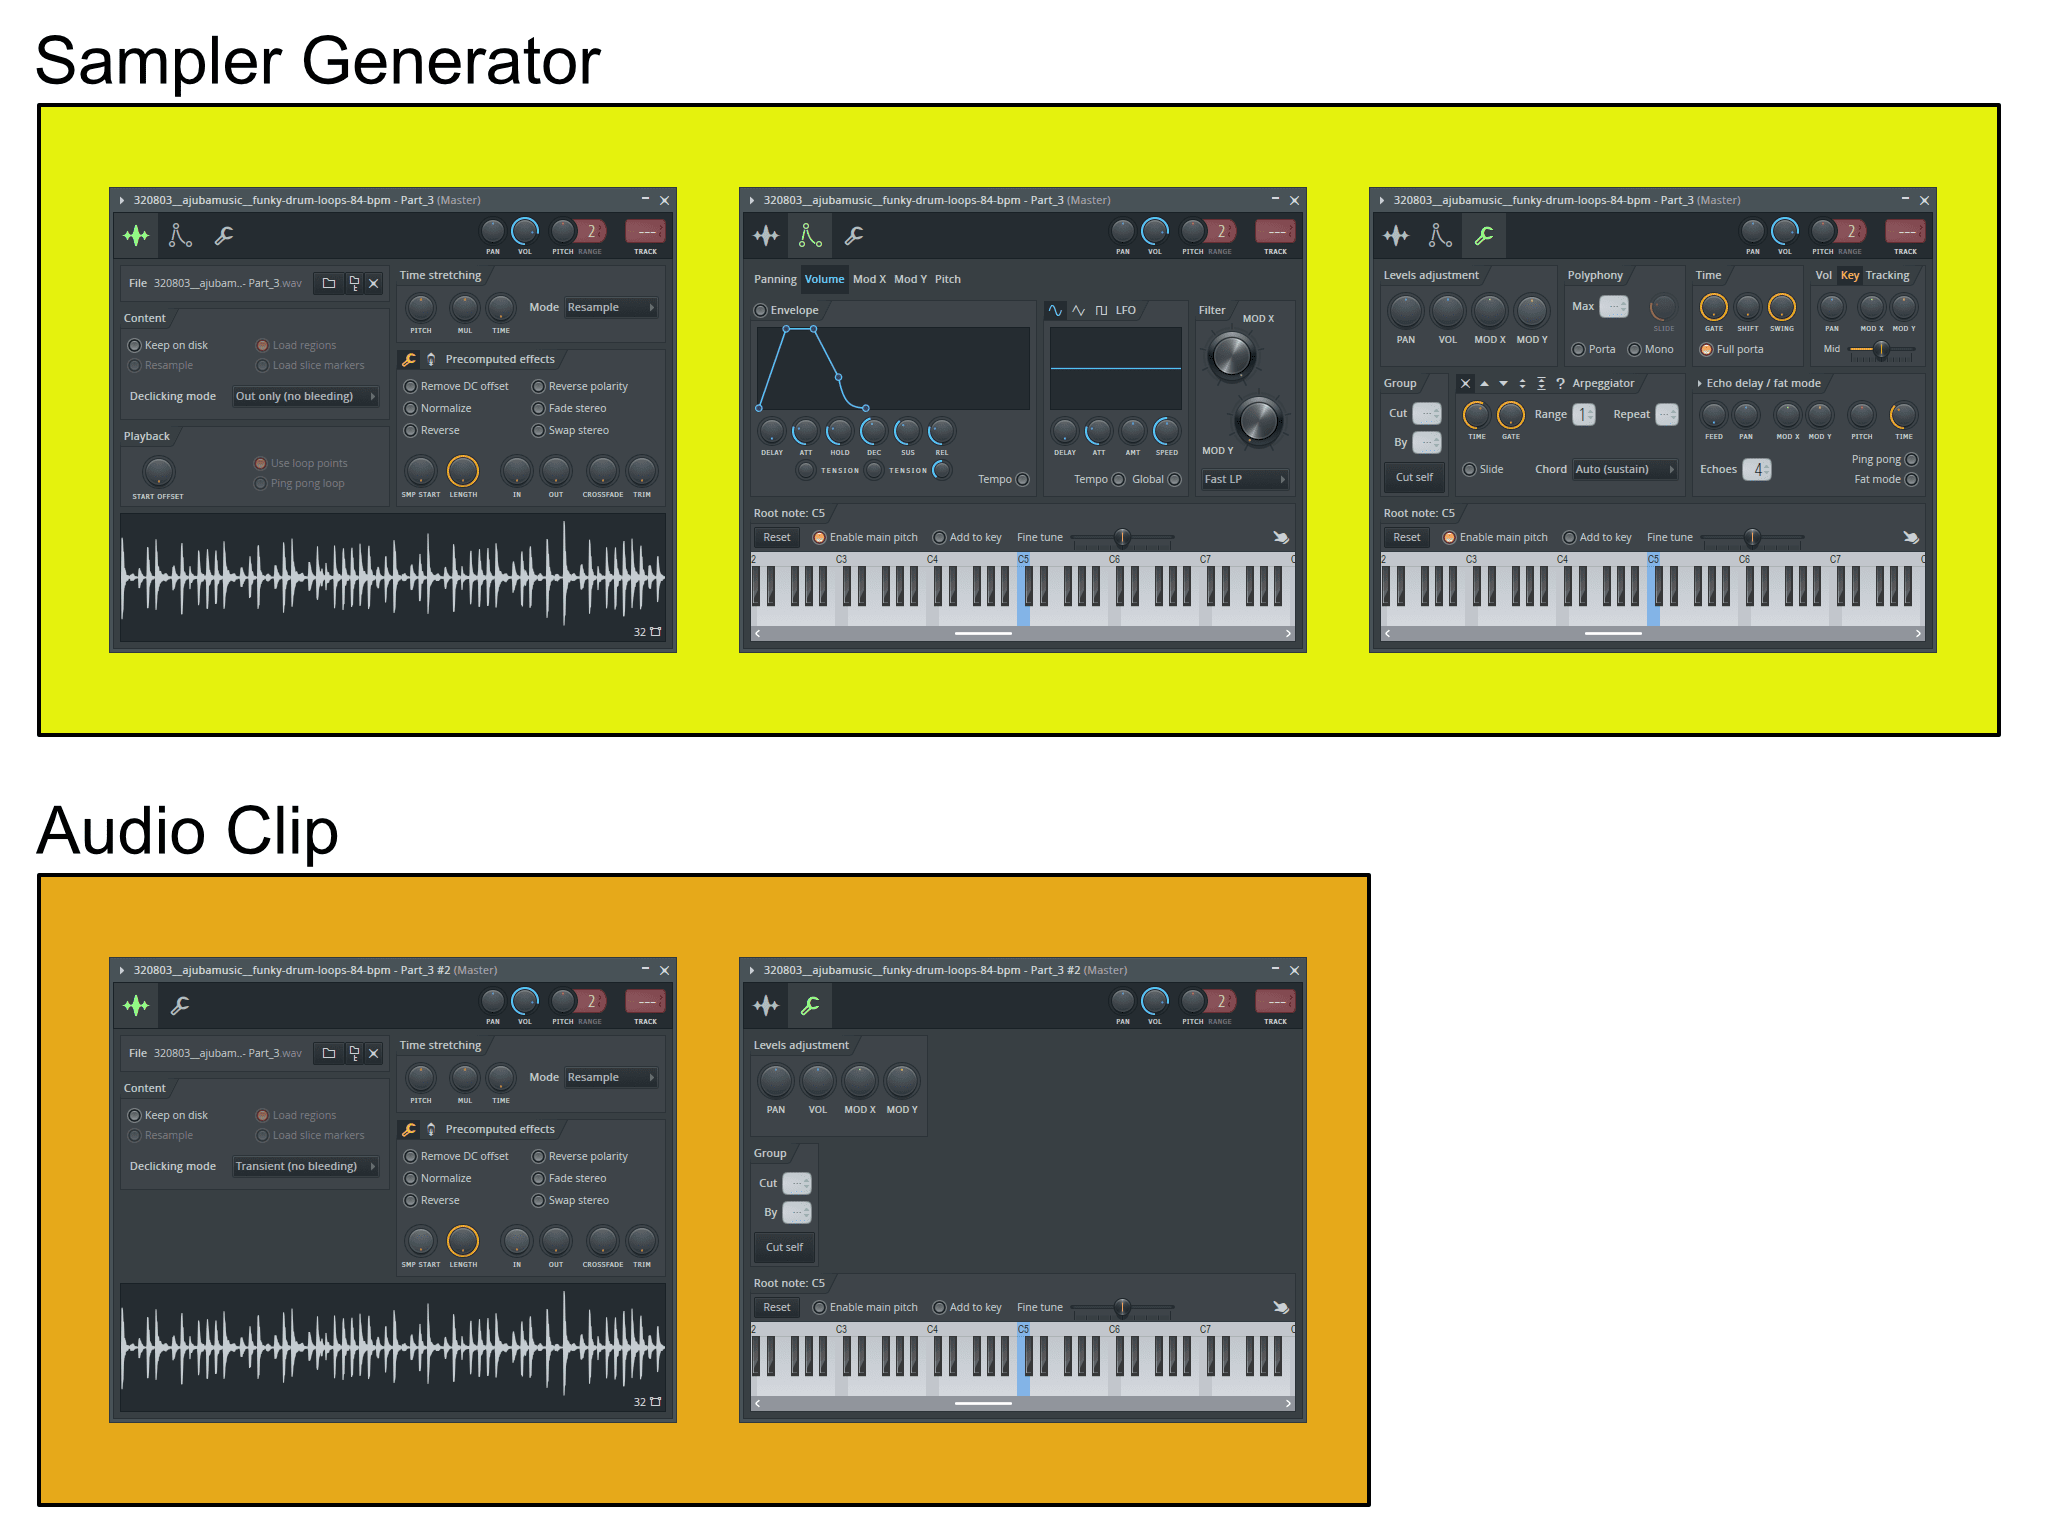
Sampler Channel
When working with Audio files in FL, everything is in a Sampler Channel or Audio Clip. This means that you have a number of realtime modifications available to you.
There's 2 variations of Sampler Channels: Sampler Channel (the generator) and Audio Clips
I'm not going to go through all of the features, but there are some notable ones for audio clips.
-
Audio Clip - An Audio Clip is a special Sampler Channel that isn't locked to a pattern. It has some limited options compared to normal Sampler Channels, but the interesting features:
- Easy normalize, DC offset and Reverse.
- Knob-based pitch and time adjustment with a variety of algorithms.
- Fade stereo - the clip pans from left to right over the course of the clip
- Crossfade - This is really nifty. Crossfade removes some of the start of the audio and adds it to the end fading in to the end. This allows you to create seamlessly overlapping loops.
- EQ/Filter - There's a low-end EQ and a low-pass filter with resonance readily available.
- Ring Modulator - There's an interesting ring modulator with variable sine-based modulator on every channel. Surprisingly fun and useful at times.
- 2 styles of reverbs and a delay - Not exactly the best reverbs, but there's 2 styles of reverbs available. The delay is a simple one knob mix affair that delays the left/right channels from each other slightly to produce the precedence effect I never found much use for these.
- POGO - Pitch drop or pitch rise. Great for those tape speed up or tape slow sounds.
-
Sampler Channel - The normal Sampler Channel is like a VSTi sampler. It's triggered by MIDI. It has all of the features of Audio Clips.
- I'm not going through all of the features here. Most of them are self-explanatory and common in samplers. Click the image above for a large image.
So you get some nice 'free' bonuses from having things in a sampler channel by default. There's really no downside specifically here and just bonuses.
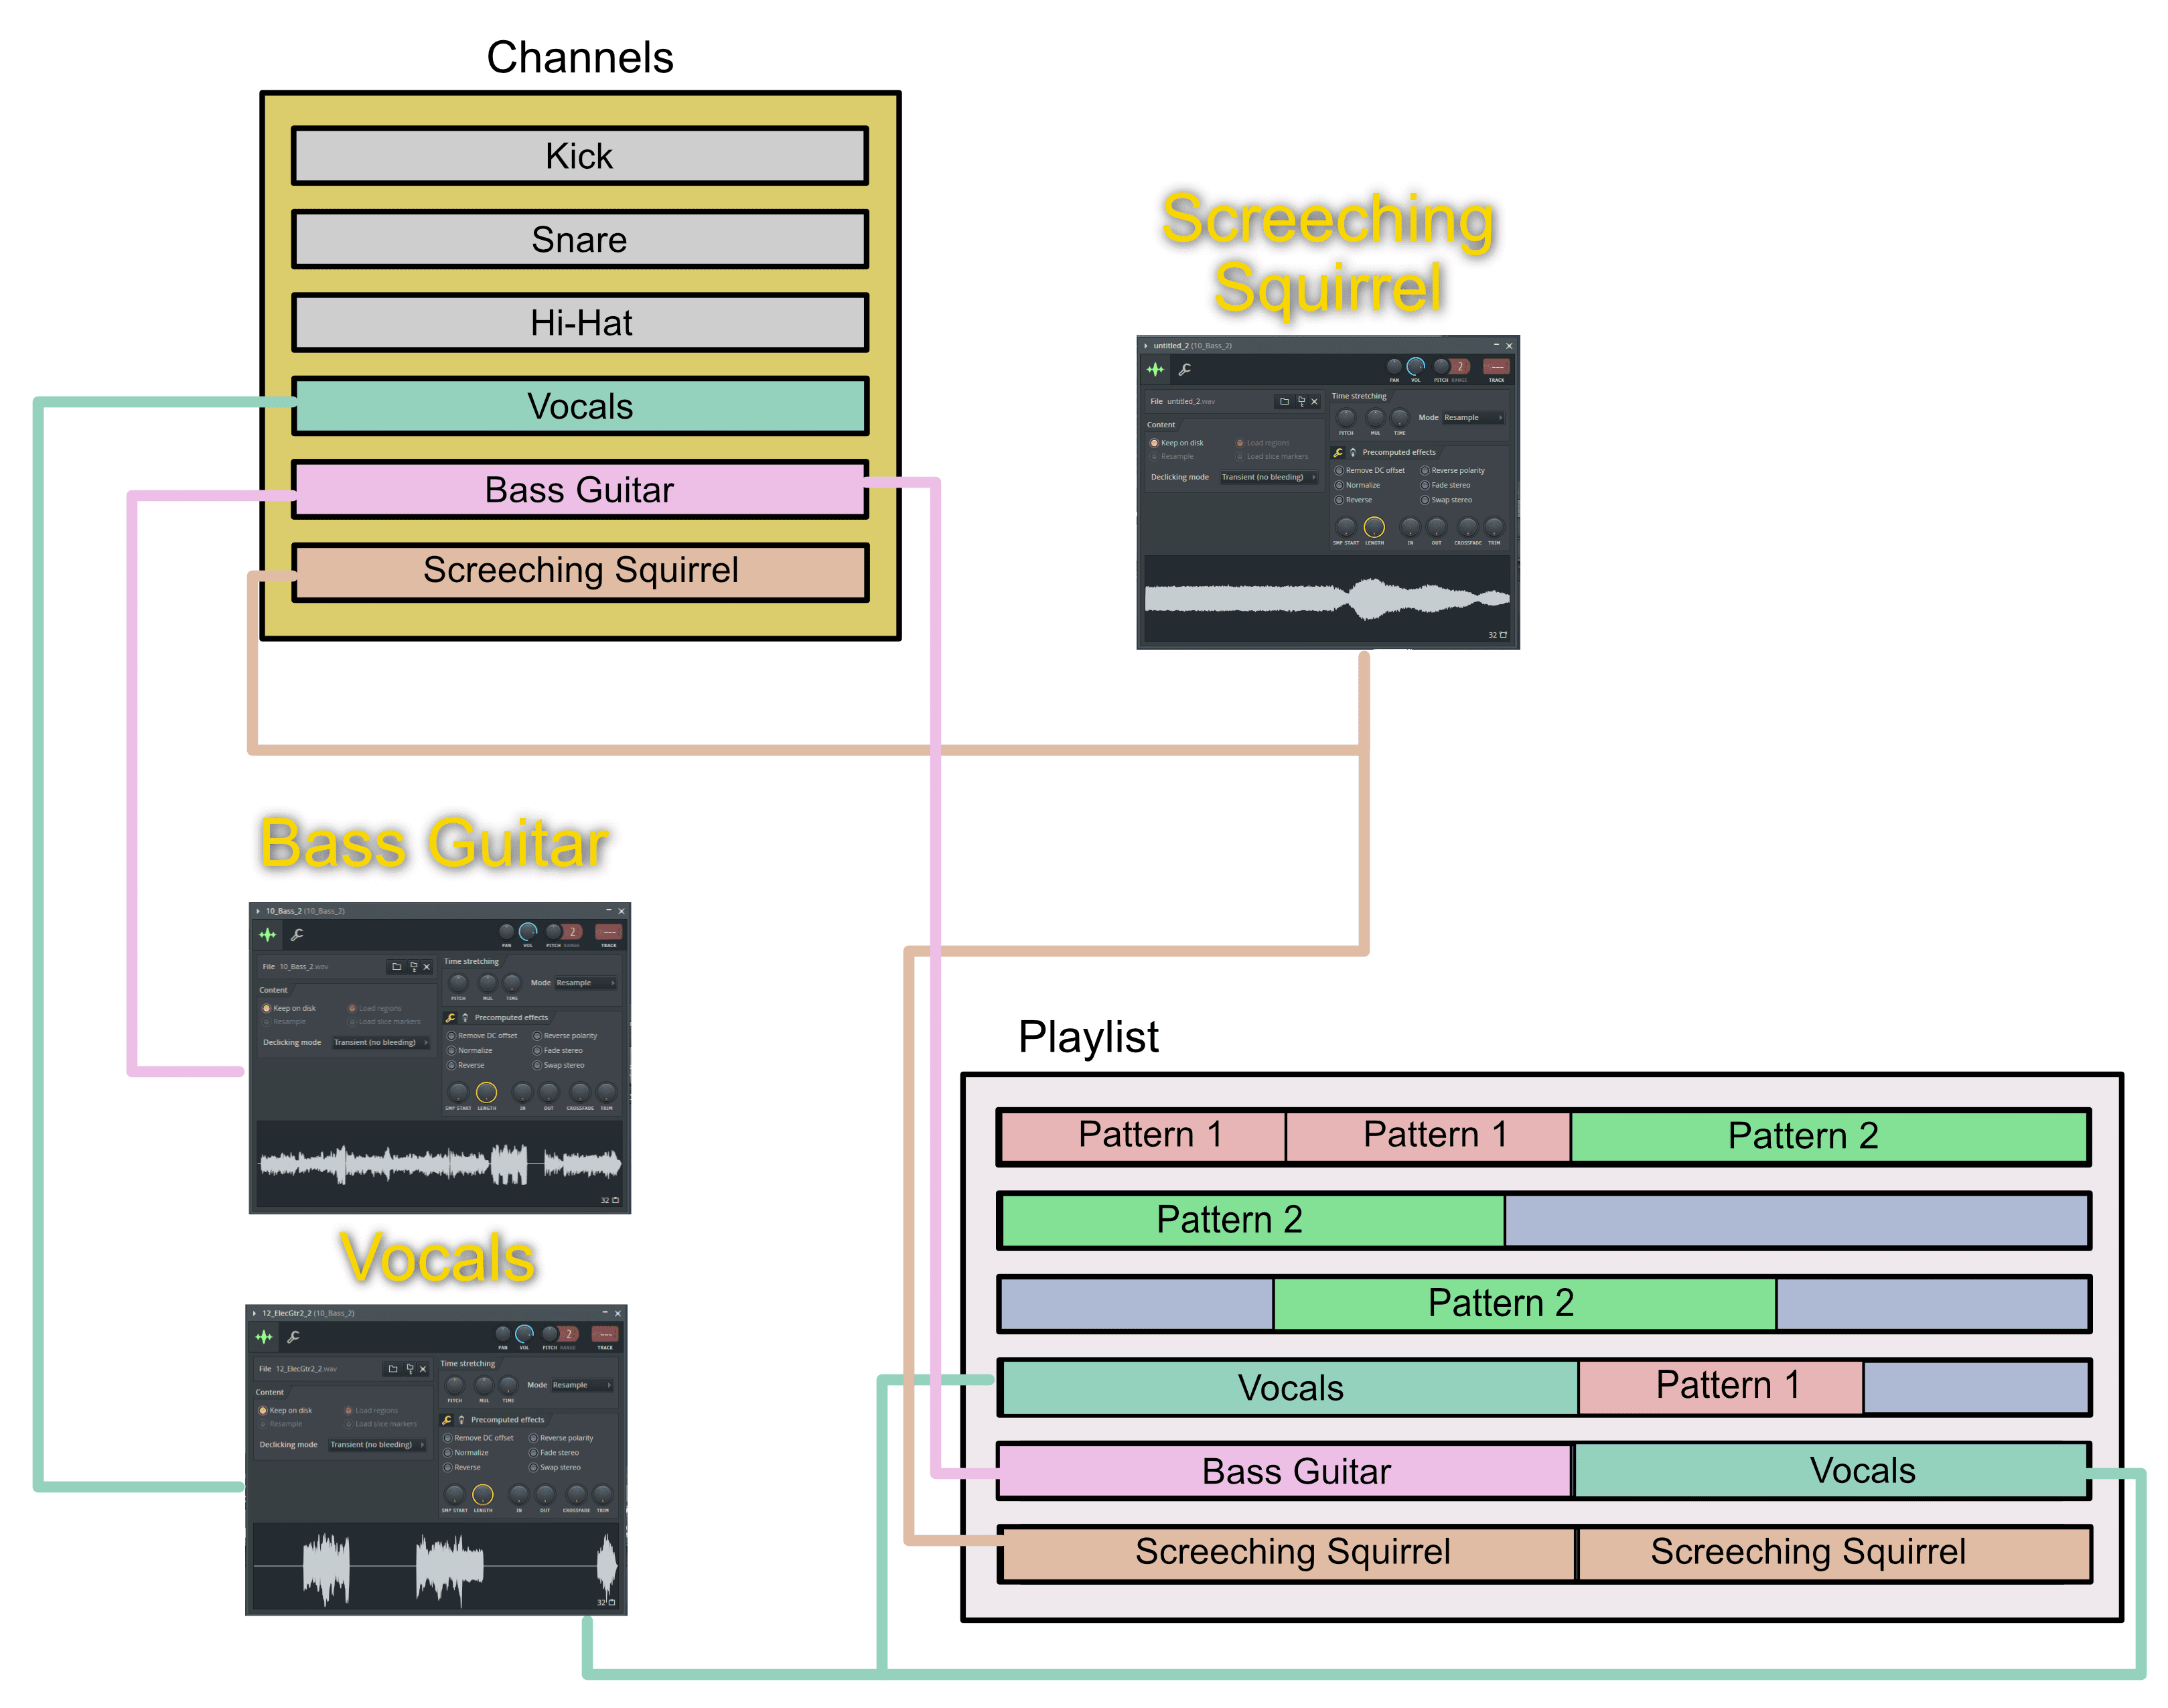
Playlist
Audio is sequenced, like everything else, in the playlist. The playlist is active in song mode, and that's where you'd utilize audio clips.
Dealing with auto clips in the playlist is a mostly familiar scenario. You can resize, cut, move, copy, paste, slip, etc...
The part here is as I explained before: Playlist tracks don't correspond to mixer tracks. You can place an audio clip on any playlist track, and it will still always output to the mixer track that the audio clip channel is assigned in the channel rack.
This delinking of the playlist and mixer offers you a lot of flexibility. I'll explore this further later.
How Audio Recorded
Recording audio can happen one of two ways: Via the Mixer (??) or Via Edison.
Neither of these are really ideal, but there are pros and cons.
Mixer Recording
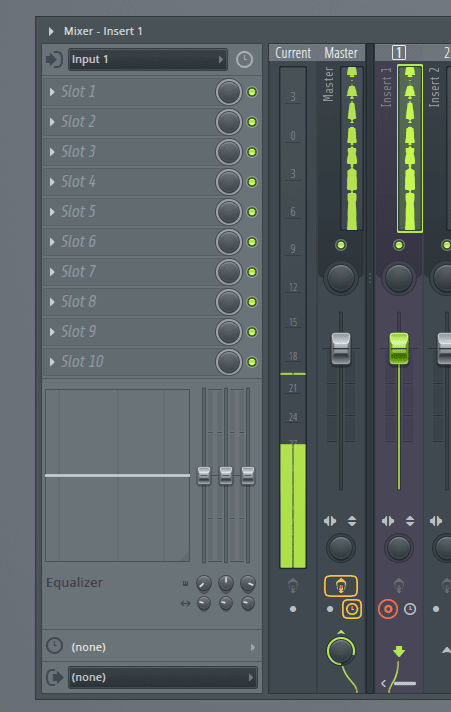
The method of recording that's more closely related to the traditional workflow is mixer-based recording.
You select a Mixer channel, select an input, make sure that your record mode is set to "audio" and then you hit play. That's it! Well... no.
There's a few workflow issues here:
- If you have any effects on your mixer channel then those effects are recorded. If you want to monitor live effects (like reverb on your vocals), then you need to select a clean Mixer channel, create a send to another track, add effects to your other track and then record on your blank mixer channel.
- Recording through the mixer assigns the audio clip to the mixer track that the recording mixer track was assigned to. If you simply grab a track that's routed to the master (as everything is by default) and then record, your resulting audio clip will be routed to the master. EW! Gross.
- You can fix this by routing your recording mixer track to another track, like you'd do with monitoring effects. Now your audio is assigned to the track you routed to.
- The playlist can automatically drop your audio clip on to the next free track. What if the next free track is empty for something you're saving for later? What if you want the audio elsewhere? I find that you often need to move the audio around manually after recording if you want to keep your project organized.
- There's only 125 mixer tracks. That may seem like a lot, but they get eaten up very quickly. This becomes notable when you read the above issues and notice that you often need 2 mixer tracks per recording input. Along with your normal project, mixer channels get eaten up very quickly.
If you are doing something simple like recording vocals for an electronic track then this is only mildly annoying. It's still much better in nearly every other DAW that exists.
Image-Line seems to pride themselves on a "one click recording" workflow that also exists. So after you setup your mixer channel (or two!) then assign inputs you can click (twice) to use the "one click recording". Then after that you most likely still need to make adjustments to your project to maintain some semblance of organization. "One click"... meh.
In other DAWs you select your input, record enable and hit record. Your recording is on the track you assigned it. No need for a second track. No browsing the mixer. No moving clips around.
Overdubbing workflow
There is a few brightsides though!
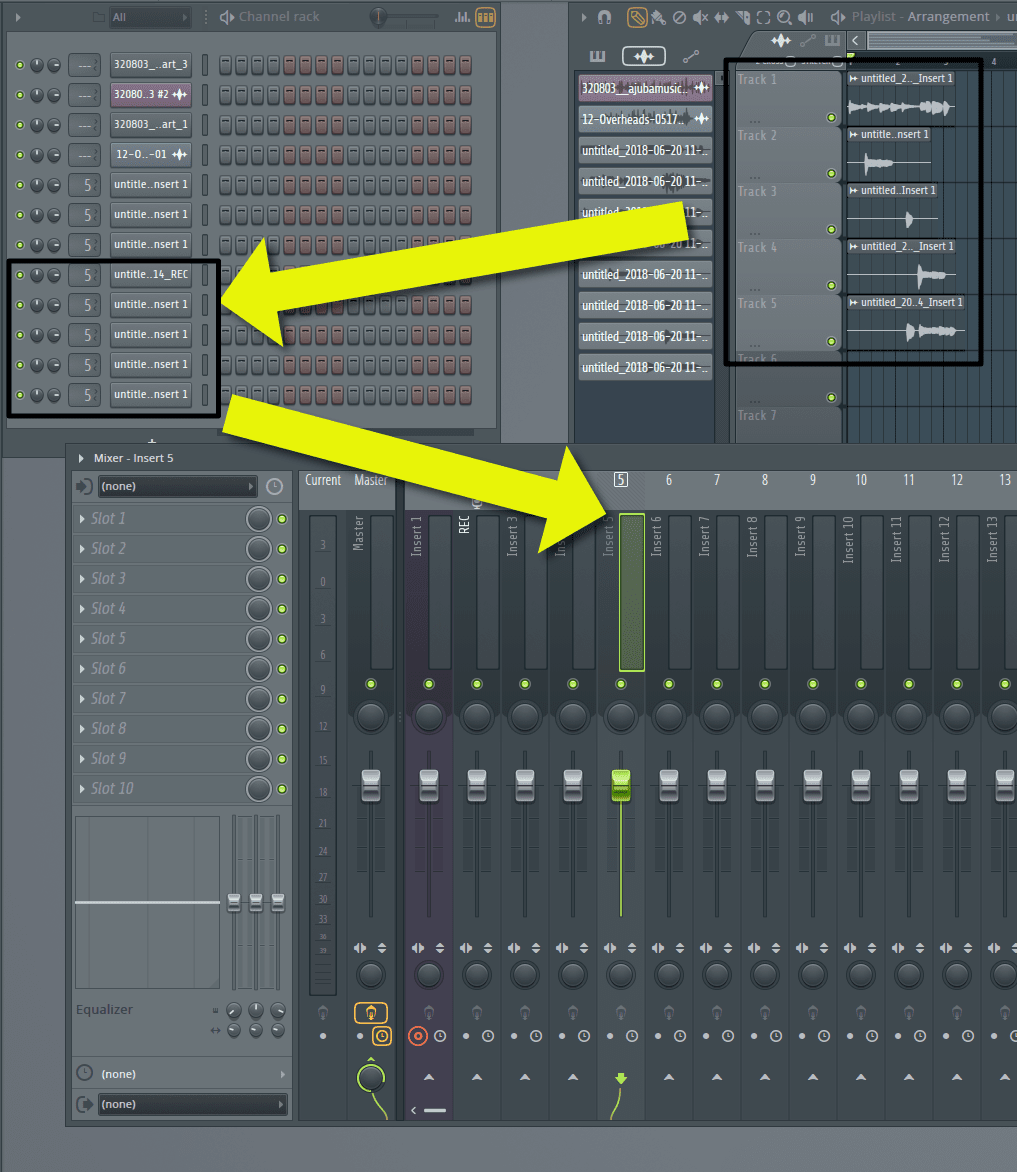
If you setup 2 mixer channels (input channel, and then 'routing' channel), all of your takes or overdubs will always be routed to that 'routing channel' no matter where they appear on the playlist!
So you can have overdubs neatly sequenced across multiple tracks in the playlist, but they all go to one mixer track. There's no need to fool around with groups or 10 tracks for a single overdubbed vocal performance.
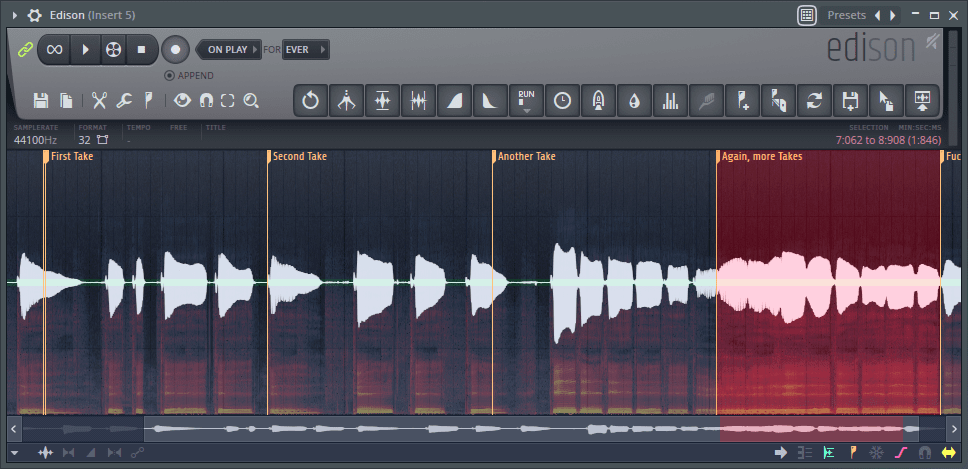
In the image above I have recorded a vocal track, then recorded 4 overdubs. Each recording's channel is assigned to Mixer Track 5. So every overdub goes to the 5th mixer track no matter where it appears in the playlist. So I can have my vocal overdubs separated and nicely organized without needing to eat up mixer tracks.
Loop Recording
FLStudio supports one of my absolute favorite features: Loop Overdub Recording.
This means that you can setup a loop, record, and each loop records a new part. The important thing here is that you can hear each previous take from previous loops as you record.
This means that you can live record harmonies or piece of a complex solo note by note with audio recording. Maybe even record a drum-part bit by bit.
It's a lot of fun, and when you find a use for it then it's completely indispensable.
Edison Recording
Playlist recording isn't the only way to record. You can insert an effect called 'Edison' on a track and record any audio going in to Edison.
There's a few benefits, regarding recording, to this method:
- Edison is an effect. It only records the signal that comes to that point, so you can place other effects after it. With playlist tracks, any effects on the track are recorded. With Edison, only effects before Edison are recorded.
- Edison is FL's audio editing suite. This drops you in to Fl's audio environment immediately.
- Edison has "on input" recording mode. Any audio input that violates the adjustable threshold begins recording, which can be useful for stepping away from your computer to record a short clip
- Unfortunately, 'On Input' mode does not trigger playback, so you won't hear the project.
- It also has "Input" mode, which records clips during input, but does not record during silence. Same limitation as "On Input" mode.
The downside, and this can be a fairly significant downside, is that your audio is not ready to use after recording. If you record in the middle of your project and hit play, even with Edison's 'Slave playback to host', your audio will not play where you recorded it unless you recorded starting at the very beginning of the project.
You have to do send the audio to the playlist and place it appropriately. This can be done via a menu or drag&drop. Then you need to do something about the Edison effect on the mixer track, because it will start playing back if you have 'Slave playback to host' on.
For the purpose of recording quick samples to use in a project, like foley/fx/drum hits etc... Edison's workflow is fantastic. For recording audio additions to your project it's a frustrating amount of work to do after every take to hear what you did in context of the project.
I hope I've missed something, but I have checked the manual, watched a number of videos and spent hours working with Edison for recording. I can't imaging how this is a tolerable workflow for anything but the absolute simplest of recording tasks... and even then it's a number of extra steps compared to other products.
To be very clear, I don't think there's anything wrong with recording using Edison. Recording is an interesting experience for simple mono/stereo recordings. Doing something with the recording is where the workflow really seems to stumble.
NOTE - The option Ignore host selection, in Edison settings, does not fix this. The manual says Edison will play back the equivalent region (based on time), as selected in the host. For example, if you record your whole song into Edison you can select a part of the song in FL Studio and Edison will play the same selected part..
This only helps if you start recording at the beginning of the project and want to seek during playback.
If you want to begin recording in the middle of your project, Edison will not sync to the place in the playlist where you recorded.
Edison Loop Recording
Edison has loop recording. You may be familiar with Loop Recording workflows from other DAWs where you can record in a loop, you get various takes and then you can comp them using some implementation of some comping feature.
Edison only does the first part. You can record in a loop. It adds markers to each loop. You can grab the whole take (region) that's good and use that. There's no comping feature to be had.
The other downside is that you once again can't immediately listen to your takes in the context of your project. There's a few steps to be had before you hear what you did in the context of the project.
Perhaps this was considered a cool feature 2 decades ago, but even 'The Little Guys' in the DAW world do much better than this in 2018.
Edison Editing
I've already covered Playlist editing. It's very simple cut, move, copy/paste and slip.
Edison adds more complex editing capabilities, however the complexity is only relative to what's possibly in the playlist.
There are some neat features:
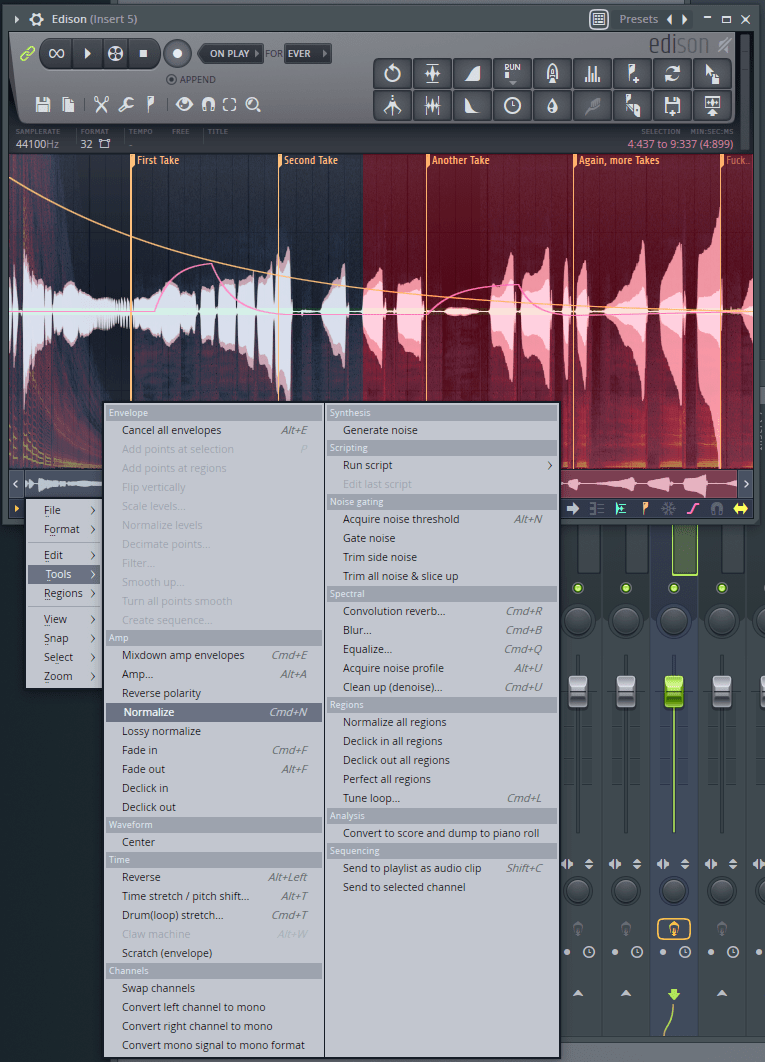
- Built in envelopes - There's bezier envelopes for pan, volume, stereo separation, and an 'all purpose envelope' that lets you do dynamic effect mixing/undo mixing or scratching. The undo mixing is interesting since you can do something, then mix the before/after states using an envelope. Very neat.
- De-clicked editing - edits can be done with small fade-ins to avoid clicking. Fairly normal feature for DAWs, but good to have.
- Overlaid waveform and spectrogram views as shown in the image above
- Applied effects - there's a number of effects that can be destructively applied to the sample as shown in the image.
- Noise removal - The noise removal tool is fairly decent for the average user with low-quality equipment.
- Blur - Blur is an interesting convolution based effect. Great for creating soundscapes and textures from any sample.
- Slicing - creating 'beat slices' is simple. There's not a lot of configurability for how it's done, but it appears to do a decent job most of the time.
There's also some warts:
- Most effects are destructive. If you apply an EQ then a Reverb and you want to reverse them, you can't. You need to undo them both and redo them manually.
- Destructive effects will apply your envelopes. If you have a level envelope then wish to use the blur tool or normalize etc... then your envelopes will be rendered and reset to zero! I consider this a terrible thing.
- No easy audio warping. :( (but you can do this in Newtone)
- You can not edit multiple clips simultaneously across channels/tracks with Edison.
- You can not use Edison to edit audio in the context of a project. You have to make edits, send them to the play list, listen and possibly redo the whole workflow to make changes. Possibly some layers of undo and manual redo too!
- Edison does not follow recording start time. If you start recording at 2:00.00, Edison doesn't care. It sees the recording starting at 00:00.00 and will start playing at that point until you send the clip to the playlist.
- Effects like Reverb and EQ aren't that useful.
- Fade editing is limited. You get 2 fade styles: fade and declick. There's no control over fade shapes.
- No crossfading between adjacent files unless you jump through hoops and consolidate the 2 clips.
- Edison is an effect in your mixer. Sometimes it can be difficult to hunt down if/where you have something recording because you got distracted and left an edison in record mode somewhere.
- Edison records to RAM, not to disk. If you are short on ram then this is an issue.
Yes, I am used to linear sequencers, but I did come into digital audio by using Trackers. I am familiar with the style of disconnected recording where the idea is to record something and use it in a project. Edison is awesome for that.
If you just want to record a sound so you can manipulate it and sequence it after then you will have a lot of fun, and you'll appreciate how Edison is used and setup.
If you want to record audio with the base performance being an integral part of the song, then the Edison recording workflow is infuriating. Luckily you can use playlist recording.
Newtone Editing
Newtone is where the pitch and time editing features are.
Newtone has 2 parts, pitch and time.
The pitch section analyzes monophonic audio and lets you adjust a great deal of parameters of each note. You can adjust tremolo, vibrato, fade-in/out, position, pitch, detected pitch and pitch variation of every note. You nearly have full control of every note in the audio as if it was its own little audio file.
It puts many other tuning solutions to shame, even famous third party solutions when it comes to how much control you have over each note and the ease of adjusting those parameters. Watch the video above to see how easy it is.
Then you switch to the time mode...
Time mode places markers at each sonic event in the audio, and allows you to stretch the audio at each marker between the adjacent markers. So you can adjust the position of a single guitar note without creating unnatural silences or overlapping tails with the next note. Just that one note is stretched, but only until the next note.
Once again, watch the video above for more.
Newtone deserves a much longer section than this, but the guile is in the simplicity of it. In pitch mode, it easily lets you treat each note as if it's an 'audio file'. You can do most basic editing tasks to it just like that. In time mode, you can stretch markers intelligently. Exceptionally powerful, yet simple.
HOWEVER. There's an issue here. Other DAWs have these features too, but Newtone is an effect, and you must import audio in to it. To hear the audio in the context of your project you need to send it back, OR use a file that was recorded from beginning to end.
Newtone has no idea where your audio was in the playlist. If you want to work on a file in the context of the project then you are out of luck. You have to shuffle the audio file back and forth to the playlist and back. You can't just pull up an editor like in another DAW and non-destructively work on the region, hit play and hear your changes instantly with everything else. Newtone doesn't work that way.
Conclusion
There are certainly pros and cons to how FL works. I'm sure that I've made it seem like I greatly dislike how Audio works in FL, and that's true. I tried a number of workflows from recording vocals, guitar, drum samples, short fx loops, dialogue, etc...
The only thing that felt like it worked nicely, compared to other DAWs, was recording noises to use elsewhere. Oneshots and effects.
Recording vocals is easy. Using those recordings is painful. Maintaining an organized project where you keep a clean delineation of parts, that's a bit annoying.
I do applaud IL for trying to make the act of recording simple, but it's an improvement that doesn't translate. I can assign an input in Pro Tools, hit record-enable and hit record... and I'm off. It's 3 steps, just like FL's "one-click recording". The difference is that in Pro Tools (or most DAWs) I'm ready to move on with my project immediately. Hit stop and work on the next thing.
FLStudio... it's a tossup. If you used that super simple setup, then you may need to go back and setup your channel mixer assignment. You may have had to create a second track and adjust routing to monitor FX. You might also need to change where the audio clip was inserted, since it could have ended up on the wrong track because you left an empty track for organizational purposes (FL chooses the nearest empty track).
If you used Edison then you need to send the clip to the playlist to even hear it in context and continually shuffle parts between edison and the playlist. You will need to setup the channel mixer assignment as well.
Then again... If you only need occasional simple recording, or none at all, FLStudio has a lot more to offer. There's a lot more to come, and certainly some features and workflows that make up for these shortcomings.
Support Me!
This post took 8 hours to research, photograph, write and edit. If you appreciate the information presented then please consider joining patreon or donating!
Other parts in this series
- Part 0: Introduction to this series
- Part 1: Introduction to FL
- Part 3: Piano Roll basics
- Part 4: Advanced Piano Roll
- Part 5: Piano Roll Tools
- Part 6: MIDI Controllers
- Part 7: Modulation
- Part 8: Performance mode and Video FX
- Part 9: Workflow
- Part 10: Effects Review
- Part 11: Instruments Review
- Part 12: Conclusion
If you appreciate the information presented then please consider joining Patreon or donating money/time.
