Last time on this episode of "30 days with FLStudio 20" I covered the basic functionality of the Piano Roll. Things like simply adding and removing notes. The bare basics.
This post will deal with what I consider "Advanced" functionality. These are things like dealing with scale colouring, advanced selection, configuration, slides, grid/snapping and more.
There's still another post to go in this mini-series though, so don't think this is everything just yet.
Other posts in this series:
Contents
- Advanced Editing
- Basic Advanced Editing
- Advanced Advanced Editing
- Configuration
- Is it the best yet?!
- Support Me!
Advanced Editing
I consider "Advanced Editing" to be things that extend beyond adding/removing notes. To help clarify further, here's a list of what I'd consider more advanced editing techniques in FLStudio:
- Note property editing - A method of directly entering values for MIDI notes
- Scale Highlighting
- Tools to enter Chord and Scale
- Quantization of various parameters beyond just note start
- Scale/key highlighting
- Markers - a way to easily mark sections
- Grouping - the ability to select many notes with a single click, consistently.
- A variety of zooming tools
- Selecting tools
- Background Waveform - adding a waveform behind a MIDI piano roll display
- List editing - showing notes in a "list" format where each row is named, instead of a keyboard format. Excellent for drum editing.
- Editing MIDI CC
- Various tools for snapping notes to a grid
I'm going to go through what I feel are the more commonly desired of these, and then discuss some things that I feel are missing and of course... is it the best now?
Basic Advanced Editing
There's some "Advanced" things that are just expected these days.
Snap and Grid

FLStudio of course has different snap settings. This is what allows you to adjust data so that it fits upon an even division of the current beat.
What's rather interesting here is the non-traditional terminology used. A "Step" is 1/4 of a beat. So 1/4 step is 16 divisions per beat.
It also does not label things in terms of triplets. You get divisions divisible by 3, like 1/6th or 1/3rd. Even though I'm classically trained and I usually have a meltdown about things like this, I must say that I prefer it. I suspect that most people will more easily map the concept of 1/3rd step divisions (3 divisions of 4 divisions per beat, for 12 total per bar), than saying "eighth note triplets".
There are 3 modes that are relatively unique, in that some DAWs do not have them, and all three are very useful:
- Line - When zooming in the divisions per beat increase, and the snap resolution increases. This gives you a dynamic snap as you zoom. As your visual resolution increases, your snap resolution increases.
- Events - Snapping occurs relative to the time delineations of other events. Note starts and note ends are the snapping points. What you are snapping to is highlighted as you move around, which is a nice touch.
- Markers - Time markers control snapping.
Line mode is the easiest to use and the most fluid. When using it there's basically no "thinking", you zoom in/out as you need and the snap resolution changes to fit your physical capability to adjust the notes.
MIDI CC
CC stands for "Control Change" (though some are "Continuous Controllers", specifically 14-bit CC combinations). This is MIDI data that isn't attached to a note. You can think of it like automation for MIDI.
CC is used by a lot of synths to control parameters that don't have specific GUI controls that can be automated. With hardware synths that's basically everything. Many samplers use CC to allow you to change articulations.
MIDI CC really doesn't matter to some people in context of composition, as they'll only use it for mapping hardware controllers. Some people do need MIDI CC for controlling hardware synths or sending specific non-automatable data to synths.
This is one of FLStudio's sore points.
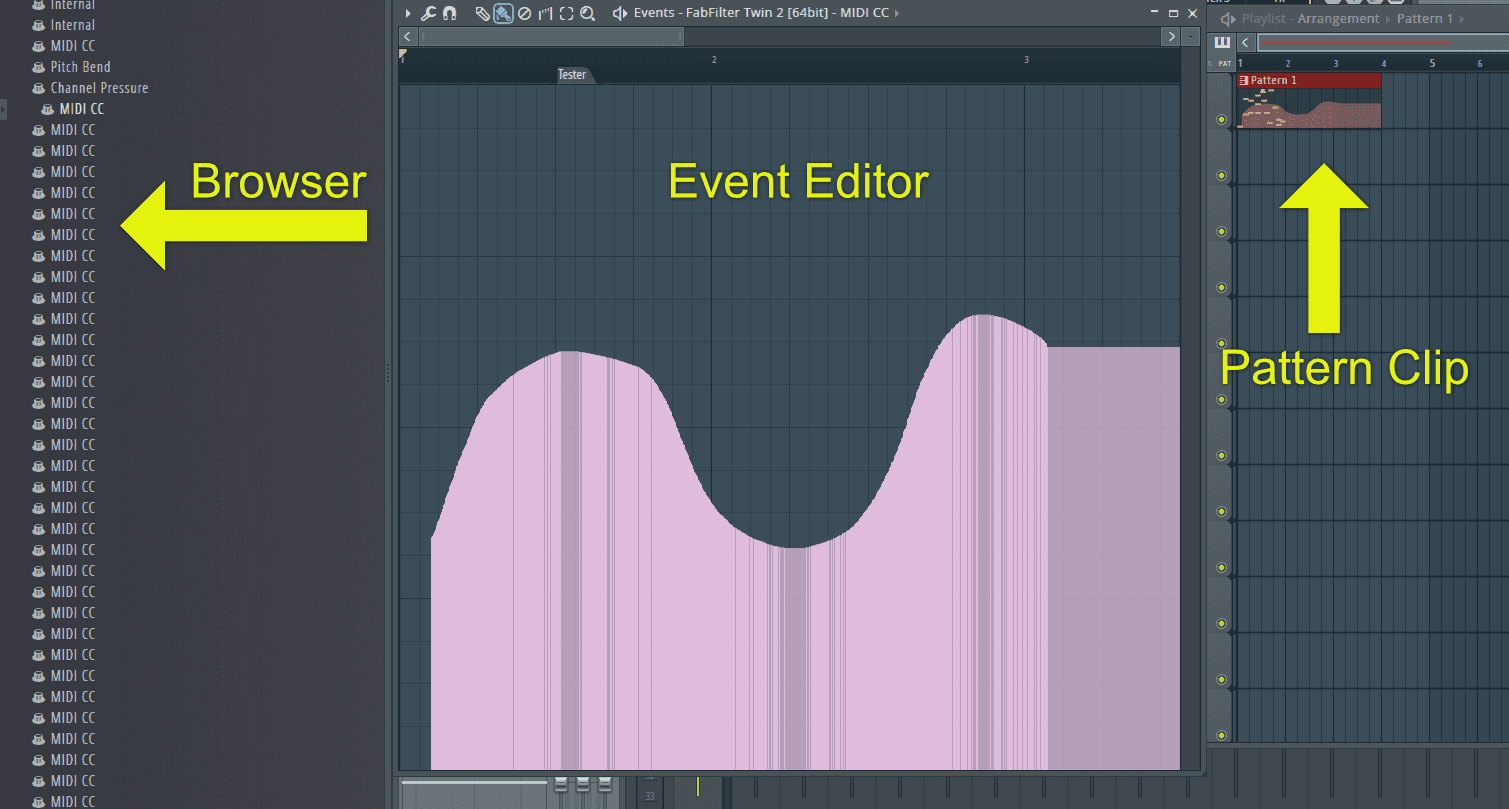
The most prominent issue is how difficult it can be to even access MIDI CC data to edit. You have to use the browser to find the generator, then browse a massive list, then it may not even show you the MIDI CC numbers! (like in the image above).
You can see your MIDI CC data plainly (if not really messily) in the pattern clip it belongs to, but when you click to edit the pattern clip you can't easily return to that data. You once again have to jump through hoops and browse massive lists to get to what you want. What if you don't remember what you want? Well... heh. Good luck friend. Hope you can find it!
Then we get to the Event editor...
Event Editor
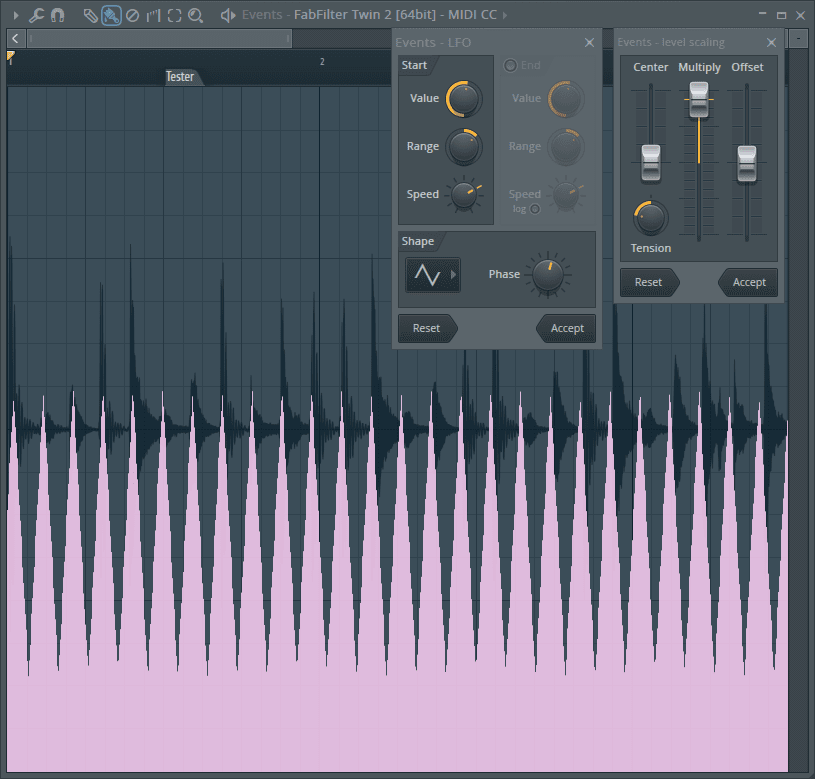
The event editor is where you can edit automation and MIDI CC. Let me cover the best parts about it first...
- Scale tool - This allows you to scale the existing data according to the parameters shown.
- LFO tool - easily overwrite your current data with a sine, triangle or square shape.
- Background waveform - You can apply an underlay of any audio file that you want, which is rather useful.
- Interpolate tool - this lets you select data and add new data interpolated between points. It works well with large spaces between events, but with already tight event positioning it can act a bit weird.
- Autosmooth - This interpolates between events automatically.
It has zooming and selection tools like the MIDI Editor as well.
Actually editing is a pain. Changing an existing value often ends up with you overwriting adjacent values. Trying to enter singular values is an exercise in futility. Data can't be 'linked' to notes (like it can in other DAWs if desired). Snapping doesn't snap events, it snaps drawing. There's no way to add shapes or scale data over time. No display of current notes. No editing of existing point data. No easy copy/paste of data.
Compared to other DAW's capability of editing automation and MIDI it's somewhat poor. FLStudio expects you to deal with automation using automation clips, which are fantastic. You can't use automation clips for MIDI CC though
BUT WAIT
You can turn MIDI CC in to automation clips. I will cover automation clips later, and it does solve some of these issues with the event editor.
The issue of finding the MIDI CC to start is still there, automation clips are generally the way to go.
Hopefully I remember to link the automation clip section here...
Selection
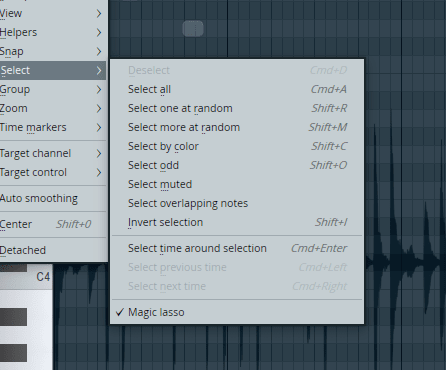
There's a few neat selection tools as you can seen above.
Select odd, select colour and select overlapping are particularly useful and missing from most DAWs.
One of the really neat selection tools is the "Magic Lasso", which is something I wish every DAW had.
Magic Lasso
The magic lasso is one of the neatest things. It allows you to draw a shape around the notes that you want to select, and they are selected.
No more boxing then adding/removing from the selection, or clicking multiple notes one at a time.
Just circle your mouse around the notes with the selection tool active (ctrl on win, command on mac) and they are selected. You don't even have to press any keys.
The only downside is that there is not a visual indicator of what you are selecting, and it's a bit awkward to not click anything.
It's still awesome though. Extremely awesome.
Note Properties
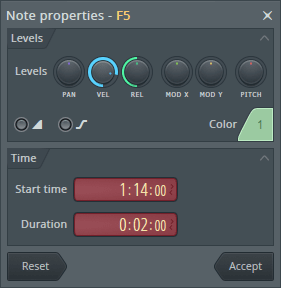
You can double click a note to directly edit values of that note, or selection of notes.
Unfortunately as far as I can see, there's no way to enter exact values. If you want to set a velocity of 68, then you're out of luck.
Zooming
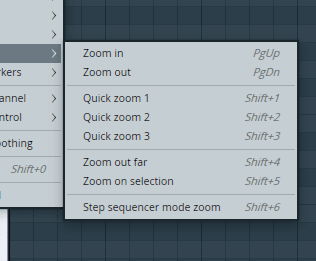
There's a variety of zoom capabilities with shortcuts as shown in the menu above. There's also a zoom tool that allows you to select an area to see.
The quick zooms are preset zoom levels that you can't change. There is no 'zoom undo', however right clicking with the zoom tool with zoom you out fully.
When using the draw tool, you can hold ctrl (Windows) or command (Mac) to right-drag and zoom. It's a handy features and very fluid to use.
Likewise you can middle-click-drag to pan around. This allows you to stay zoomed in and still browse your piano roll without much difficulty.
I'm a big user of zoom tooling in DAWs. I don't think you should ever need to struggle to see what you're doing, or to fiddle around with micro-movements. Due to this preference I get rather annoyed when DAWs have limited zoom tooling like FLStudio does, however...
FLStudio's zooming workflow feels nice. Accessing the zoom tool is so easy that the lack of assignable zoom levels or no zoom undo/redo is relatively unimportant. By default there's a light animation of the zooming process which adds to the smooth feeling of editing.
I think that is one of those corners of FL where they've managed to take something that's normally mildly complex and simplify it just enough to where it's no less functional, but manages to feel more fluid. You zoom to selection via an easy to access shortcut. You right click to back out. It looks nice when you do it. It does exactly what you asked. Simple and effective.
Advanced Advanced Editing
Multitrack MIDI editing
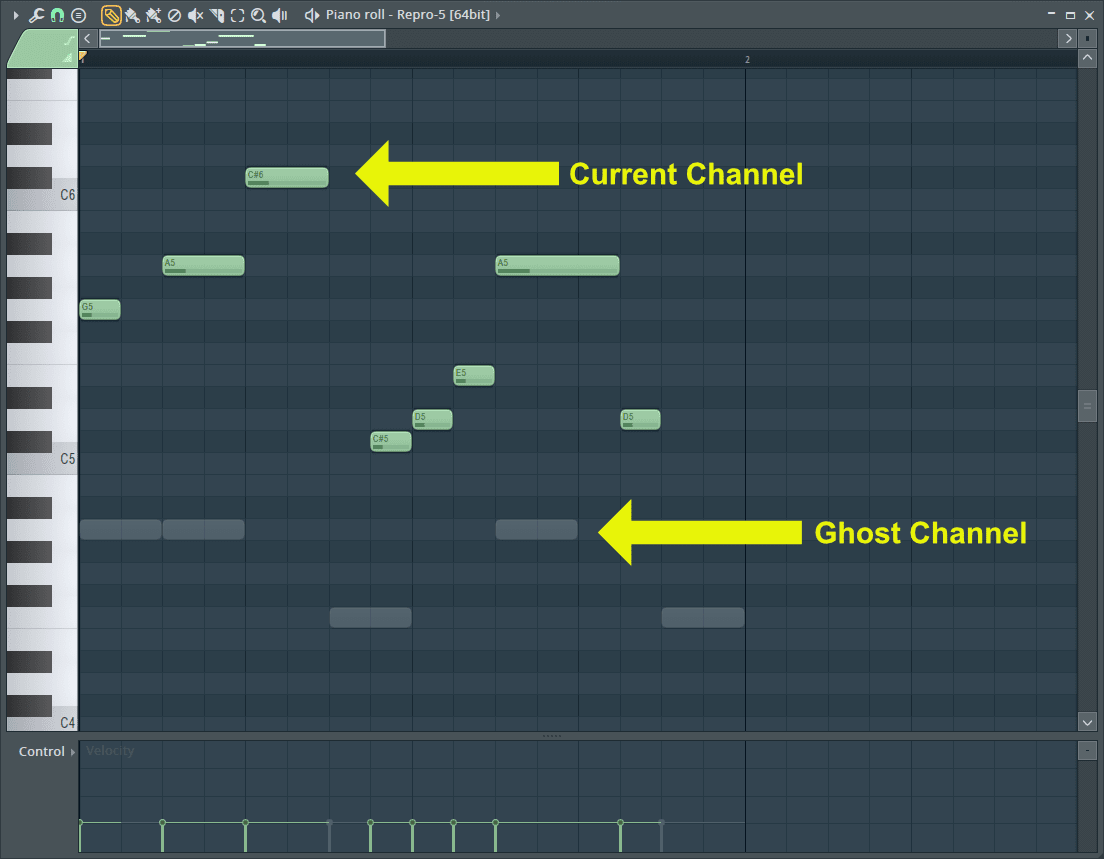
Editing multiple MIDI parts at once allows you to create complex parts that interact with each other, without needing to constantly reference each part separately.
FLStudio does this. You can see all of the notes in the current pattern, and select which layer is editable. These are called "Ghost Channels" and are accessible via the Helpers menu.
You can select to allow editing of "Ghost Channels" as well, so while you're working on a kick part, you can grab snares on another channel if needed.
You can double-right-click on a ghost channel to make it the foreground channel, which is a useful feature that I enjoy.
There are some things that could be improved:
- Different colours for differing parts (or different shading/shadows)
- Selecting which ghost channels are shown (rather than everything in the pattern)
- Per-channel ghost channel editing (so you can select which channels are editable)
- Selection tools should work on editable ghost channels
- Improved display of control information (like velocity)
- Improved display of overlapping notes - currently if you have multiple channels with the same note, you can't edit them reliably or even know there's multiple notes there.
- The mousewheel only works on the foreground layer, even if "editable ghosts" is on. It's somewhat easy to forget that you can't use it on ghost notes after you've been editing them with other editing tools..
Other DAW implementations of this feature are a bit better, largely because they better define what can be interacted on and what can not along with visually differentiating layers better.
How often do you really use this feature though? I use it often, but I suspect that many musicians would appreciate the simplicity of FLStudio's implementation. The double-right-click to select a ghost channel as your foreground is what saves the day. Using that allows for a clean workflow without needing to worry about 'editable ghosts'. They still need to work on visually differentiating channels though.
Scale colouring
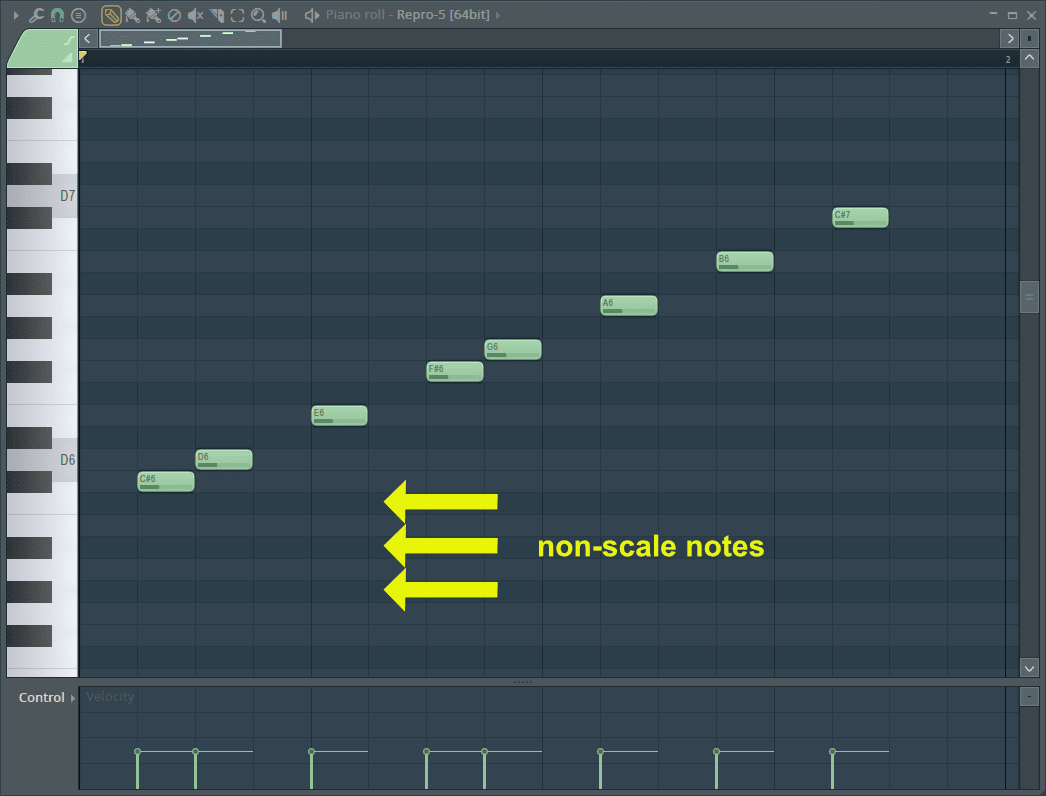
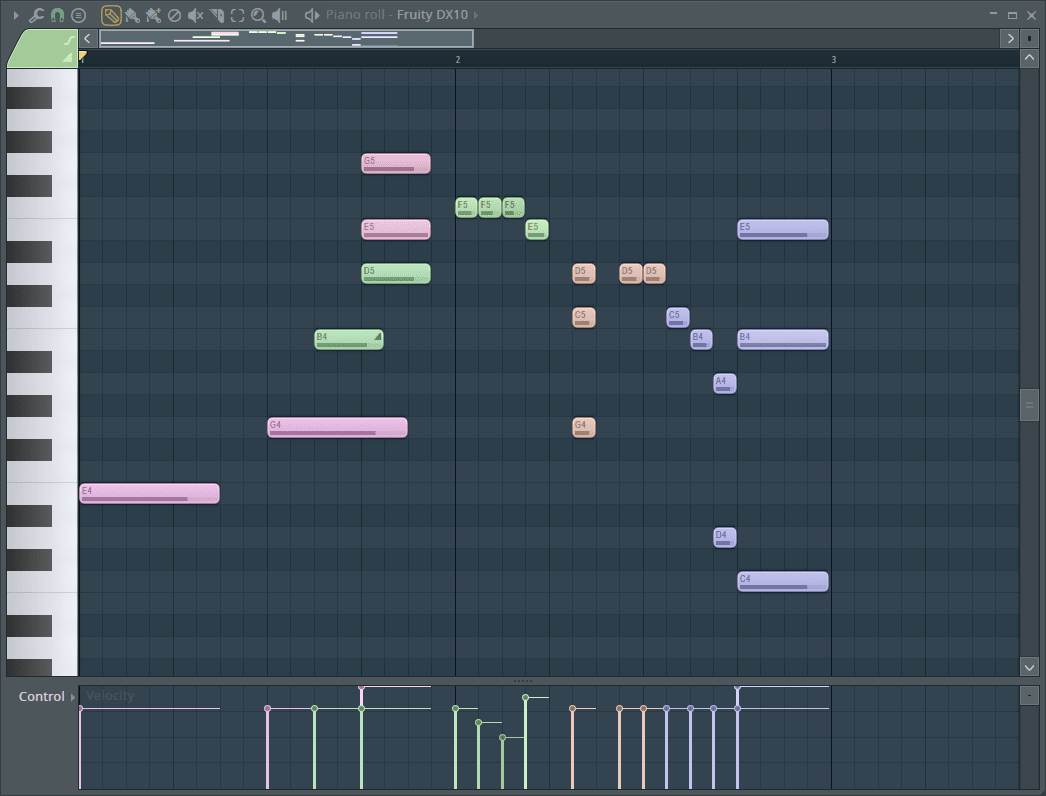
FL has an interesting way of visually defining scales. Other DAWs colour notes or constraint placement. FLStudio changes the background grid.
Look in the image above. Usually the dark rows correspond to the black keys, but with scale highlighting they correspond to the non-diatonic notes (notes not in the scale).
It's an interesting concept, however it is buried behind 2 menu layers. Fear not though! If you right-click the scale options, the menu does not close. That feature is something that just about every other DAW on earth could learn from. Sometimes you want to select something in the menu, but you don't want to close the menu.
You can make your own scales as well. They don't even necessarily need to be 'scales', but you can use them as indicators of specific notes for some purpose.
Yet another feature that's not exactly technically superior, but there's one or two little things that increase the ease of use.
Slide, Portamento and Mod X/Y
Maybe you've read my post about implementations of MPE and per note editing elsewhere.
FLStudio does not have MPE nor does it have VST Expression. It does have its own multi-dimensional per-note parameters that work with native synths though:
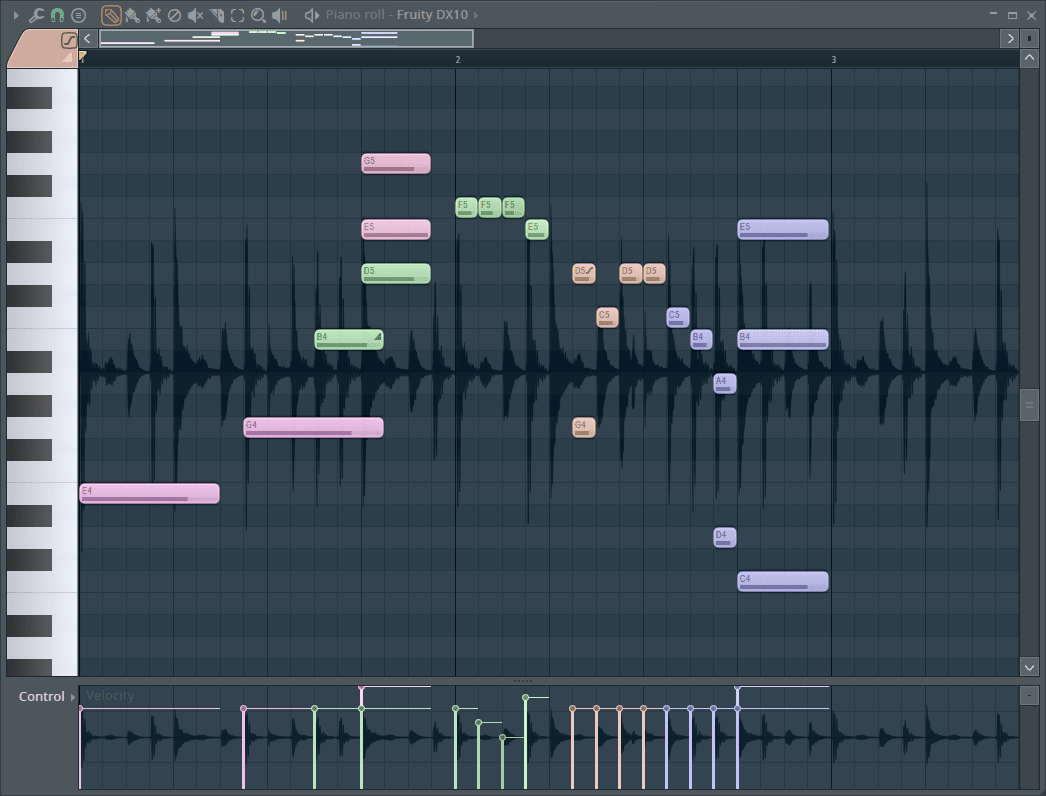
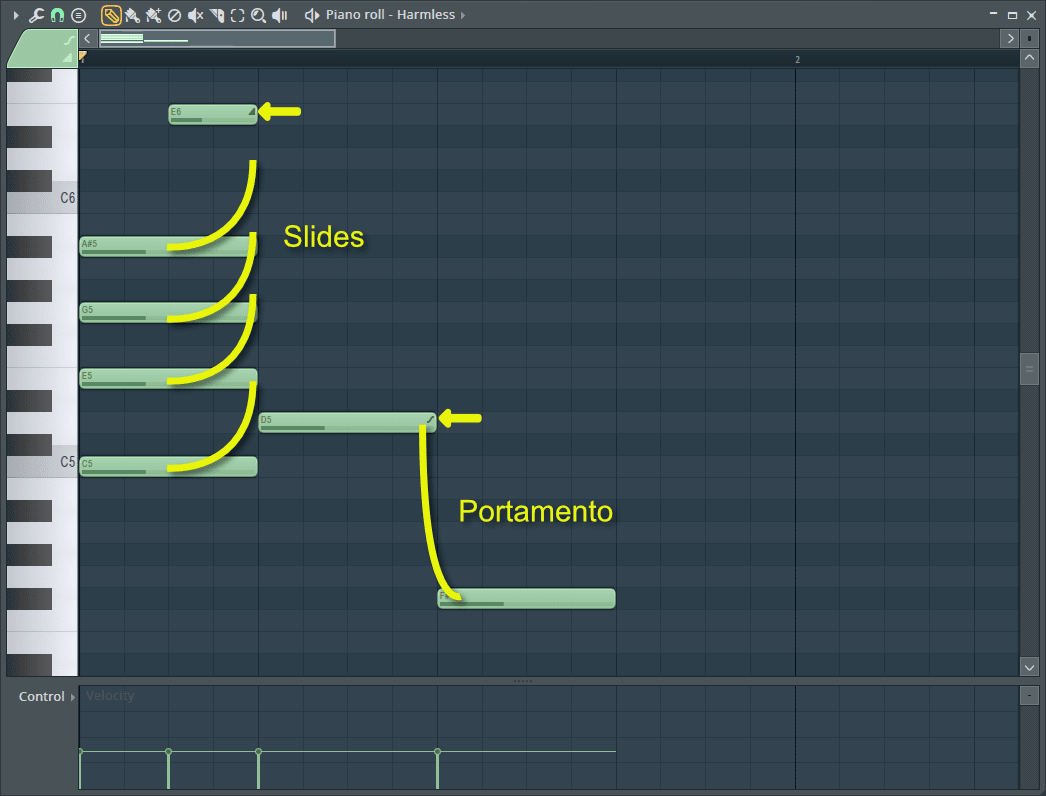
- Slides - the pitch/mod x and y/pan of a note slides from one to another according to the beginning of a slide and the end of the 'sliding note'. Slide notes aren't played notes, they simply indicate a slide.
- Portamento - the portamento slides from the end to the start of the next note very quickly.
- Mod X/Y - 2 parameters used by native synths for various modulation
In the image above I drew some yellow lines to show you what's happening. The FLStudio interface does not give you any visual indication of slides or portamento except for a tiny little shape in the upper right of the note object doing it.
As you can see in the example, the whole chord gets slid up by that single slide note. If you want to slide a single note, then it needs to be on a different MIDI channel! Since some instruments use other MIDI channels for certain functions, you might be limited quickly. There's a handful of instances where synths are not OMNI (listening to all MIDI channels) and you might run in to issues as well.
When you slide up to a note, any parameters of the 'slide note' are slide to as well.
Mod X/Y are per note static features outside the note-slide. You can't modulate them over the course of a note like you can with other MPE implementations. You can emulate this with a lot of slide notes if you wanted though.
This is a feature that's lagging behind what's available elsewhere. Take a look at how Bitwig, Cubase and Waveform handle it. They also work with a variety of VSTs (Cubase is slightly different). You get more control, better visualization and better control.
That's not to say that FL's implementation is useless. I do take issue with how slides and portamento are displayed, since in a busy part it can be rather difficult to know what's a slide and what's note at glance.
Color Groups (MIDI Channels)
FLStudio's method of colour notes is per MIDI Channel. Not velocity, not pitch... per MIDI channel.
I've found very little reason to use this. Some synths do use specific MIDI channels for articulation information, like Harmor uses channel 13 to bypass Strumming. Many VST sampling libraries use certain MIDI channels for articulations as well...
The issue is that it's only colour. When you make selections or use tools on the part, you're still going to ruin your articulations because most of the tools aren't channel sensitive.
Synths that aren't sensitive to MIDI channel usually accept data from any MIDI channel, so you can manually use MIDI color groups to colour your sequence. It's a lot of clicking, and a lot of micromanaging though.
I think that it would be far more useful if note colour was used for note properties like pitch, pan, velocity etc... as the user configures it.
Configuration
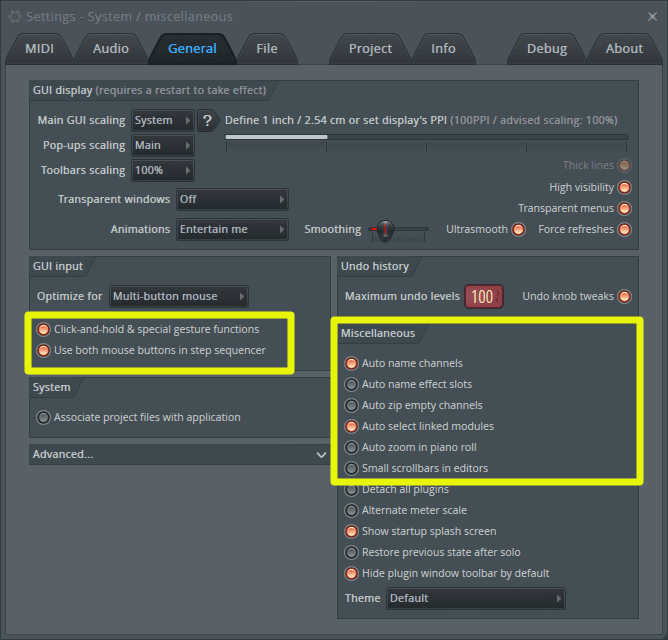
What if you don't like how the Piano Roll works?!
TOO BAD
You can change some things about how things are displayed, and some of the behaviours highlighted in the image above, but if you want to change the functionality or shortcuts, then you're out of luck.
Want to change the modifiers? Nope.
Want to change what colours notes? Nope.
Want to adjust the grid drawing? Nope.
What to adjust the Velocity drawing method? Nope.
Change 'follow' behaviour? Nope.
Scroll speed? Nope.
Hand pan inversion? Nope.
Shortcuts? Nope.
Filter specific items when recording? Nope.
Change how notes are entered or deleted? Nope.
Change MIDI channel of note easily? Nope?
Use Flats when correct? Nope. RAGE
Want right click to do something other than delete a note? NOPE!
There may be more or fewer things depending on what DAW you're used to. The takeaway here is that there's relatively little you can change about how FLStudio's piano roll works other than some superficial visuals, and some few mechanics.
Now... is this bad? I don't know. If you like how FL works then this is a total non-issue. In fact, it's a bonus! You can't screw up a perfectly working system.
I personally had some moments where I found it annoying that I couldn't change how something worked. This is partially because I'm used to certain OS-specific conventions, and because I'm not full-adapted to FL's way of working. I think that if you learned FL first and only used it then it's likely you may be perfectly happy. If you're switching from another DAW then... you might have some stumbling blocks.
Is it the best yet?!
Not really, but it's certainly not terrible, or bad.
There is a re-occurring theme of simplicity and fluidity. In 2018 though, I've still yet to find something in FL that you can't do in another DAW.
Then again, in other DAWs you would need to know that you want it to work that way, configure it, learn it, throw away the manual because you've change things so much...
I do want to be positive in somewhat, but while writing these articles I'm constantly opening up other DAWs and comparing. Logic, Cubase, Reaper, Cakewalk, Bitwig, Waveform, Live, Studio One, Pro Tools, Digital Performer... I've been comparing features constantly between them. The only notable thing I've found that was totally absent in other products was the 'right click menu item to keep it open'.
I've yet to find any feature or workflow that would make FL better than the other big names except, "FLStudio is what I learned and what I'm used to." Same could be said for any other product.
The flipside is that I haven't found anything glaringly wrong with FLStudio's piano roll except the awful event editor. I can't say that for every DAW. I can think of some strange things in other DAWs that are utterly mind-breakingly annoying. I haven't found anything like that in FLStudio yet except for its insistence on using sharps for everything.
Some more advanced DAW users that rely on MIDI may be a bit confused by what I've labelled as "Advanced" editing here and are wondering where tools are like Logic's "MIDI Transform", Cubase's "Logical Editor", DP's "Search" or complex transpose tools, or detailed CC editing, or inversion handing, or humanizing, or advanced quantizing, or advanced arrangement tools, or...
I'm aware of these advanced things. FLStudio is missing some of them... but we still have more to go!
There's still one more part to go in the MIDI mini-series: MIDI Tools.
Support Me!
This post took 11 hours to research, screenshot, write and edit. If you appreciate the information presented then please consider joining patreon or donating!
Other parts in this series
- Part 0: Introduction to this series
- Part 1: Introduction to FL
- Part 2: Recording and Editing Audio
- Part 3: Piano Roll basics
- Part 5: Piano Roll Tools
- Part 6: MIDI Controllers
- Part 7: Modulation
- Part 8: Performance mode and Video FX
- Part 9: Workflow
- Part 10: Effects Review
- Part 11: Instruments Review
- Part 12: Conclusion
If you appreciate the information presented then please consider joining Patreon or donating money/time.
